Photo Notes A place to talk about making images.

April 24, 2010

U-Shaped Curve

Filed under: Post-Processing — John Siskin @ 10:27 pm

Branded 2 468x60

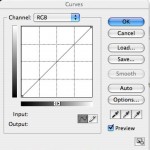
Normal curve

I wanted to take time out and talk a little about Photoshop this week, specifically curves. Curves is under Adjustments in the Image menu, if you don’t find yourself going there every time you’re in Photoshop. The standard curve is a line from the lower left corner to the upper right corner. This is a really powerful part of Photoshop; you can control contrast, exposure and color. You can do this with any level of detail you might wish. Some time ago I found an article at about.com that discussed solarization in the computer.  When you did in a wet darkroom you re-exposed the print to light during development. The results were very interesting, but unpredictable. I have to say that unpredictability was part of the charm.

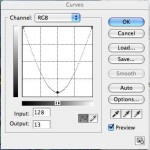
It turns out you can do something vaguely similar with curves. If you put the bottom left corner at the top left corner and bring the middle down all kinds of interesting things happen. The mid tones go toward black and the shadows and the highlights are light. With a gray scale image this can be very compelling.

U shaped curve

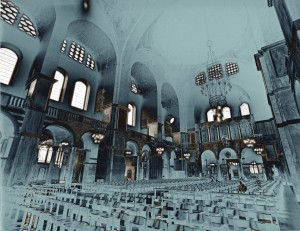
Cathredral grayscale

cathredral grayscale with u-curve

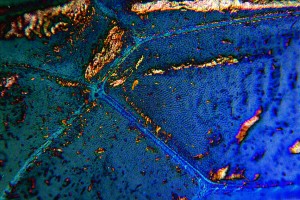
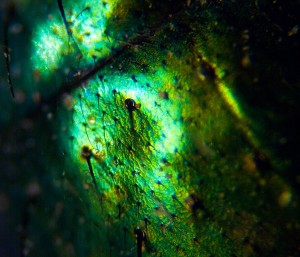
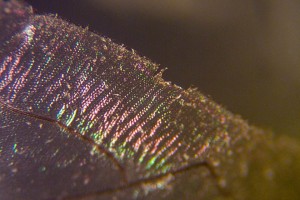
If you work with a color image or a gray scale image that you add a little color to, things get even more interesting. Here I added some red and yellow to the cathedral image. Then I used this u-shaped curve.  In addition to the cathedral image I used above I’m using some of the fly wings from last week with u-curve

The warm version of the Cathedral. I added red and yellow in Curves 

Fly wing with u-curve

The warm version of the Cathedral with the U shaped curve applied.

Please check out my classes at BetterPhoto. You can still sign up for the current session!
An Introduction to Photographic Lighting

Portrait Lighting on Location and in the Studio

Getting Started In Commercial Photography

Thanks, John Siskin

April 19, 2010

Using a Microscope

Filed under: Micro Photography — John Siskin @ 5:28 pm

Branded 2 468x60
First, unless someone wants to give me an electron microscope, this will be the last blog about macro/micro for a while. I am going to discuss the microscope, and I hope you’ll find it interesting. I’ve written about this before, and the best copy of the article is at BetterPhoto.com, here’s the link: www.betterphoto.com/article.asp?id=185. There are more images in this version than the version on my website. Anyway, I hope you’ll look, because I’m not going to cover everything here.

The microscope is a compound system, that is there are two sets of lenses that work together to create a large degree of magnification. Telescope and binoculars work the same way. The objective is the lens near the subject and the eyepiece is at the top of the microscope. You multiply the power of the two to get the power of the system: a 4X objective and a 10X eyepiece give you a 40X enlargement. A basic student grade microscope will cost you about $120 and reach an enlargement of 600X. In theory anyway.

The problem is that when you use powerful objectives, any thing over 4X, the lens is too close to the subject. You just can’t get any light on the subject. Still this will work well if the subject is translucent, because microscopes are designed to light things from below, so the light goes through them. So I often use a 4X objective and a 15X eyepiece, which gives me 60X. 60 times life size is pretty damn close! I use quartz lights to illuminate my subjects from above, or rarely from below. I have also used strobes successfully, but you need to have a bright modeling light to see the subject. Seeing the subject is a big challenge.

You need a standard monocular microscope like this one: http://www.surplusshed.com/pages/item/t1480d.html. Then you need the adapter. This allows you to use a T-mount to mount your camera to the microscope. Here’s the adapter: http://www.surplusshed.com/pages/item/m1573d.html. Here’s a T-mount to Nikon: http://www.surplusshed.com/pages/item/m1610d.html and for Canon: http://www.surplusshed.com/pages/item/m1607d.html and there are others.

Please check out my classes at BetterPhoto. You can still sign up for the current session!
An Introduction to Photographic Lighting

Portrait Lighting on Location and in the Studio

Getting Started In Commercial Photography

Thanks, John Siskin

Branded 2 468x60

April 11, 2010

Special Micro Lenses

Filed under: Micro Photography — John Siskin @ 11:57 am

Branded 2 468x60

Shot with the 63mm Zeiss Luminar lens and an extension tube.

First I want to say that I received the latest issue of Photo Technique Magazine yesterday, with my new article in it. This is the May/June issue and I hope you’ll pick it up. I really like the layout.

The macro/micro techniques I’ve been discussing in the last few weeks could easily have been done with a 50mm f1.8 lens. In fact, for use with bellows or an extension tube or a reverse mounting ring this is a very effective lens. The thing is that there are many other lenses that you could use and some of them are better. Most camera lenses are designed to focus at infinity. If you want the lens to focus much closer than it is good to optimize the spacing between elements to achieve that. I am not familiar with any lens that changes its internal geometry to continuously optimize the lens as you get closer. I don’t think it would be practical to attempt this for the small benefit it would provide. Still there are many lenses that have been designed to focus at a very close distances, but these lenses don’t work well at infinity.

The problem is how can we adapt these lenses to a modern digital camera? Since there are two lens mounts that are common for lenses that would work for micro imaging we really only need two kinds of adapters. First the two lenses: enlarging lenses and microscope lenses. Enlarging lenses were meant for traditional photographic enlargers. The distance between the negative and the photo paper was small, so these lenses were optimized for close work. Common focal lengths are in the range from 50mm to 135mm. These lenses would work well with extension tubes or bellows. High quality enlarging lenses, from Nikon and Schneider, are often available for reasonable prices. Almost all enlarging lenses were made with a simple 39mm thread mount. This is called the Leica Thread mount.

Shot with a Schneider 28mm enlarger lens

Microscope lenses are obviously designed for extremely close work. You can shoot with just an objective lens, with out the eyepiece. This gets you a considerable enlargement of your subject onto the sensor. The best lens for most situations is a 4X lens, as stronger lenses require you to be too close to the subject. A PLAN lens is very well corrected and would give excellent results. I will be talking about shooting with a complete microscope in another blog. Most microscope lenses also use a common thread, called DIN. In addition to lenses designed for microscopy there are some large format micro lenses that use this thread. Zeiss made a lens called the Luminar, which is extremely fine and uses this thread. I own a 63mm Luminar that has given me excellent results. There have also been other micro lenses that used this thread including the Micro Tessar from Bausch and Lomb. One advantage these lenses have over the microscope lenses is an adjustable diaphragm.

So the problem is how to mount Leica Tread and DIN lenses to a Nikon, Canon or whatever. The answer is actually two adapters. The first step is to covert the lens thread to a T-mount. This was a standard mount developed decades ago to allow secondary manufacturers to make lenses for several cameras. Since the mount doesn’t allow for any automation, aperture, focus and so on, the mount is little used. You still see them on mirror lenses, which don’t have auto focus and don’t have adjustable diaphragms. Anyway this adapter will allow you to mount a DIN microscope lens to T-mount: http://www.edmundoptics.com/onlinecatalog/displayproduct.cfm?productID=1968&PageNum=1&StartRow=1. I have now spent over an hour trying to find a Leica M39 thread to T-mount adapter. Actually finding one was easy. I have one right here in front of me. I can’t find a link to buy one. If you can find a link let me know, so I can update this.  For T-mount adapters, from the T-mount thread to Nikon, Canon and so on, you can go many places. I usually buy these from Surplus Shed (www.surplusshed.com).

I’ve attached a couple of pictures with the 63mm Zeiss Luminar, microscope thread to extension tube; and a picture with a 28mm Schneider Enlarging lens. I have no idea what the 28mm enlarging lens was actually designed to do, since it is too short for most enlargers.

Please check out my classes at BetterPhoto. You can still sign up for the current session!
An Introduction to Photographic Lighting

Portrait Lighting on Location and in the Studio

Getting Started In Commercial Photography

Thanks, John Siskin

Slag Glass
Branded 2 468x60

April 5, 2010

Reverse Adapters

Filed under: Micro Photography — John Siskin @ 5:43 pm

Branded 2 468x60

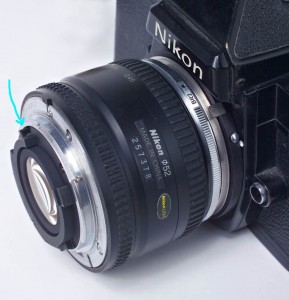
50 f1.8 lens reverse mounted. The mark shows where the diaphragm lever is on this lens.

What your average lens does is to make a big image, called reality, so small that it fits onto your sensor. Reality doesn’t fit on your sensor, just an image of it. Your sensor is pretty small, so this is a big reduction. Now if you could turn your lens around, so the back was facing the subject and the front element was facing your film, it would make small things big. There are devices from camera companies that do this. Nikon calls theirs a BR-2A. You can get a generic reverse adapter for less than half the price of a Nikon one, but the Nikon one is only about $40. Keep in mind that there are no optics in this, just a piece of metal that screws into the front of the lens on one side and has a lens mount on the other side. One of the great things about this gadget is that it is small and doesn’t weigh a lot, so it’s good to have in the camera bag.

There are a couple of things that make working with the reverse adapter tricky. First the auto-focus and auto-diaphragm controls are sticking out the wrong side of the lens, so they don’t work with the camera. Also your auto exposure systems don’t work. So you need to find your exposure by trial and error, using the image on the camera back. Of course you need to do zone focusing with this set-up. I talked about zone focusing in a recent blog. You can control the diaphragm with your hand, look at the picture of the reversed lens to see what lever you have to use. Nikon does make a ring to allow you to mount filters on your lens when it’s reversed, the BR-3. This will protect the back of your lens, which is a good idea. Nikon used to make a device called a BR-4 that would enable you to use the auto-diaphragm. In order to do this you needed a dual cable release, the second cable stops down the lens before you shoot. I used the BR-4 with my old 55 f3.5 Micro Nikkor for the pictures I’ve attached to this blog. If you want you can use extension tubes or bellows to get even closer. Wide-angel lenses and fixed focal length lenses work better. Wide-angle lenses give greater magnification. I used to have 20mm lens that was great reverse mounted. You can also reverse mount such things as enlarging lenses and get excellent sharpness. Reverse mounting lenses will enable you to make something anywhere from life size to several times life size on your sensor. Of course a print or a file can be many times larger than the sensor.

I have a new article on Architectural Lighting coming out in the May/June issue of Photo Technique Magazine . I hope you’ll check it out. I also hope you’ll check out my classes at BetterPhoto.

An Introduction to Photographic Lighting

Portrait Lighting on Location and in the Studio

Getting Started In Commercial Photography

Thanks, John Siskin


Branded 2 468x60

Powered by WordPress