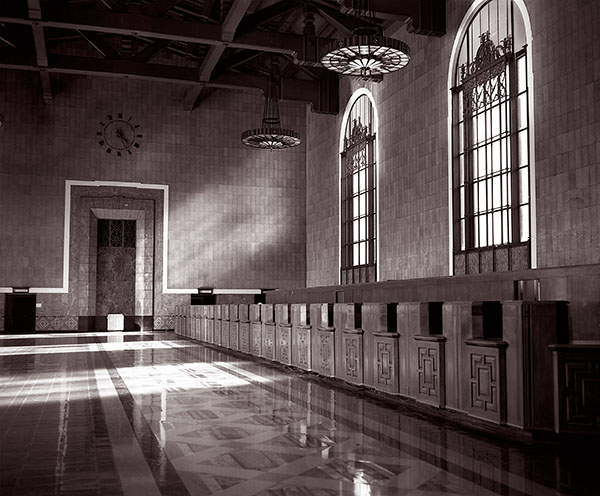
This is one of my favorite images. I love the look of the print. I have it above the desk in my office. Sometimes the experience of making an image is transformative: making this image changed the way I make pictures. I learned to take risks, even if the shot might not work. While this might seem natural with digital photography, it’s different with film. I shot this image on 4X5 film. Each sheet of film is individually loaded into a film holder. Five film holders, ten sheets of film, weighs more than a pound, and takes up a lot of room as well. Each exposure costs more than two dollars after processing. So on location each shot is precious. I made this shot with my speed graphic, which weighs almost seven pounds (I got out the scale to do this blog). This isn’t usually important, but Union Station, Los Angeles, won’t let anyone shoot with a tripod unless they have a permit. I made the shot with a Schneider 65mm f8 Super Angulon lens. I’d never made a really sharp image with this lens. So I hand held the camera at an exposure of 1/15 sec at almost f16. The light was beautiful, but I didn’t know if I could hold the camera still for the exposure.
There’s something that I didn’t know about using the Super Angulon lens, or any wide-angle lens on a large format camera. If you focus the camera on infinity and stop down the lens only the center of your shot will be sharp. In order to get a sharp image with this class of lenses you have to focus closer if you stop down the lens. So if you want to have the whole shot sharp, and you’re going to shoot at f16, you should focus at about eight feet from the camera. When I took this shot I was very careful, because I knew I needed to get as much depth of field as I could. So I focused closer, using the rule of thumb that depth of field extend a third in front of your focus point and two-thirds behind that point. To my surprise and delight the whole image is sharp edge to edge. I’ve posted a lot more about aperture and depth of field in these posts: https://siskinphoto.com/blog/?p=50, https://siskinphoto.com/blog/?p=56 and https://siskinphoto.com/blog/?p=68. Of course the fact that the image is sharp also means I held the camera steady at 1/15th of a second. Pretty good for a large format camera!
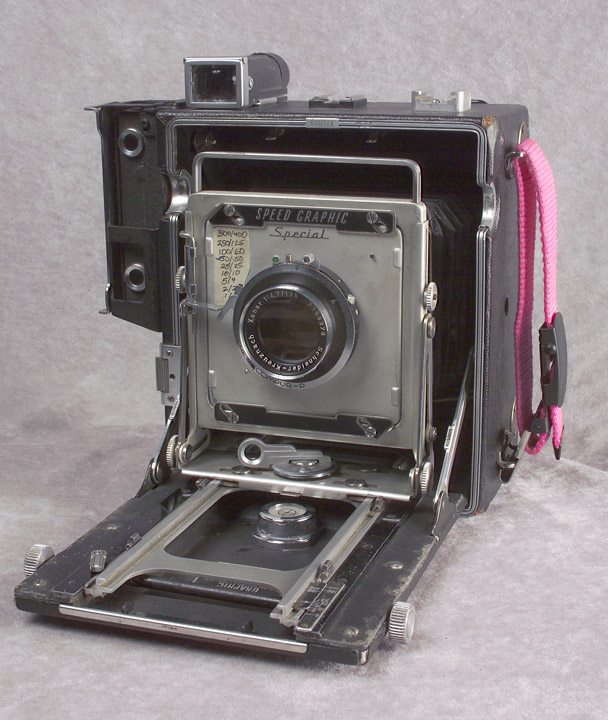
My Speed Graphic camera with the 135mm lens, not the 65mm Super Angulon.
It’s always exciting to see your film images after processing, because, unlike digital, you don’t know you’ve got the shot until it’s processed. When I saw this negative, before I even made a print, I knew it was great. I still remember that moment. Regardless of how you make a photograph it’s exciting when you realize you’ve made something special. By the way, since this image is titled Union Station, Los Angeles #1, you can assume that there are more images of this fabulous site to come.
I hope that when I get the website updated I’ll be offering silver gelatin prints of this image in various sizes. Right now I’m offering archival digital prints of this image at a special price just $95, mounted and matted on cotton rag board, and shipped in the United States. The image will be about 11X13 inches and matted to 16X20.


I’m going to be using my blog to add information about images to the fine art pages of my site. This part of the site isn’t functioning yet, but it will be. These posts will enable me to put up information about the shot and to add details about buying prints. I think it’s very useful to talk about the details of creating specific images. I hope to hear from you about this-use my e-mail to let me know: john@siskinphoto.com. Of course I hope you’ll also want to buy some prints. I’ll be offering more types of prints in the future.