Photo Notes A place to talk about making images.

January 23, 2011

Strobe Projector 2

Filed under: Do It Yourself,Lighting Technique — John Siskin @ 12:30 am

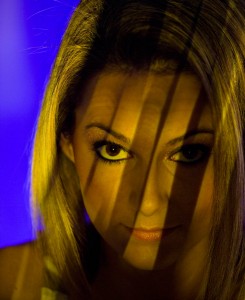
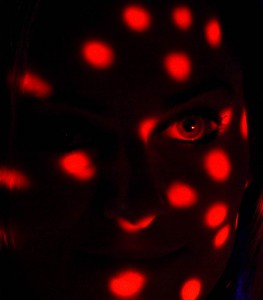
All the light is from the strobe projector using a cookie of little holes. I think the light in the eye makes this wonderfully effective.

And I am continuing the shameless plugs at the beginning of the blog. My book Understanding and Controlling Strobe Lighting: A Guide for Digital Photographers is on Amazon.com. It got as high as number 15 in photographic lighting books! And there was much rejoicing! But is is dropping now, so you need to buy a couple of copies, please! Here is a different sample chapter. Of course I still hope that you will consider purchasing my fine art book B Four: pictures of beach, beauty, beings and buildings. Frankly purchases of this book mean a lot to me, and it is also a fine gift for any occasion.  As you know I teach for BetterPhoto.com. I really hope you’ll sign up my class:  An Introduction to Photographic Lighting. Sign up are very good this month!

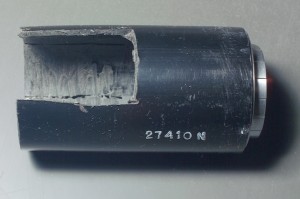
When we last saw this project, back in December, I showed some of the parts I used to make the projector. The most involved part is the tube that holds the lens and the series 7 filter holder. The

This tube is the key to making the projector work.

Series 7 filter holder is used to hold the cucoloris, or cookie, that creates a pattern, or a slide that is used to project an image. You can see where it fits on the image of the tube. The finished version of the tube is 4 inches long. There is a slot that is an inch and a half wide and 2 and a half inches long cut into the side. I cut the slot with a Dremel tool. This is quick, but you do need to be very careful. Dremel saw blades can break and fly at you. There are three other cuts made into the front of the tube that are the same light as the shot. These make the tube expand enough to hold the lens. On the other side I ground out the interior of the

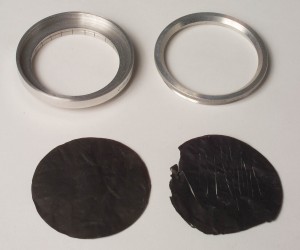
The Series 7 filter holder and a couple of cookies. One cookie is cut and the other is blank

tube enough to hold the filter holder. You could do the same thing with 52mm filters, but you would probably have to remove the glass filters. I used the Dremel tool to do the grinding. Dremel tools are very versatile.  There is nothing special about the Series 7 filter holders, except that I had a couple of them that weren’t doing anything. You would probably need two 52mm filters so you could put the cookie or the slide between them. I made the cookies from cine foil. You would also need to cut a mask of cine foil if you wanted to project slides, to keep light from spilling out the sides.  I cut the foil with and X-Acto blade and other tools. This tube is really the only significant part you’ll need to build and it isn’t terribly difficult. Although I did build four versions before I got it right.

I used a cookie with slits cut into it.

The projector is not very bright, especially with a cookie or slide in place. At ISO 100 and 10 feet, without any cookie the meter reads f5.6, so the guide number would be 56. Most of the time you won’t be using the projector very far from the subject, so it is bright enough. By moving the lens in the tube it is possible to go from a hard edge, or if a slide a sharp image, to a soft edge, or if a slide a soft image. This gives you considerable control over the image. The difficulty is making changes to the projected image while shooting. If the projector is near the camera, as it was for the demonstration images, it can be reasonably convenient to shoot. If you are projecting a background or lighting the side of a subject than it is more difficult to arrange the image. A remote control release for the camera might be useful, or it might be helpful to work with an assistant. I am still working on ways to use the projector to create a background, which has been difficult. The problem with backgrounds seems to be the low power level of the
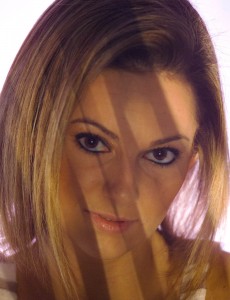
I really like the effect of the slits cut into the cookie. It is simple and effective. There is a filter over the projector and over the background light.

projector as well as the difficulty of getting it in place. Part of what makes this difficult is that when you are at the projector you can’t also be looking through the camera, so what looks right might not be right.

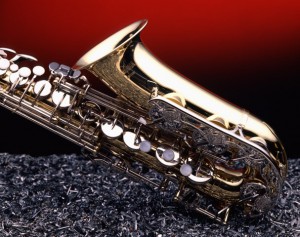
The samples this week were made with simple cookies. One is slits cut into the cine foil and the other is just holes. I used filters over the projector lens for color. On a couple of the shots I put a strobe behind the subject to add light to the background. I used colored gels on the background light as well.

I still offer a class at BetterPhoto, I hope you’ll consider taking it: An Introduction to Photographic Lighting And please consider my book: Understanding and Controlling Strobe Lighting: A Guide for Digital Photographers.
BetterPhoto.com, The better way to learn photography

January 6, 2011

Monolights vs. Dedicated Strobes

Filed under: Lighting Technique — John Siskin @ 2:24 pm

So here are the shameless plugs at the beginning of this blog. My book Understanding and Controlling Strobe Lighting: A Guide for Digital Photographers is on Amazon.com. It got as high as number 15 in photographic lighting books! And there was much rejoicing! But is is dropping now, so you need to buy a couple of copies, please! Here is a sample chapter. Of course I still hope that you will consider purchasing my fine art book B Four: pictures of beach, beauty, beings and buildings. Frankly purchases of this book mean a lot to me, and it is also a fine gift for the holidays.  As you know I teach for BetterPhoto.com. I really hope you’ll sign up my class:  An Introduction to Photographic Lighting. Sign up are very good this month!

I have probably already written something on this topic, but I think it is good to return to it. Also it has been a while, what with the holidays and all, since I posted to the blog. This came out of a discussion with one of my BetterPhoto.com students. I hope everyone has an abundant and peaceful New Year! I’ve added a few random shots to this blog. I hope you like them.

It is difficult to compare monolights, like an Alien Bee or a Calumet Travelite, with dedicated strobes like the Canon 580 EX II or the Nikon SB900. The fact is that they were designed to do very different jobs: the monolights are designed to create light for controlled circumstances and the dedicated strobes are designed for working fast. A monolight is a manual light source, with considerable power and adaptability that is designed to be controlled by the eye and skill of the photographer. Indeed it has to be controlled by the eye and skill of the photographer, as it has no auto-exposure capability. A dedicated strobe is designed for automatic control by the camera. While manual control is generally possible, the extensive menus on dedicated strobes make this difficult. I feel that reliance on manual control of light, for portraits, products and architectural interiors, makes a photograph better, because it requires the photographer to pay attention to the light. I have seen many images that had the right exposure, but the wrong light, because the photographer relied on a meter or auto-exposure rather than vision and skill. When I use a meter, which is rarely, I use it only to provide a starting place for exposure. I choose the actual light for an image after examining one or more test exposures.

If you are shooting an event, like a wedding or a party, or shooting flash fill with sunlight, a dedicated strobe is the best possible tool. In these situation composing and shooting fast is often the key to good results. It makes sense to use dedicated strobes if you travel and shoot stock or personal photos, both for speed and for portability.  However when I travel for a client I take monolights because my clients are looking for controlled results, but I might pack a dedicated strobe also.

One of the biggest differences between dedicated strobes and monolights is power. Of course this has to be very confusing: nothing regarding the amount of light created by a strobe is simple. Two brands of monolights, with the same power ratings, can create very different amounts of light. Dedicated strobes are a little more accurate about light output, but use a different rating system. Then too, different light modifiers affect dedicated strobes differently than monolights. For instance a Canon 580EX II gives you a reading of f11.2 if the meter is ten feet from the unit and set at ISO 100, with the same set up on the Alien Bee B1600 the meter reads f16.3. So the Canon is only one stop less than the B1600, which is very respectable. This shows how much direct light you can get from a dedicated strobe. For any situation in which you want hard direct light the dedicated strobes can do a fine job. However when you put the units into a soft box the situation is very different: the Canon reads f2.8.6 and the B1600 reads f5.6.7. This is a two stop difference, which means the dedicated strobe has just 1/4 the light of the B1600. To put it another way: you could set the ISO to 400 with the B1600 and you would have to set the ISO to 1600 to use the same aperture with the dedicated strobe. So when you increase the size of your light source you always lose a lot of the power of your lights, but you lose power faster with a dedicated strobe. I am sure there is a reason for this, but I don’t know what it is.

Recycling is the amount of time it takes for the strobe to be ready to fire again. This is a constant for a monolight, but varies depending on the conditions of the batteries in a dedicated strobe. On a B1600 the recycle time is 2 seconds, and it will stay that way. On Canon 580 EX II the recycle time is 6 second to full power with alkaline batteries. There are faster batteries, but all the batteries will get significantly slower as you use them. I find shooting a second shot quickly will often give a good expression, so I find a 6 second recycle time annoying. Since I often try to shoot anyway I get a lot of bad exposures with some battery powered units. Just to confuse this issue, my battery powered Norman 200B strobes, which are manual strobes, recycle to full power in about a second, fast!

There is  some difference in cost between a monolight, in this case an Alien Bee B1600, and a Canon 580EX II. The obvious difference is that the B1600 is $360 and the 580 is $420. The Bee comes with a reflector, and this is built into the 580. You can use the Bee all day and night if you plug it into the wall, or you can run it off a generator that costs $200 at Home Depot. I like generators better than portable battery packs because you can run them as long as you have gas. There is a battery pack for the Canon (CP-E4), which I think is a very important accessory. This unit will make your strobe recycle quicker, and give more pops before you need batteries. Still, CP-E4 only runs on 8-AA batteries, so it isn’t all day power. It costs $150. Any way you look at it you’re going to need a lot of batteries if you want to do studio shooting. Ni-MH (nickel metal hydride)is the fastest to recycle and they are rechargeable. Of course you will have to have a light stand for a monolight, but you can use a dedicated strobe on the camera.

I still offer a class at BetterPhoto, I hope you’ll consider taking it: An Introduction to Photographic Lighting And please consider my book: Understanding and Controlling Strobe Lighting: A Guide for Digital Photographers.
BetterPhoto.com, The better way to learn photography

Powered by WordPress