Photo Notes A place to talk about making images.

April 17, 2026

Goerz vs. Kodak, Classic Lens Tests

Filed under: Uncategorized — John Siskin @ 4:50 pm


I was out yesterday testing a couple of 12-inch lenses for my 8×10 and smaller sheet film cameras. I recently got a 12-inch Kodak Commercial Ektar, a lens with a great reputation. I’ve had a 12-inch Goerz Dagor for some years. Mine is one of the later coated Dagors. So, I needed to see the Ektar in action up against the Dagor. As it happened, I went out to lunch with another photographer right after the shoot. He mentioned a new digital lens he might get saying that it tested better than other lenses. I asked what did they actually test; which turned out to be sharpness, contrast and clarity. Frankly, if sharpness and contrast don’t add up to clarity, I don’t know what I’m missing.

I am interested in sharpness with a view camera lens; however, I am much more interested in a lens that shows long tonal gradation than one that is contrasty. The tonal gradation is a big part of the feel of a classic view camera lens. The late view camera lenses were optimized for shooting transparency film for commercial work and so they were quite contrasty. These days I prefer a different tonality for my black and white work. So, for me, a good view camera lens will show the shape of an object. In the test negatives I included columns, which are an excellent way to evaluate the way a lens records shape.

Another critical aspect of a view camera lens is bokeh, probably not in the way you think. When I first heard about bokeh it was in regard to view camera lenses. A lens with good bokeh showed more presence and detail in the out of focus area of the image, than a lens with bad bokeh. Pretty much the opposite of the way the word is understood now. Now people use the word to mean a lens which tends to isolate the subject from the background. I don’t like this because I want the subtle gradation and a presence in the background to create a greater sense of three-dimensionality in my photographs.

Now, perhaps you wouldn’t photograph a highway underpass, but I think it’s a perfect subject to evaluate lenses: columns and long tonal range. I’ve included scans of the complete negatives, which were made with Ilford HP-5 processed in Kodak Xtol. However, these scans are lower resolution because I can’t upload a 1.3 gigabyte file. I also included a couple of cut outs from the full image, which are at the full resolution of the original scans. Probably the easiest difference to see, in these scans, is the change in detail in the distant part of the image. The Goerz lens has much more detail than the Kodak. This is not a surprise. The Kodak lens is a 4 element, in three groups, design: a Tessar type, while the Dagor is a 6 element lens in two groups. Both lenses are in the same shutter and have similar diaphragms, so the difference is in the glass. I used my Toyo 810M field camera for these tests.

The first shot was made at f16.5 with a 1/150 shutter speed. The cut outs are from the front column, where I focused and the left side of the image. I did not use camera movements to adjust the focus, since I was particularly interested in how the lens deals with an out of focus image.

The second image was made at f11.5 and a 25th of a second. The Goerz might be just a little sharper, but it’s hard to tell. You may note that the image from the Kodak Ektar appears slightly closer to the subject. I did not move the camera. It appears that though both lenses are marked 12-inch, they have slightly different focal length. This image was made with a lot of front rise on the camera which is probably why both lenses appear to vignette at the base of the image.

Both are good lenses, but the Goerz will remain my go-to lens in this focal length. There are some links to my recent work at the end of the post. Thanks for your attention

12 Inch Goerz Dagor, coated, at f16.5

12 inch Kodak Commercial Ektar, coated, at f16.5

12 inch Goerz Dagor

12 Inch Kodak Ektar

12 inch Kodak Ektar

12 Inch Goerz Dagor

Another image made at f11.5

Kodak 12 inch Commercial Ektar, coated, at f11.5

Goerz 12 inch Dagor, coated at f11.5

A few links

Siskinphoto.Home

Introduction Page

Monument Valley

Taos Pueblo

Night Sky

Lightning

Flowers

Monastery Road

Petroglyphs

Rock

Ice and Snow

Tsankawi

Sugarite Campground

Churchs

El Morro National Monument

I did a large show when I was still in Indianapolis called Courting Chaos. The link will take you to the pages which describe the work and its evolution. These images are, well, chaotic and many of them are nudes. I hope you’ll find it interesting.

Links to my books, still available at Amazon!

April 8, 2026

Upcoming Portfolio in Black and White Magazine!

Filed under: Uncategorized — John Siskin @ 5:36 pm

I admit that I like to see my images in print. So, I often participate in the various opportunities that Black and White Magazine offers to submit images. I have been fortunate to have been chosen for publication a number of times. Some images from this group, I don’t know which ones, will be published in August. These images are all from New Mexico. If you are interested in prints from this group, please contact me at john@siskinphoto.com. You can see many of my magazine articles at this link: https://www.siskinphoto.com/magazinearticles.php and some of the magazine covers I did at this link: https://www.siskinphoto.com/magazinecovers.php. There are a bunch of other links to recent work at the end of this post. As always, thanks for your attention.

Taos Pueblo. Taos, New Mexico. From 2024

Nuestra Senora de Luz. Cañoncito, New Mexico. From 2022

Nuestra Senora de Luz. Cañoncito, New Mexico. From 2022

Puye Cliff Dwelling. Santa Clara Pueblo Reservation, New Mexico. From 2025

Puye Cliff Dwelling. Santa Clara Pueblo Reservation, New Mexico. From 2025

Christ in the Desert Monastery. Rio Arriba, New Mexico. From 2022.

Sanctuary, Christ in the Desert Monastery. Rio Arriba, New Mexico. From 2024

Pecos Mission Church, Pecos New Mexico. From 2022

San Francisco de Asís Mission Church. Taos, New Mexico. From 2020.

Bell, St Elias the Prophet, Greek Orthodox Church. Eldorado, New Mexico. From 2021

Great Kiva. Aztec, New Mexico. From 2024

Walkway, Taos Pueblo. Taos, New Mexico. 2025

A few links

Siskinphoto.Home

Introduction Page

Monument Valley

Taos Pueblo

Night Sky

Lightning

Flowers

Monastery Road

Petroglyphs

Rock

Ice and Snow

Tsankawi

Sugarite Campground

Churchs

El Morro National Monument


I did a large show when I was still in Indianapolis called Courting Chaos. The link will take you to the pages which describe the work and its evolution. These images are, well, chaotic and many of them are nudes. I hope you’ll find it interesting.


Links to my books, still available at Amazon!

July 4, 2025

El Morro

Filed under: Uncategorized — John Siskin @ 4:23 pm

El Morro is another special place in New Mexico. I’ve been there three times, but there is still more to discover. El Morro is the site of an indigenous pueblo dating back about a thousand years. After those folks left it was repeatedly visited by both Spanish and United States travelers. They often left inscriptions on the rock, as did the indigenous people before them. That’s why the place is also referred to as Inscription Rock. I’ve included a couple of pictures of these carvings along with pictures from the rim and pictures of the pool. The pool is on the edge  of El Morro and the fact that it usually held water is one reason so may people visited.

On my third visit the moon wasn’t visible so the dark sky was really dramatic. I’ve included a group of the dark sky and Milky Way pictures. 

There is a dramatic group of rock spires not far from El Morro. I believe these are called Las Gigantas, but I’m not sure. They are off Indian Service Road 135. The first time I was out there I photographed them with my 5×7 Linhof Technika. on this recent trip I used the 8×20 inch Korona camera. I’ve included the 5×7 images and a couple of digital images here, but not the 8×20 shots.

As you might imagine I’d prefer that these pages don’t get filled with a great deal of text. If you’d like information about a specific image, please e-mail me at john@siskinphoto.com and I’ll let you know what I know. Of course, if you have specific requests about an image you’d like to purchase please use the same address. If you’d like to go ahead and purchase an image, just contact me by e-mail.

As always, thanks for your attention

Dark Sky, Milky Way Images

Las Gigantas Images

A few links

Siskinphoto.Home

Introduction Page

Monument Valley

Taos Pueblo

Night Sky

Lightning

Flowers

Monastery Road

Petroglyphs

Rock

Ice and Snow

Tsankawi

Sugarite Campground

Churchs

El Morro National Monument


I did a large show when I was still in Indianapolis called Courting Chaos. The link will take you to the pages which describe the work and its evolution. These images are, well, chaotic and many of them are nudes. I hope you’ll find it interesting.


Links to my books, still available at Amazon!

June 30, 2024

Sugarite Campground and More

Filed under: Uncategorized — John Siskin @ 11:54 am

I thought I might start grouping some of the pictures from my trips here. Not a lot of organization here, but these are my favorites from my trip up to Sugarite Campground last year. Not sure why it didn’t get posted before. I got over to Chama and into the Apache Reservation as well as Sugarite, an old mining area. As Always, thanks for your attention

As you might imagine I’d prefer that these pages don’t get filled with a great deal of text. If you’d like information about a specific image, please e-mail me at john@siskinphoto.com and I’ll let you know what I know. Of course, if you have specific requests about an image you’d like to purchase please use the same address. If you’d like to go ahead and purchase an image, just contact me by e-mail.

Thanks for viewing this group of images. This is the first of the new group image pages. Since it’s the first I would really appreciate feedback. Also, of course some things may not work, and so it goes…As you might imagine I’d prefer that these pages don’t get filled with a great deal of text. If you’d like information about a specific image please e-mail me at john@siskinphoto.com and I’ll let you know what I know. Of course, if you have specific requests about an image you’d like to purchase please use the same address. If you’d like to go ahead and purchase an image, please use the Paypal link below and give me the browser link to the image and your shipping address.

I am also trying a couple of things that will give people an opportunity to support this work. While I am fortunate to have enough money to continue to do this work, some things are pretty expensive. For instance 11×14 film is hard to get and costs about $300 for just 25 shots and a 120 roll of Ilford Delta 400 is close to $9.


A few links

Siskinphoto.Home

Introduction Page

Monument Valley

Taos Pueblo

Night Sky

Lightning

Flowers

Monastery Road

Petroglyphs

Rock

Ice and Snow

Tsankawi

Sugarite Campground

Churchs

El Morro National Monument


I did a large show when I was still in Indianapolis called Courting Chaos. The link will take you to the pages which describe the work and its evolution. These images are, well, chaotic and many of them are nudes. I hope you’ll find it interesting.

Links to my books, still available at Amazon!


March 22, 2021

Photography Through The Microscope!

Beginning with this post I am going to make prints of some of the images on my blog available. More information is posted at the end of this blog. Thanks for your support
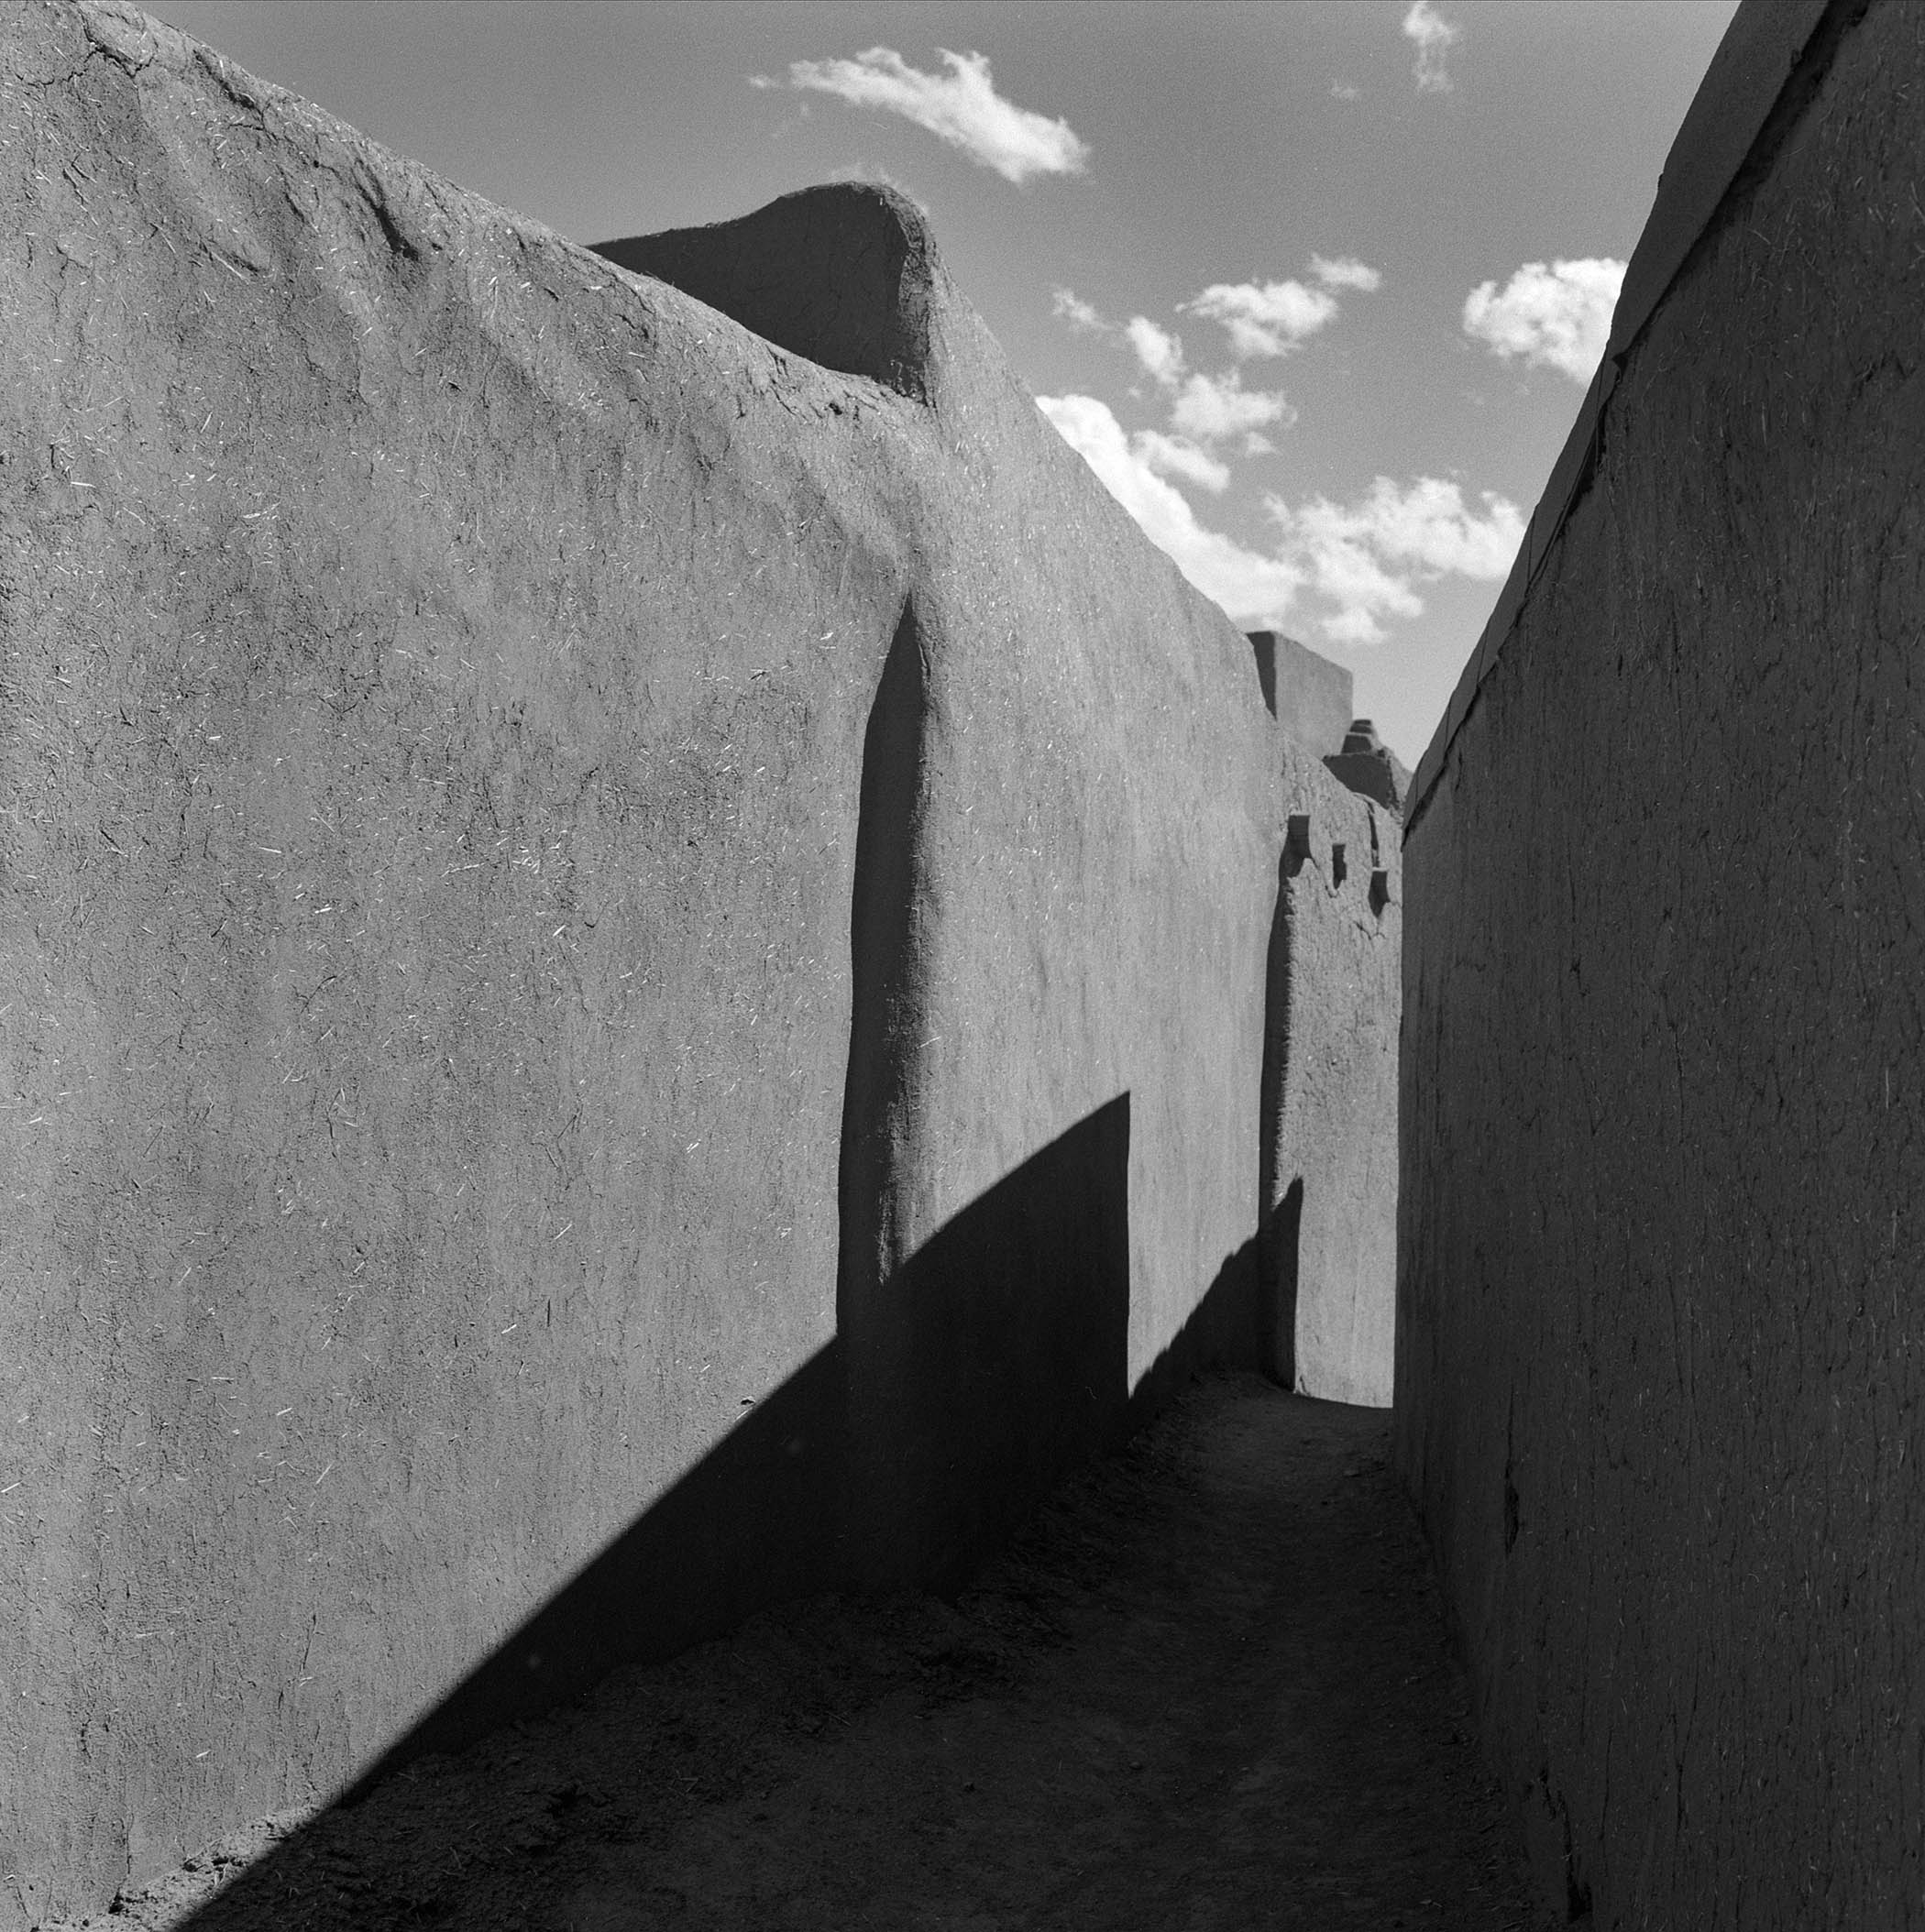
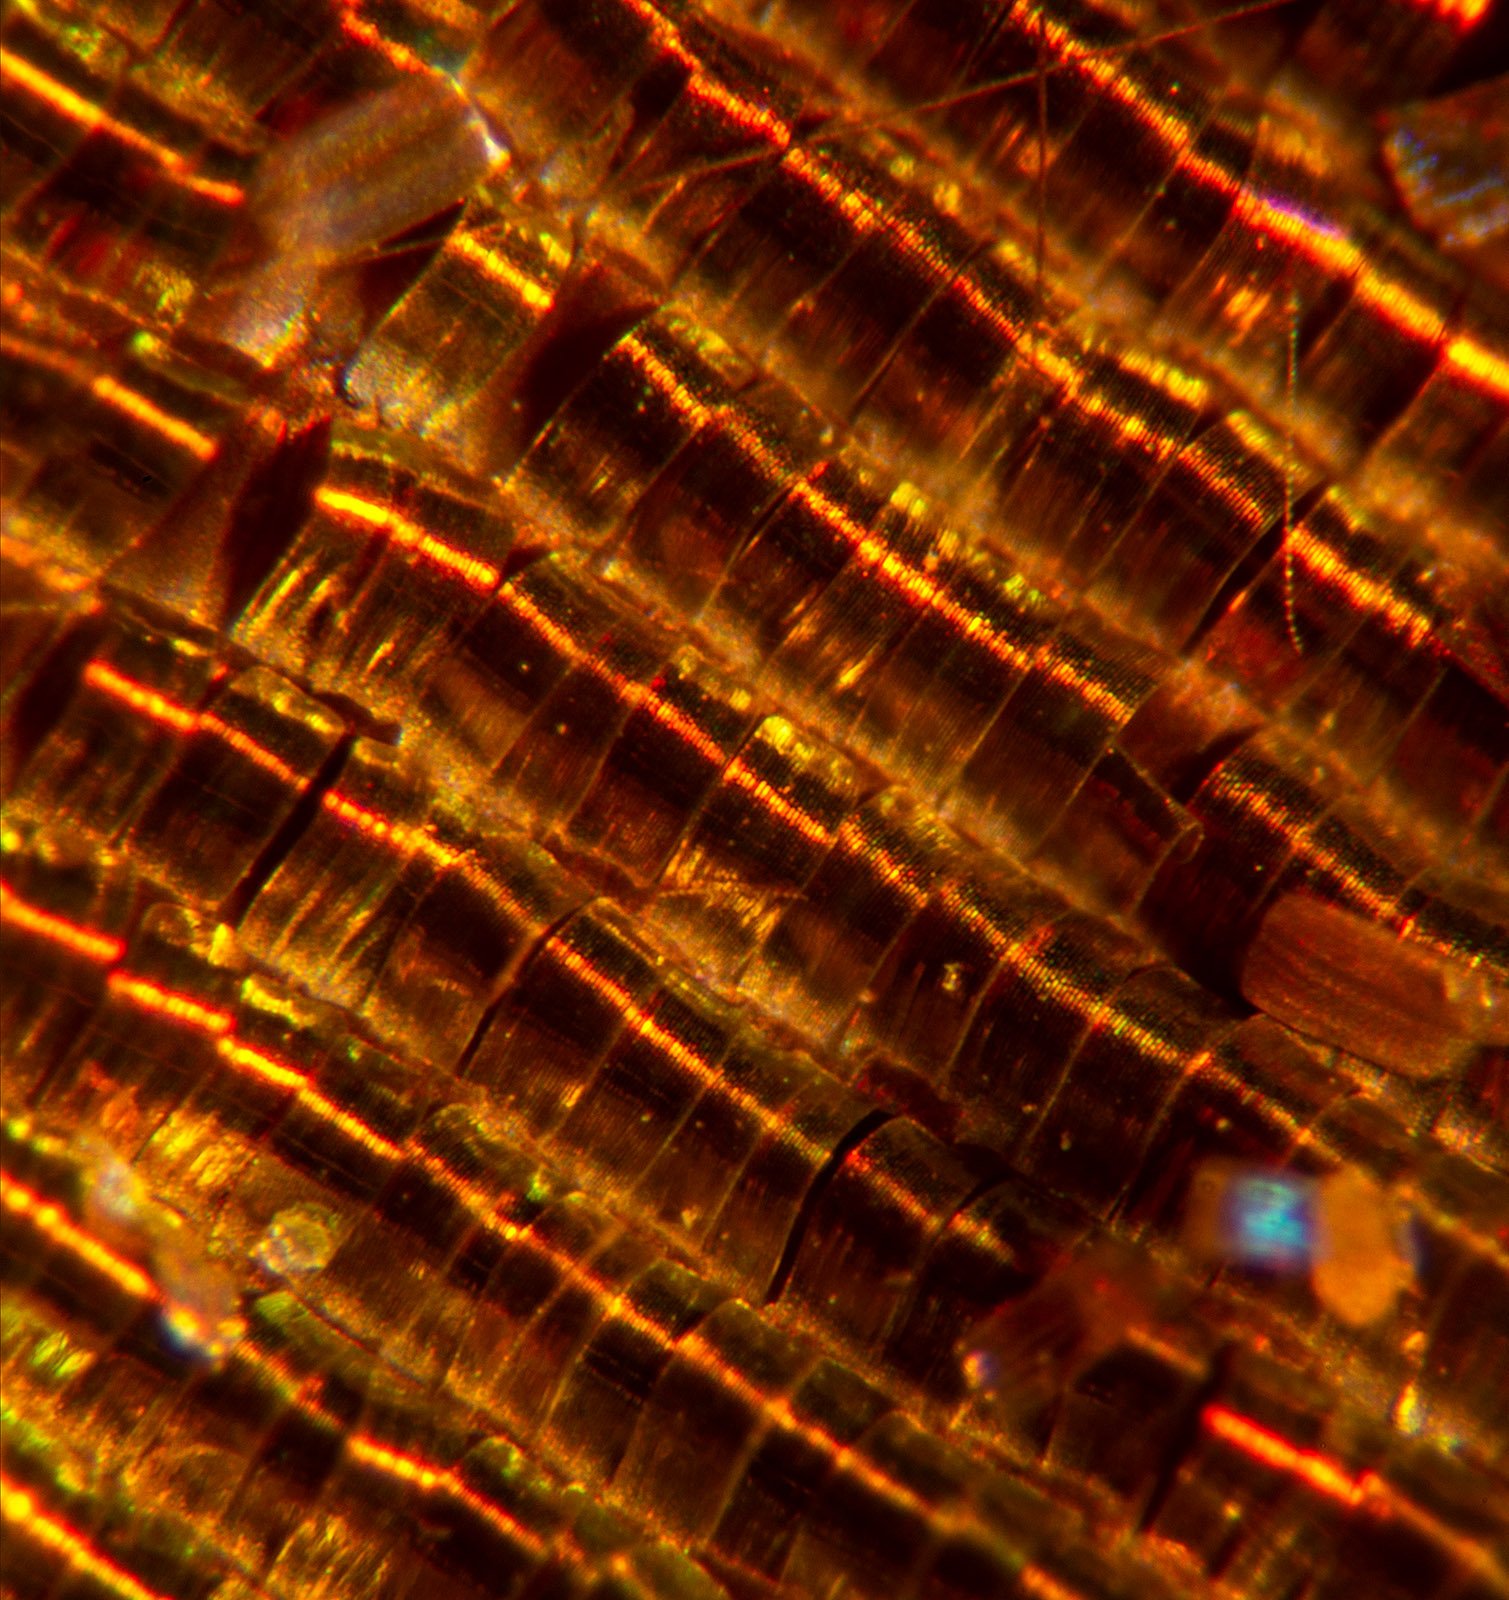
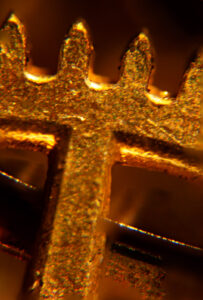
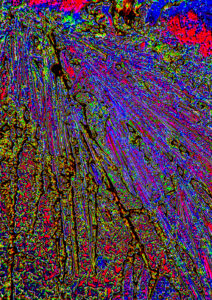
Watch face DSC-2184

In the book Zen and the art of motorcycle maintenance the author (Robert M. Pirsig) quotes an instruction booklet, that said “assembly of Japanese bicycle require great peace of mind.” Macro and micro photography require that your peace of mind increase in direct proportion to the reduction in the size of the object you are photographing. It gets more difficult, and it requires more patience, as you get closer.

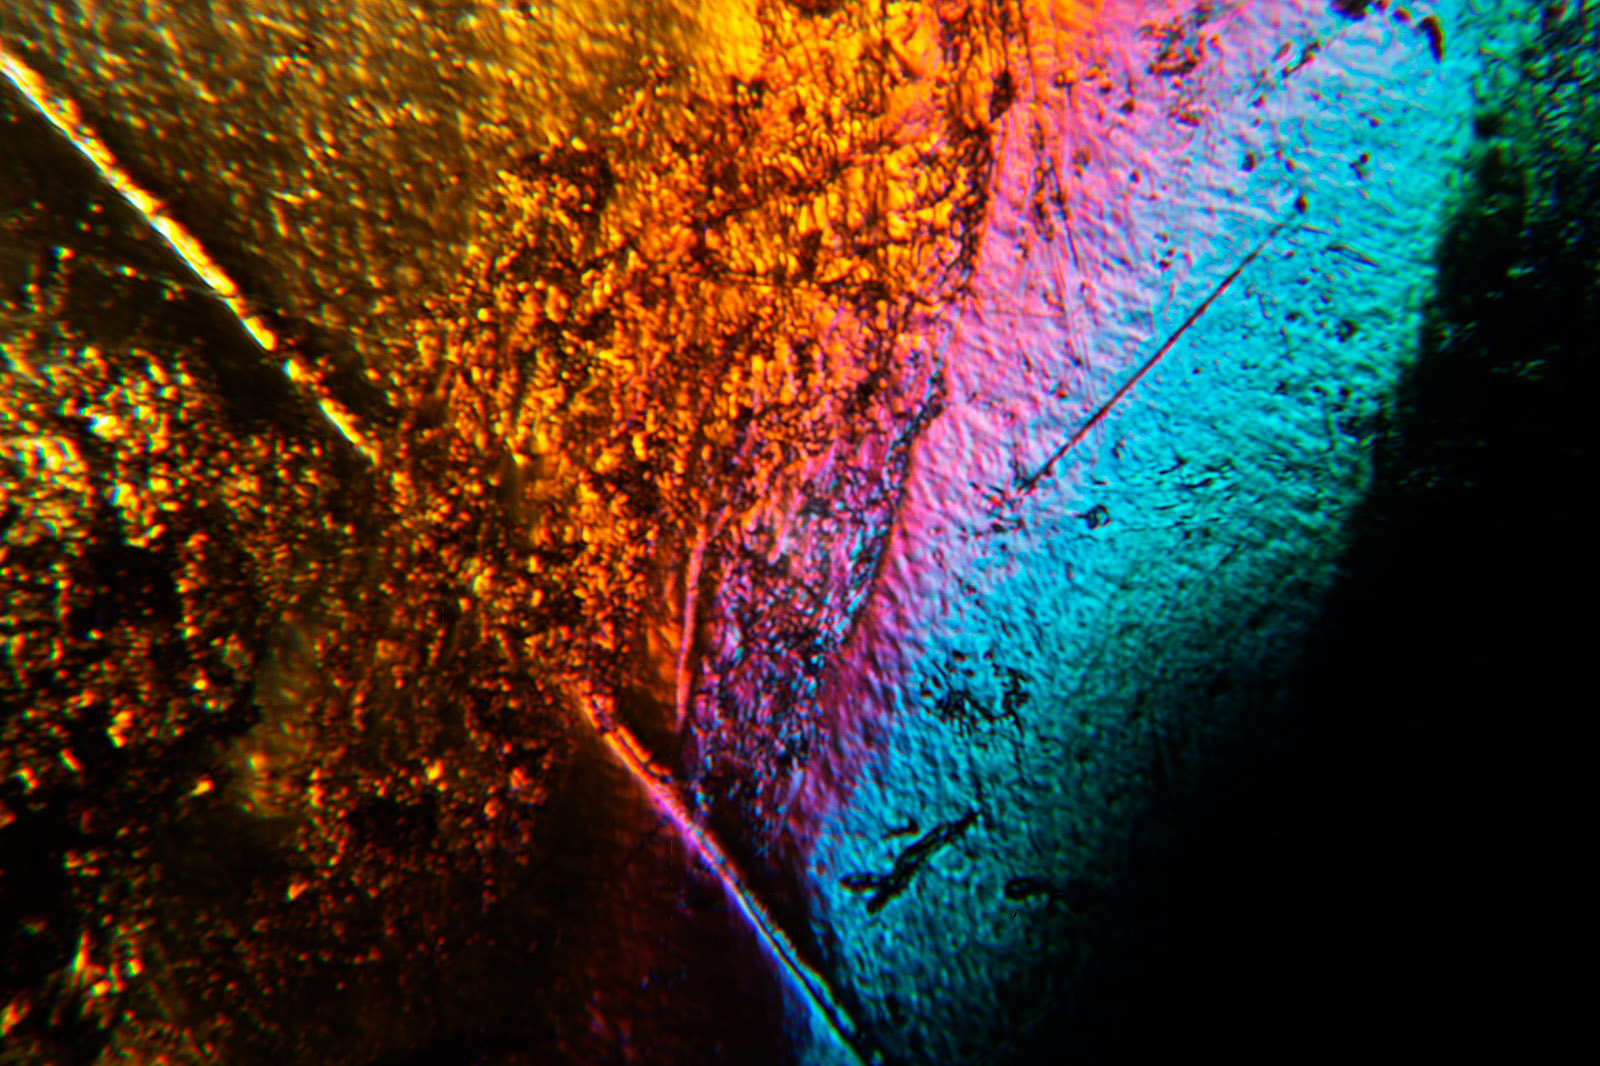
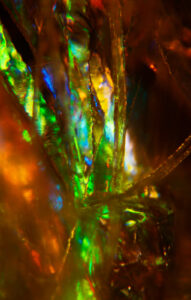
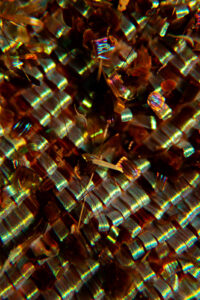
butterfly wing DSC-2184

Most people approach macro photography by purchasing some sort of macro lens which enables them to reproduce picture of an object at perhaps one quarter the size of the object in real life on the sensor of their camera, maybe even bigger.  So, one quarter reproduction means that if you had a 25 cent piece, a quarter in US language, you could take a picture four of them and stacked across the short distance of a full frame sensor sensor. And they would fit. The quarter is an inch wide and a full frame sensor is an inch wide (and an inch and a half long). If the quarter filled a full frame sensor it would be a 1:1 capture, or life size.
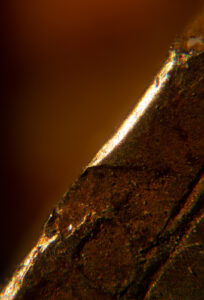
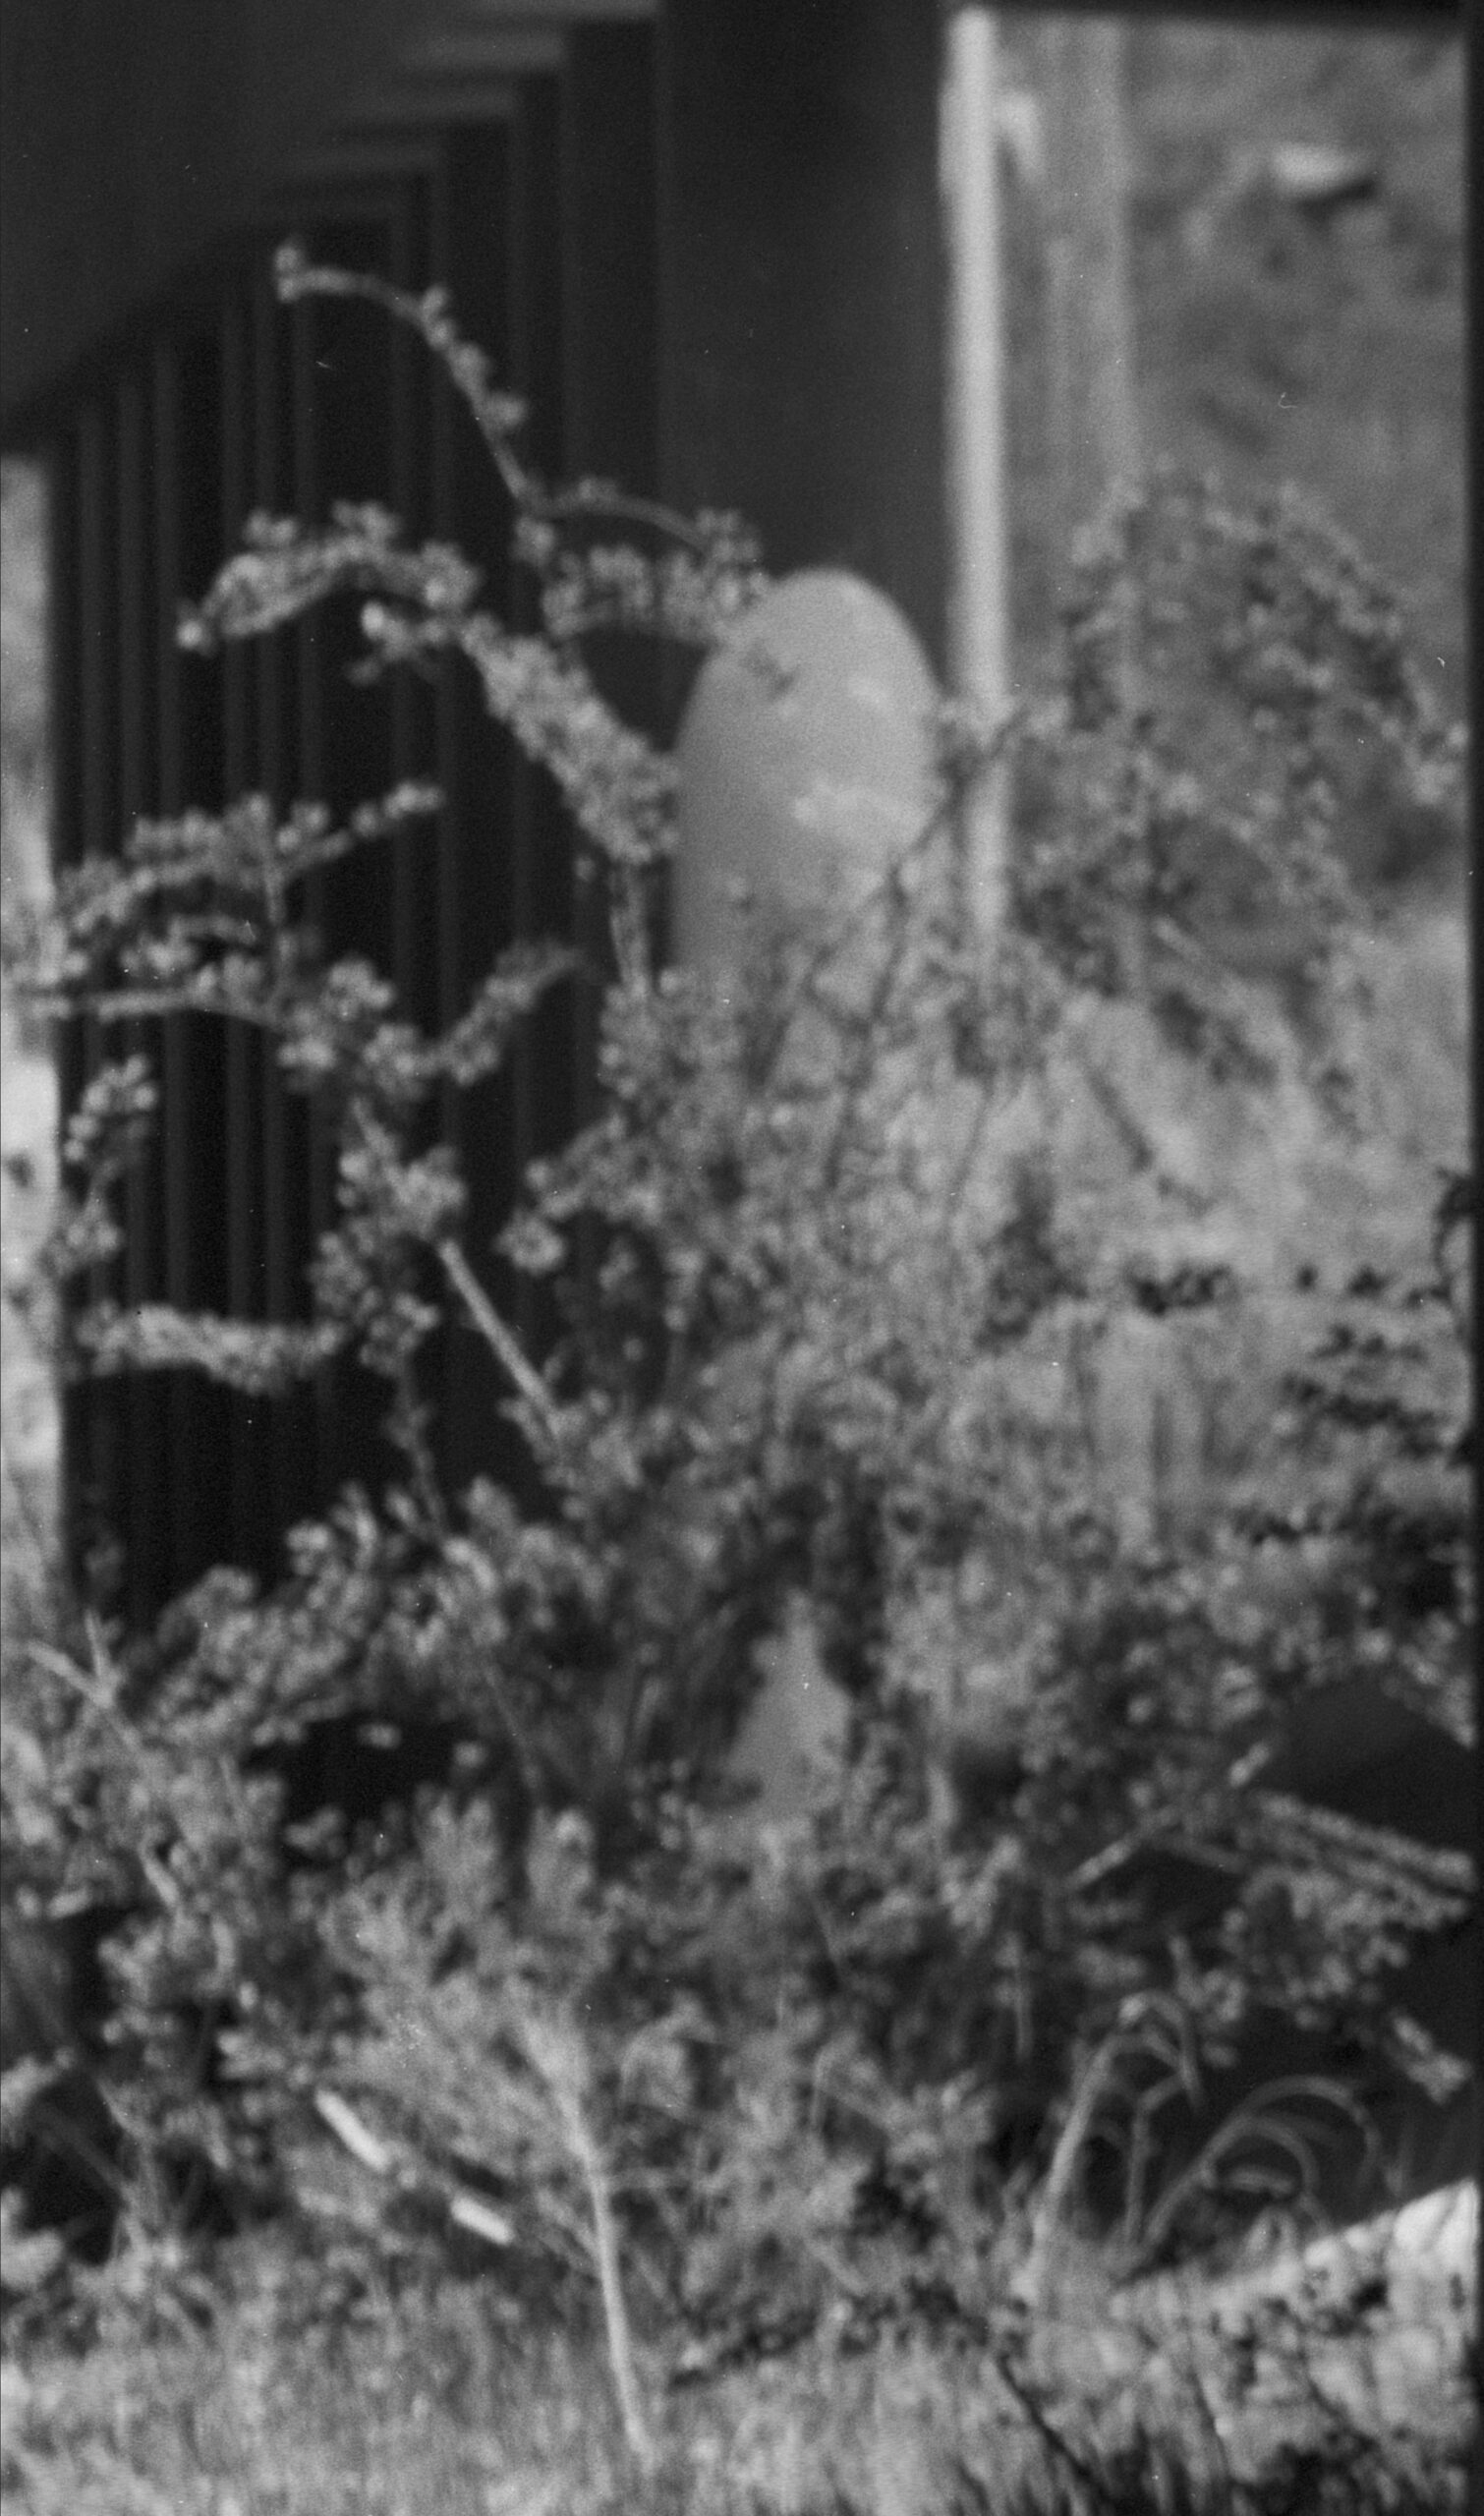
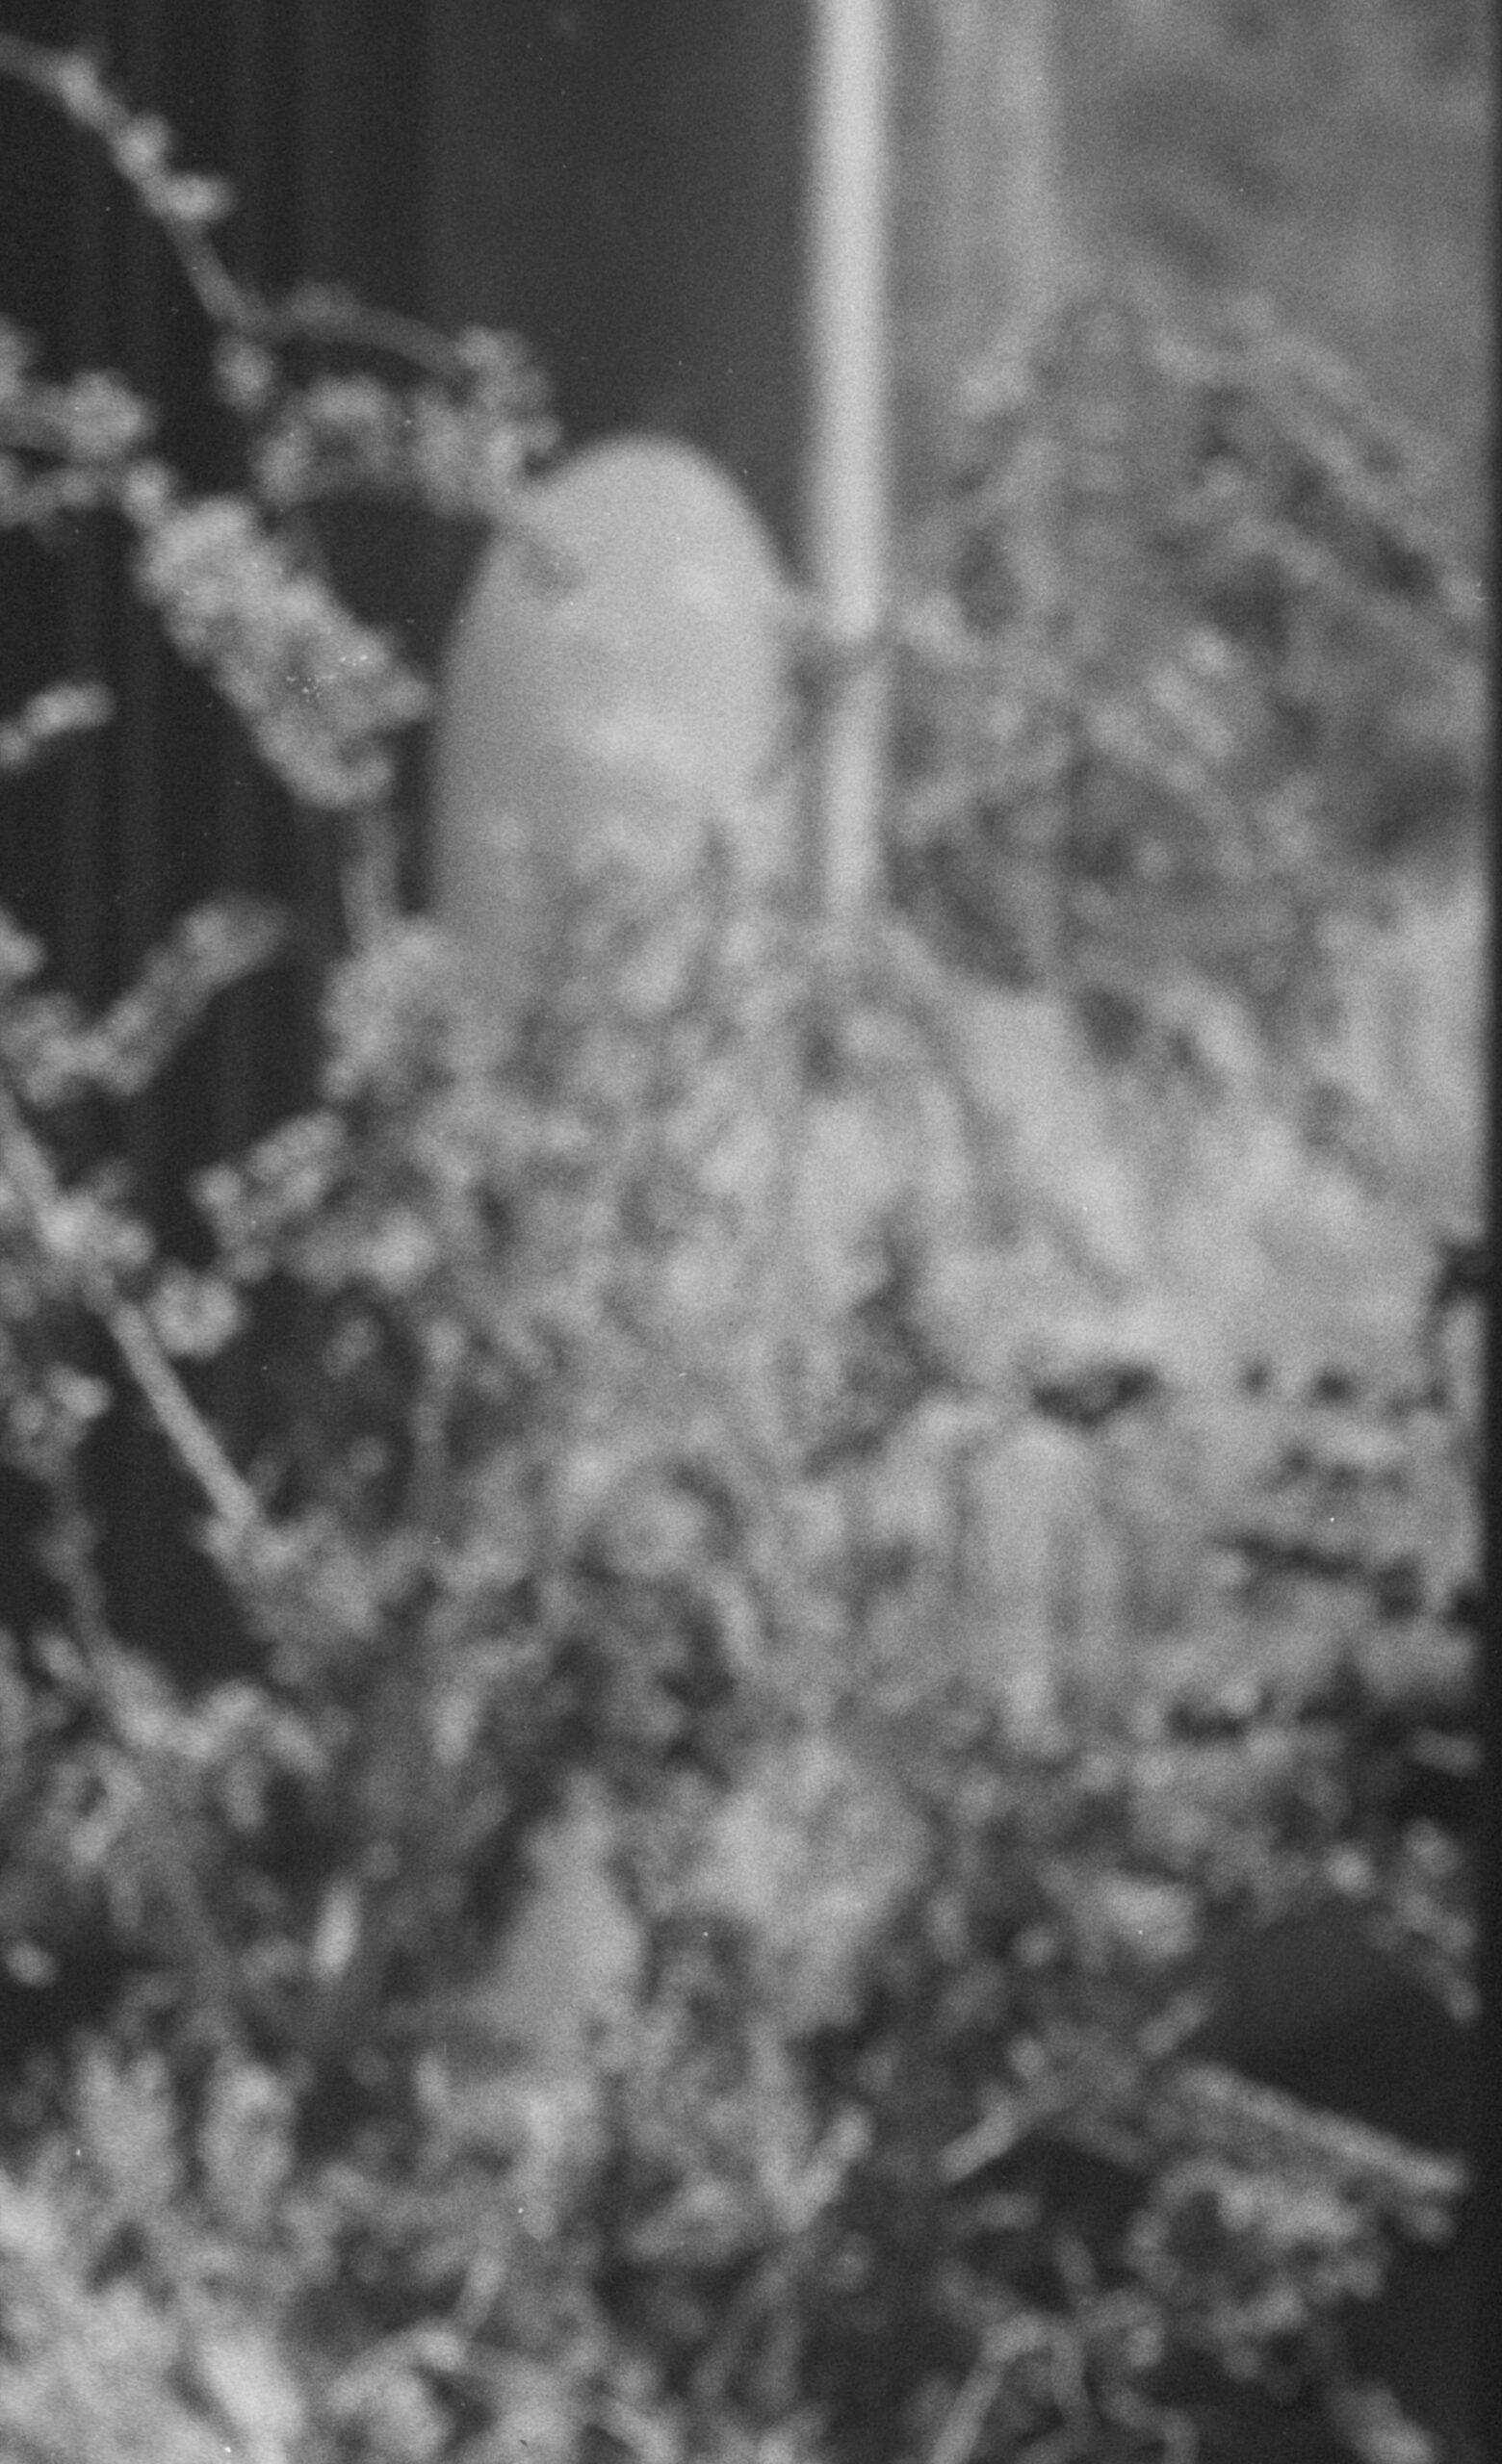
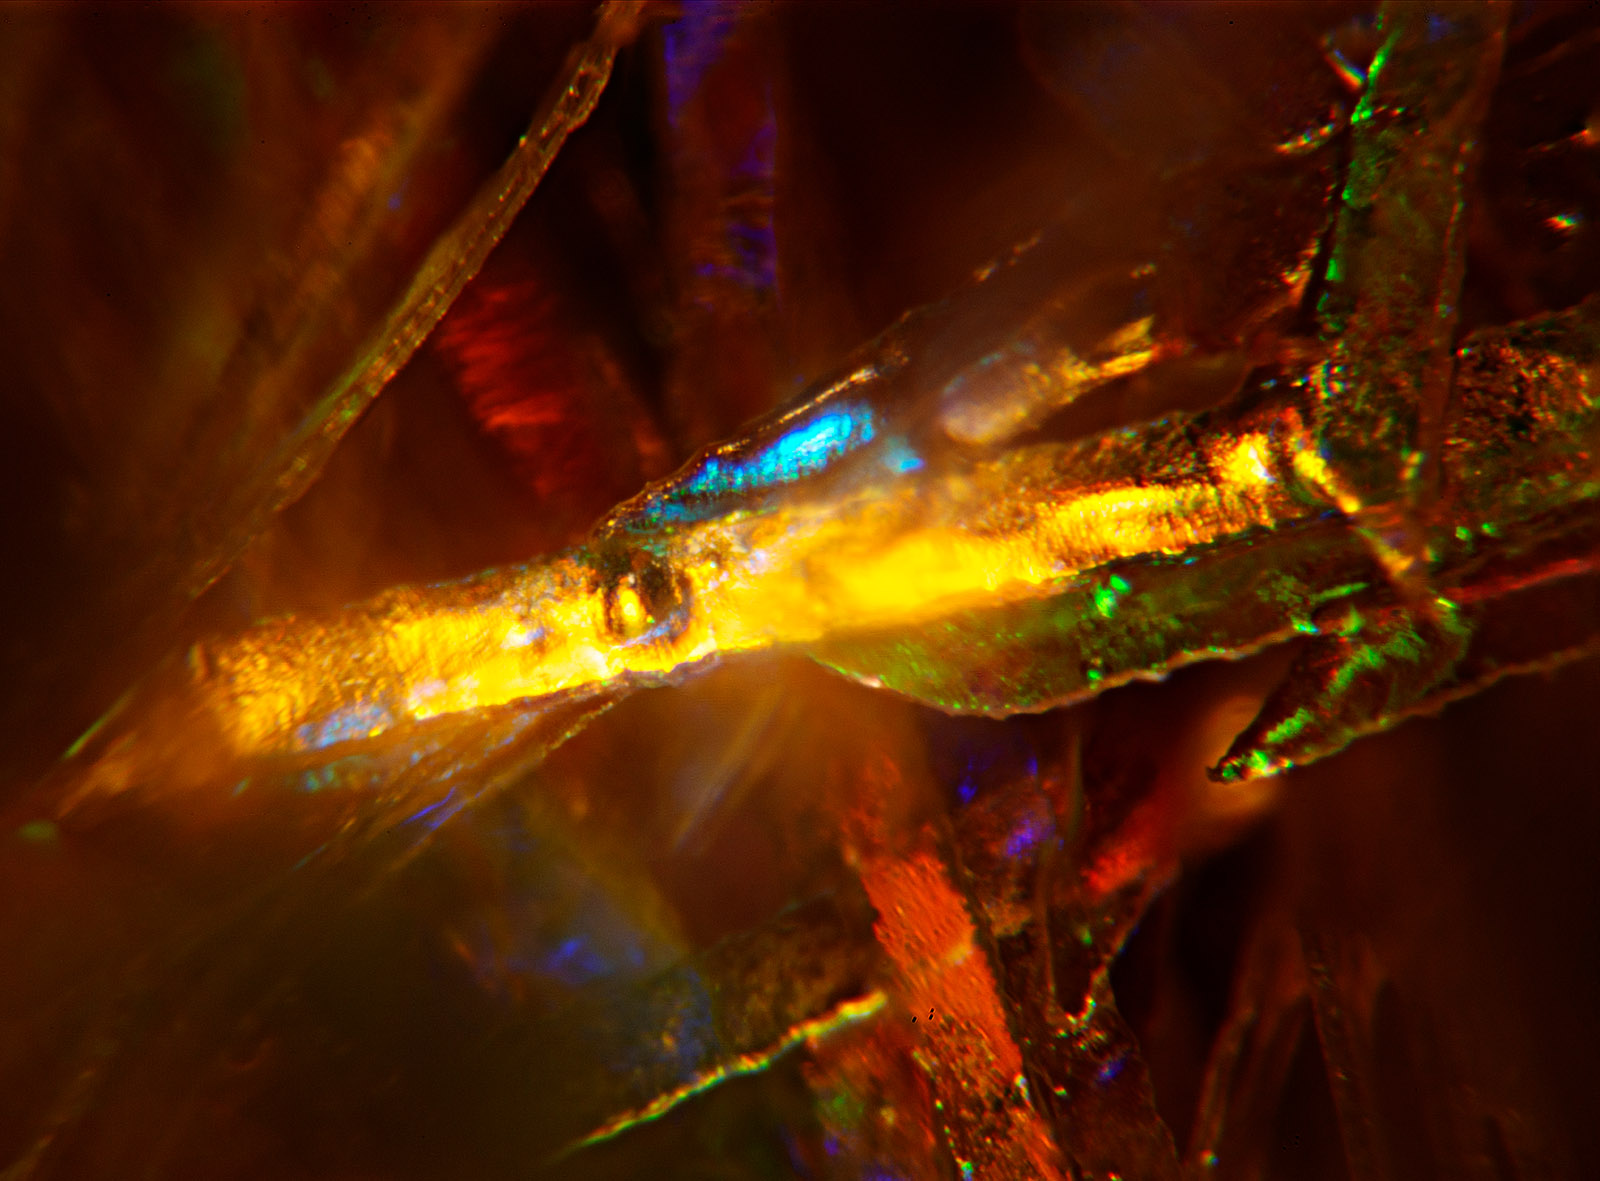
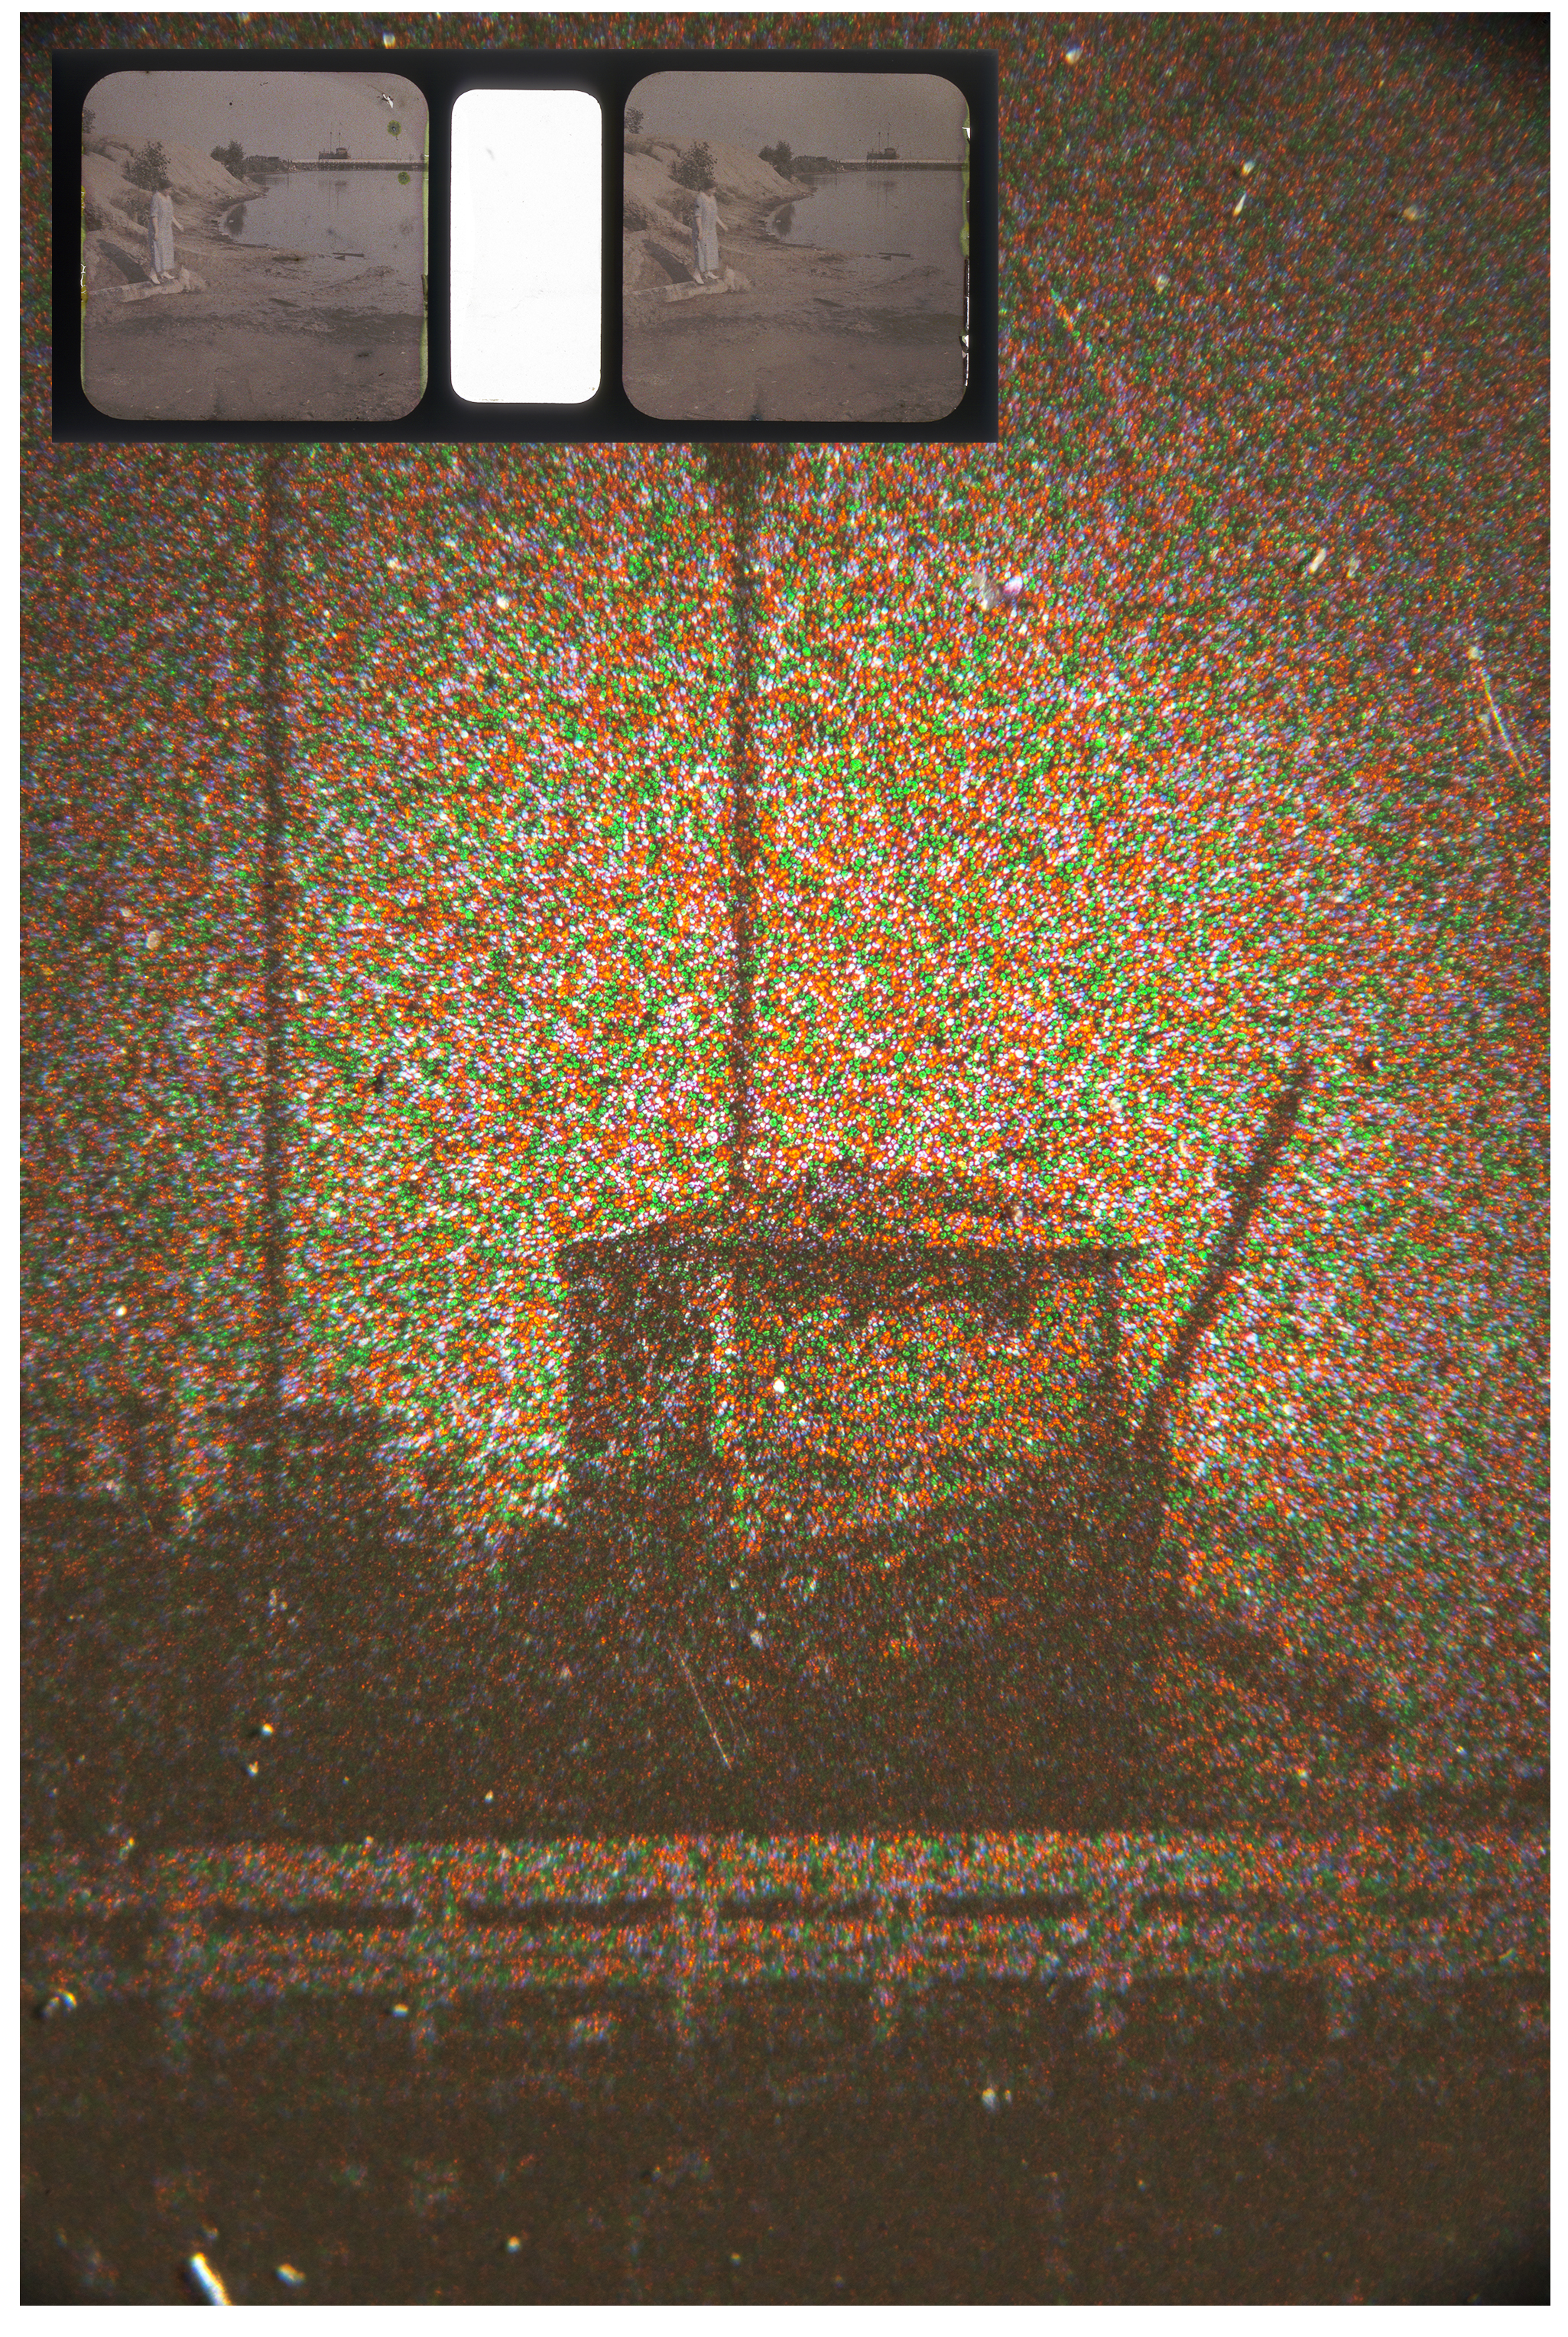
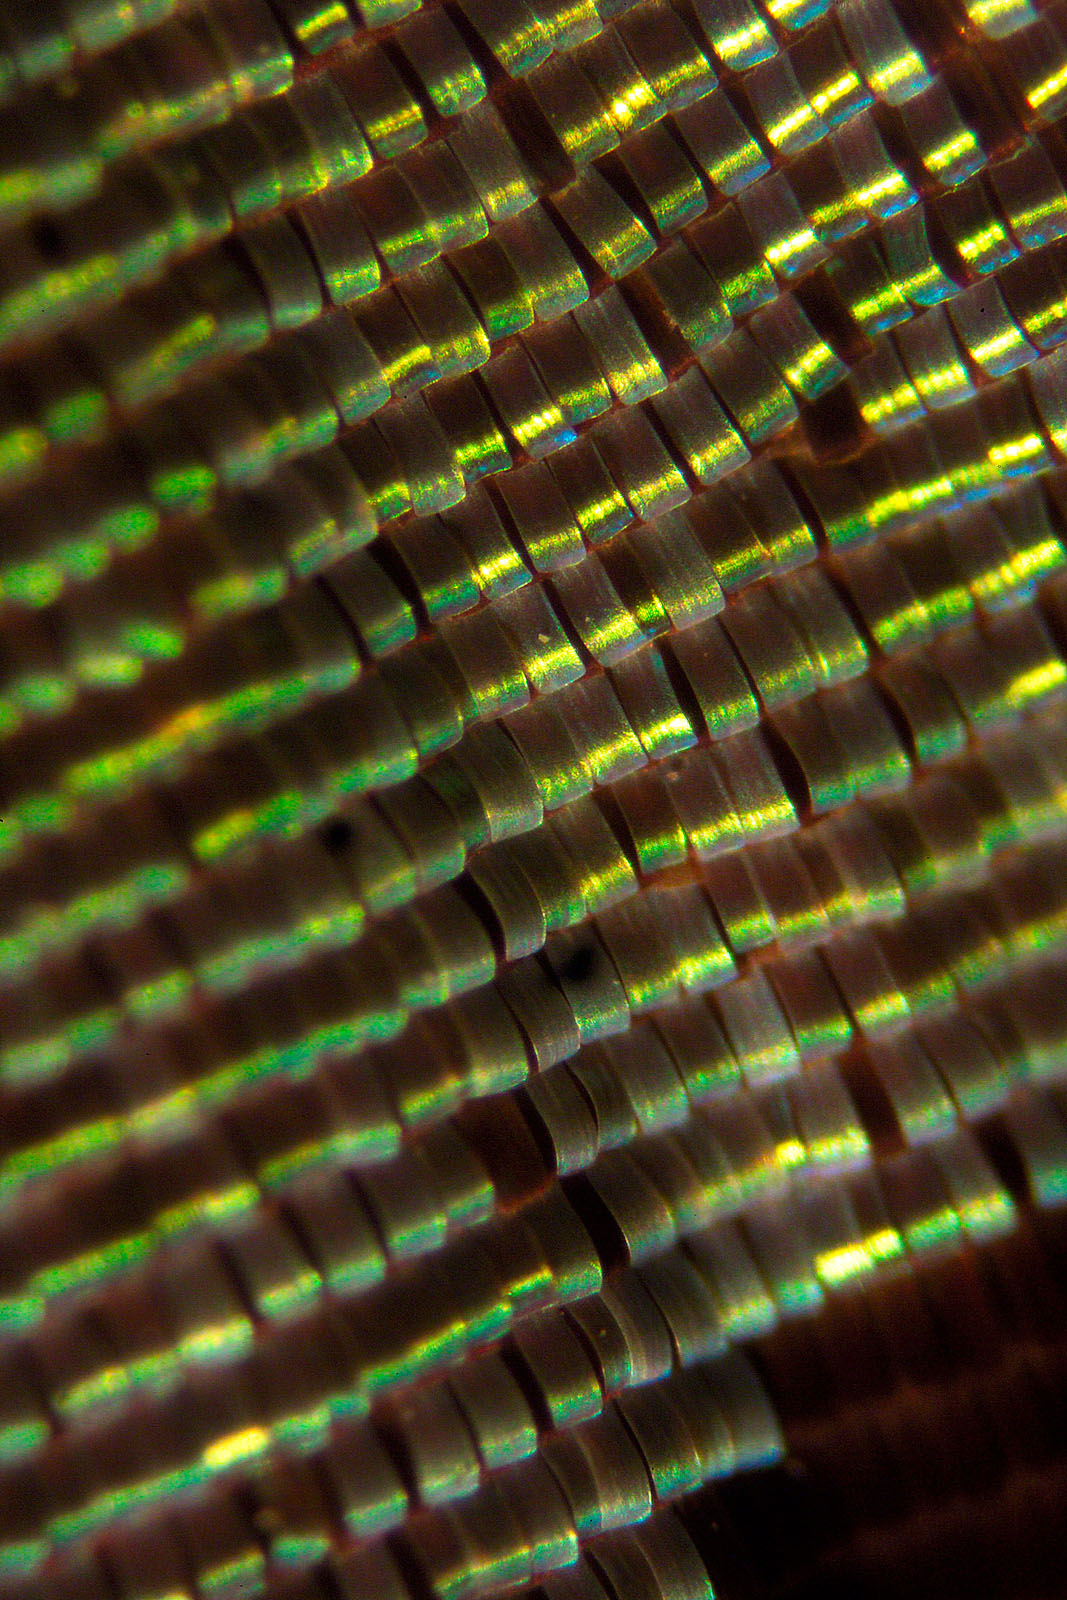
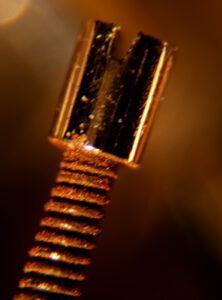
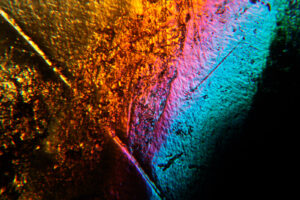
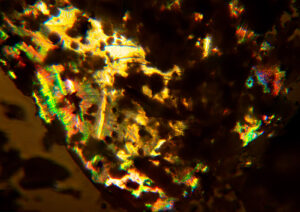
watch part  DSC2146

Macro photography is occasionally discussed in terms of where it begins and where it’s simply a close-up. I’m not sure that that’s terribly useful, but, when you are less than three feet from your subject with a more or less normal lens, you’re pretty close and it isn’t necessarily difficult to make that picture, depending upon the equipment you’re using. As you get within less than an inch of your subject it gets to be extremely difficult to shoot, and when you are within one or two millimeters of your subject, it becomes almost impossibly difficult to photograph. What I’m going to explain here is photography with the microscope, which is generally photography within less than an inch of the subject.
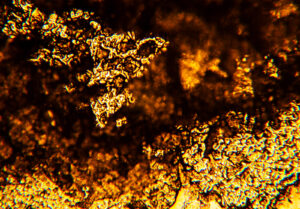
hair gel  _DSC2073

I will discuss other ways of doing close-up work in other postings. This posting is concerned with very, very close microscope work. This is not the usual way I approach this subject: in the past I’ve discussed macro photography and built up to micro and microscopic photography. That might make more sense. However, I’ve recently posted a lot of photographs made with the microscope, and so I hope that many people might be interested if I start there.
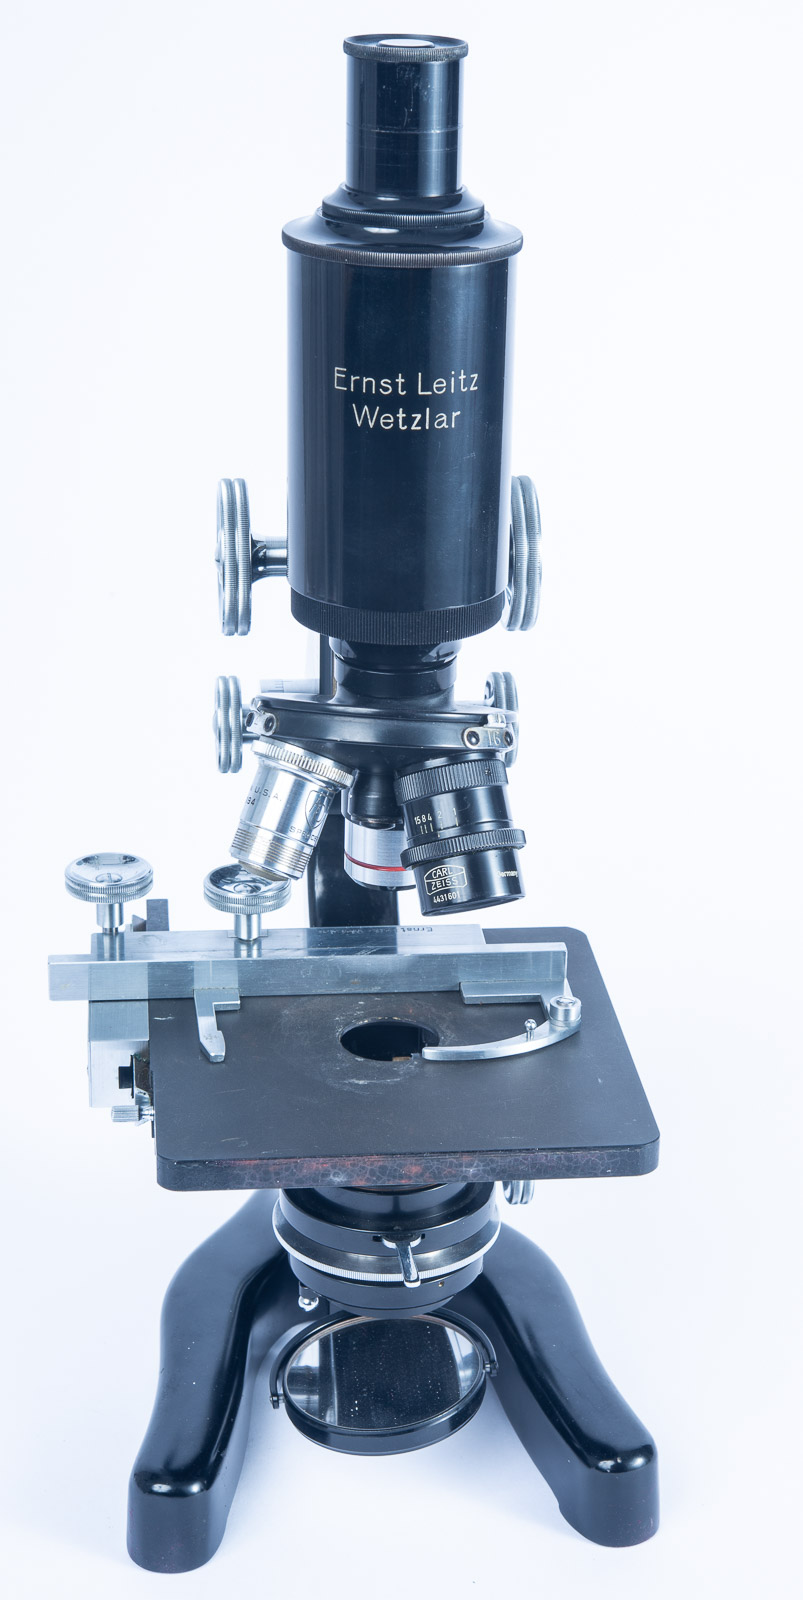
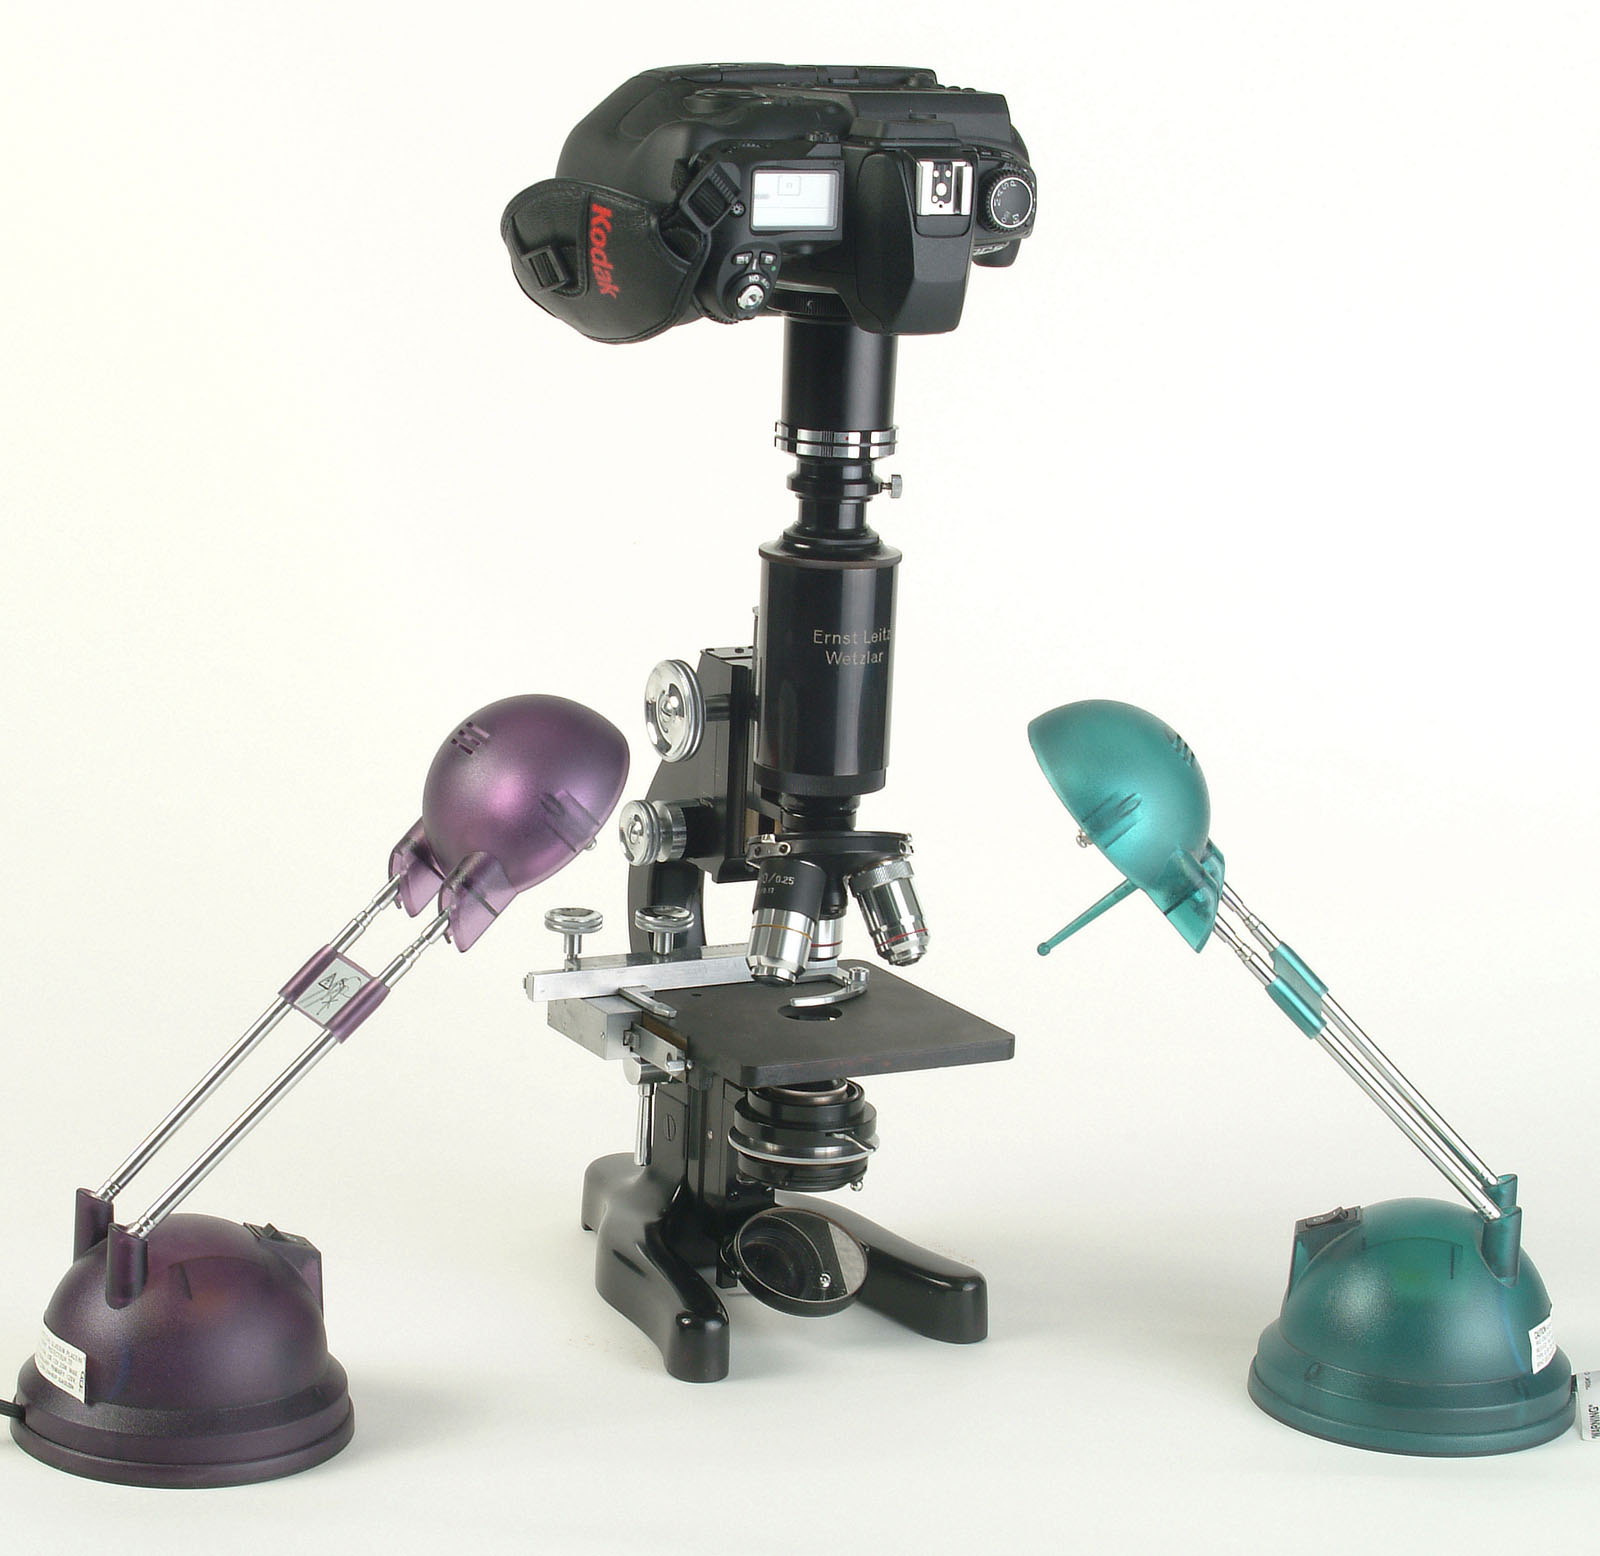
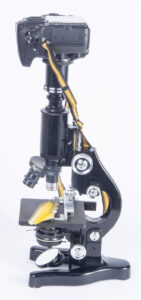
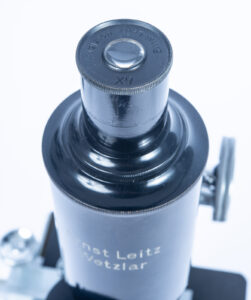
Leitz Microscope

The first thing about the microscope is to understand that the actual equipment that you need to do this kind of photography is easier to get, and less expensive, than you might think it would be. That’s important because one of the things I would hope that this discussion does is to encourage you to try this kind of micro photography or microscopy if you want to be more formal.

Leitz Microscope set-up

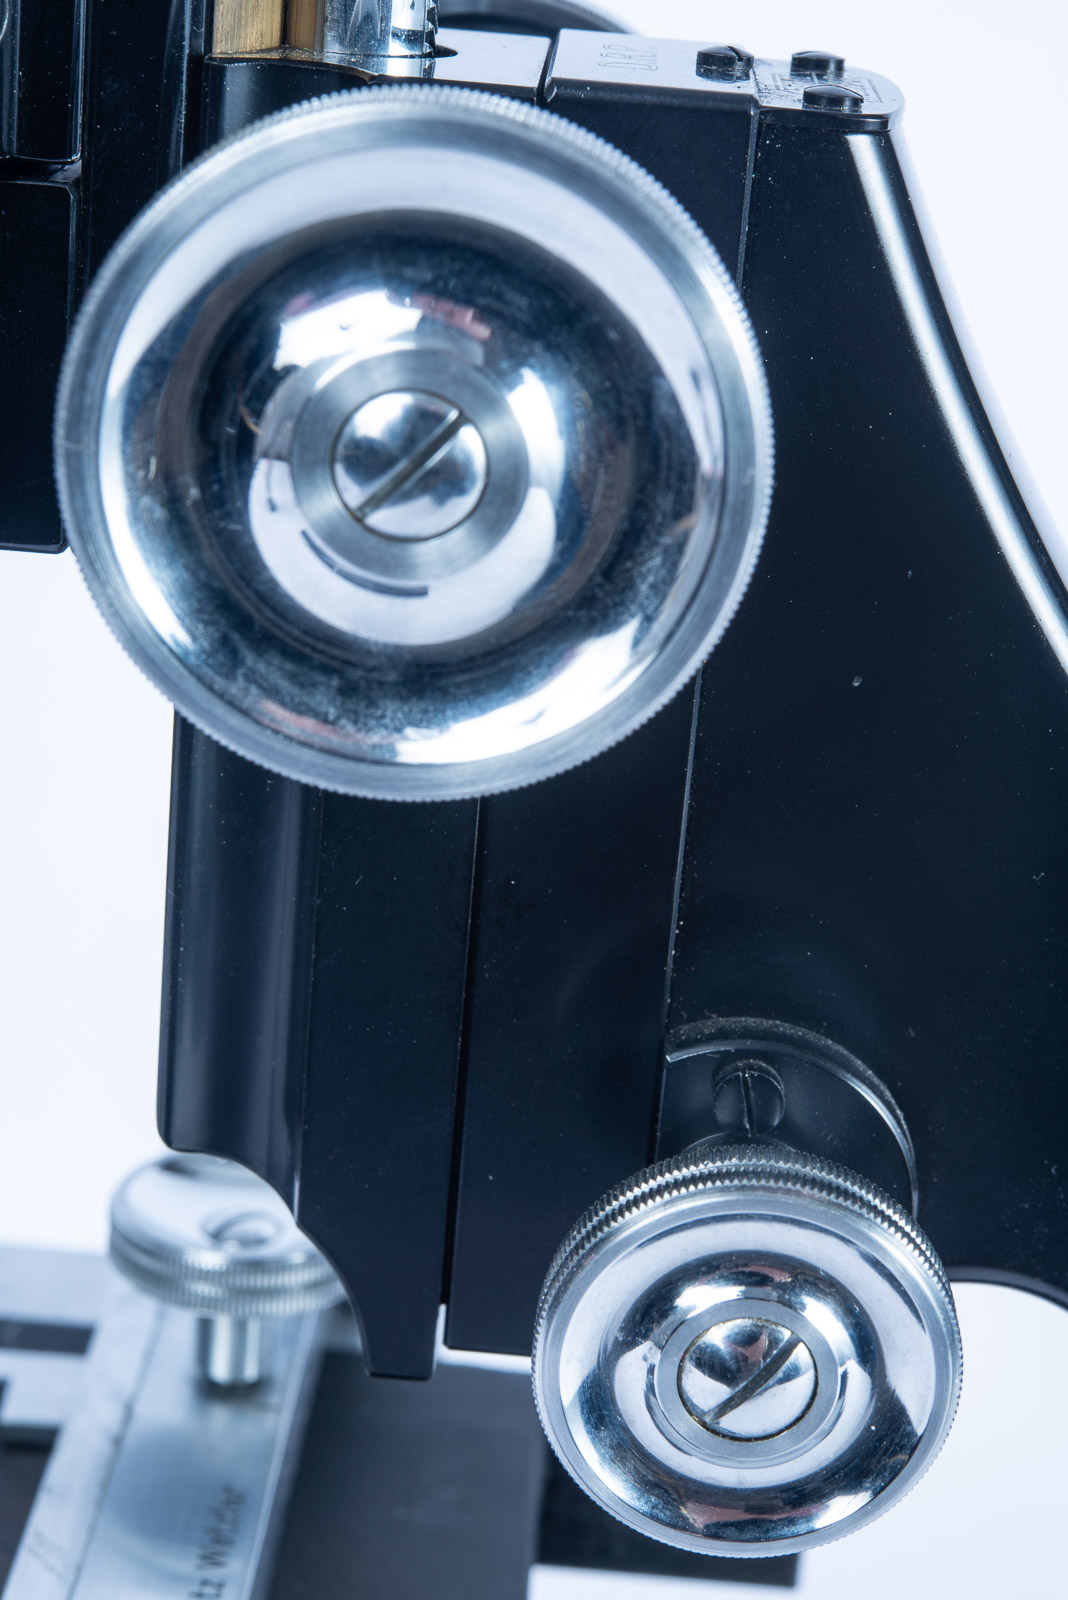
Before I write about the individual components of the camera/microscope combination, I’d like to give an overview of the set-up, from top to bottom. At the top is a digital SLR, the currently available cameras would be good for this. Next is a T-mount (more below) which connects the camera lens mount to a microscope adapter. This adapter is basically a hollow tube that fits between the camera and the eyepiece tube. The eyepiece is in the eyepiece tube, and it’s the first part for the optical system. The eyepiece tube is connected to the microscope head, where the lens or lenses are mounted. That lens is called the objective lens and it is the second part of the optical system. Below the objective lens is the stage, which is where you’ll place your subject. Under the stage there will often be an iris/condenser device, which can be used to change the quality of the light coming through the subject. Probably most scopes have a mirror below the condenser, but a few will have a light source. I think a mirror is more useful. At the bottom is the base, which is usually heavy to keep the whole thing stable.C14 The condenser, it helps to focus the light onto the subject

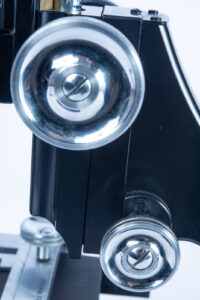
The large wheel is course focus and the small one is fine focus. They are often set up this way on modern scopes

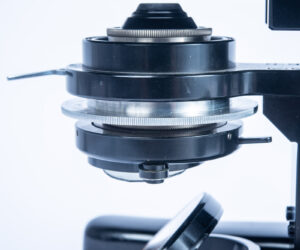
The condenser, it helps to focus the light onto the subject.

A decent student grade microscope can be had for around a hundred and fifty dollars. This will do the job. Of course, you can spend much more on a microscope, but since you are not trying to accurately reproduce pictures of cell division or tiny crystalline structures (at least I’m hoping you’re not) a student grade microscope is a good choice. A student grade scope has course focusing and fine focusing, two separate knobs. It takes standard interchangeable eyepieces and interchangeable objective lenses with a standard thread. I’ll put a link to a student scope, and the rest of the stuff, at the end of the post.

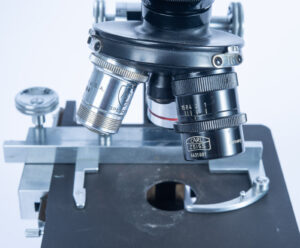
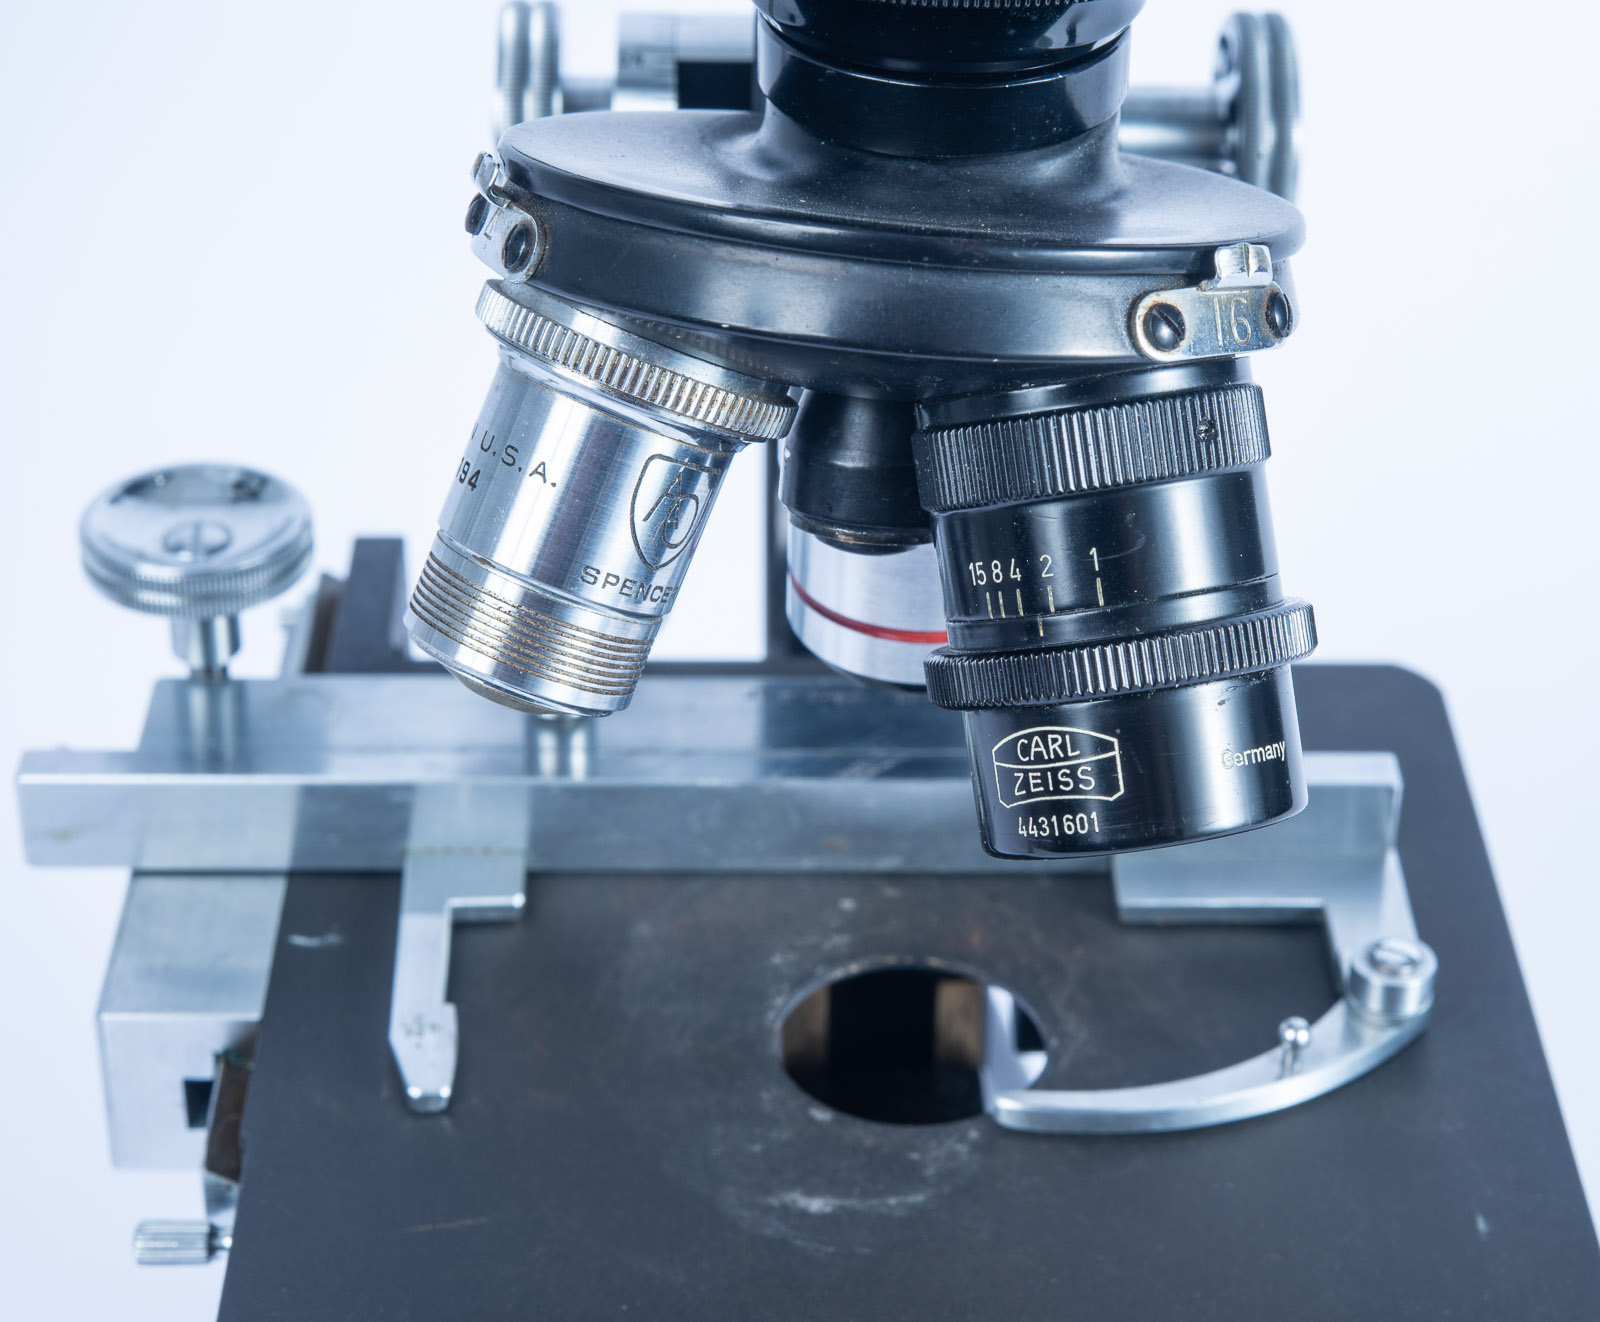
Objective lenses on Lens turret
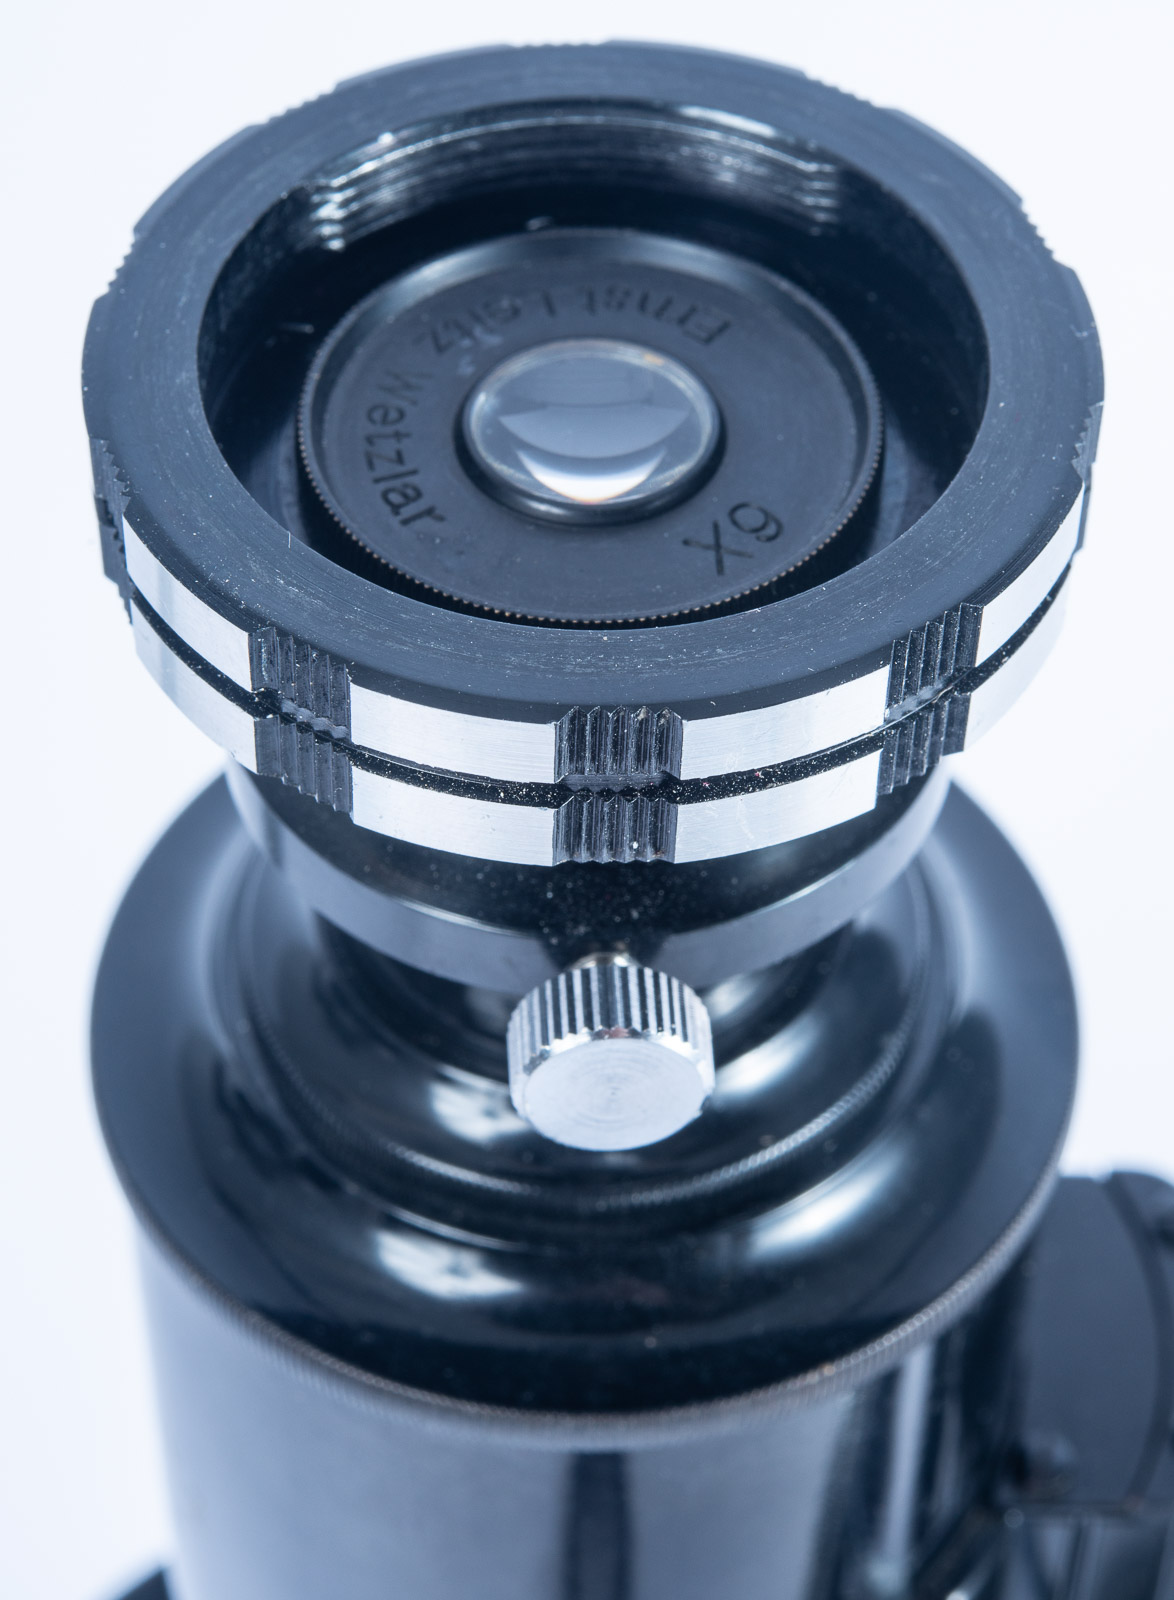
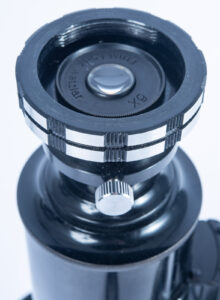
Eyepiece

In order to understand the reproduction ratio of a microscope for viewing it’s pretty simple. The eyepiece and the objective lens have numbers for their power, say 10x or 4x. Multiply the two numbers and you have the power of the system. So, if you have a 4X objective and 10X eyepiece, you would be viewing at 40 times life size, which is a nice range to work in. I’m not actually sure that this is exactly the power on your camera sensor, but whatever it is you’re damn close. When you make a print of the capture or reproduce it on your computer screen it gets larger still. So, you are frequently looking at things that may be a hundred, two hundred maybe even three hundred times life size on your computer screen, which is pretty impressive.

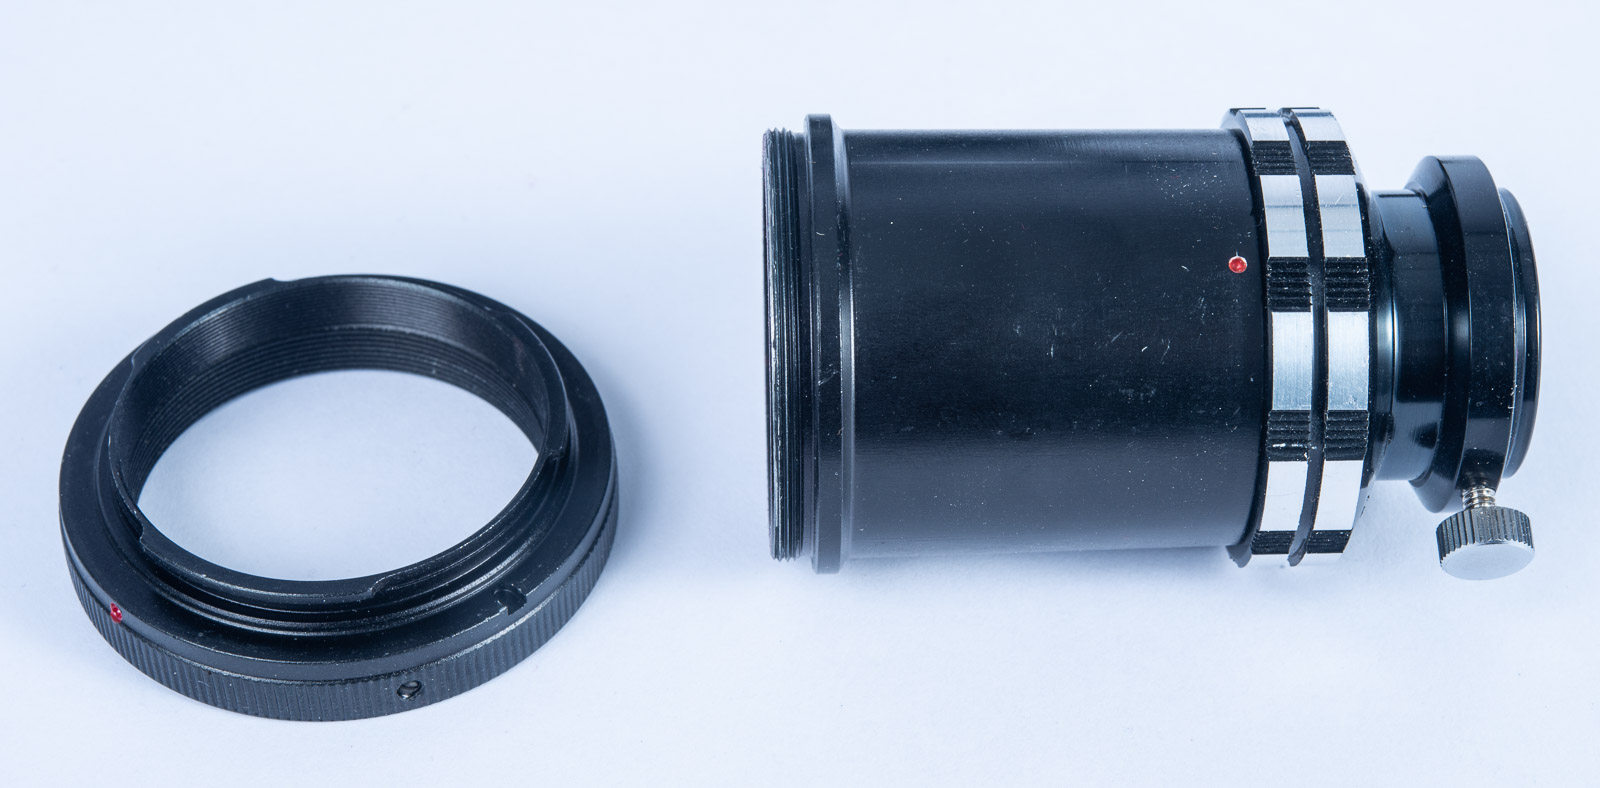
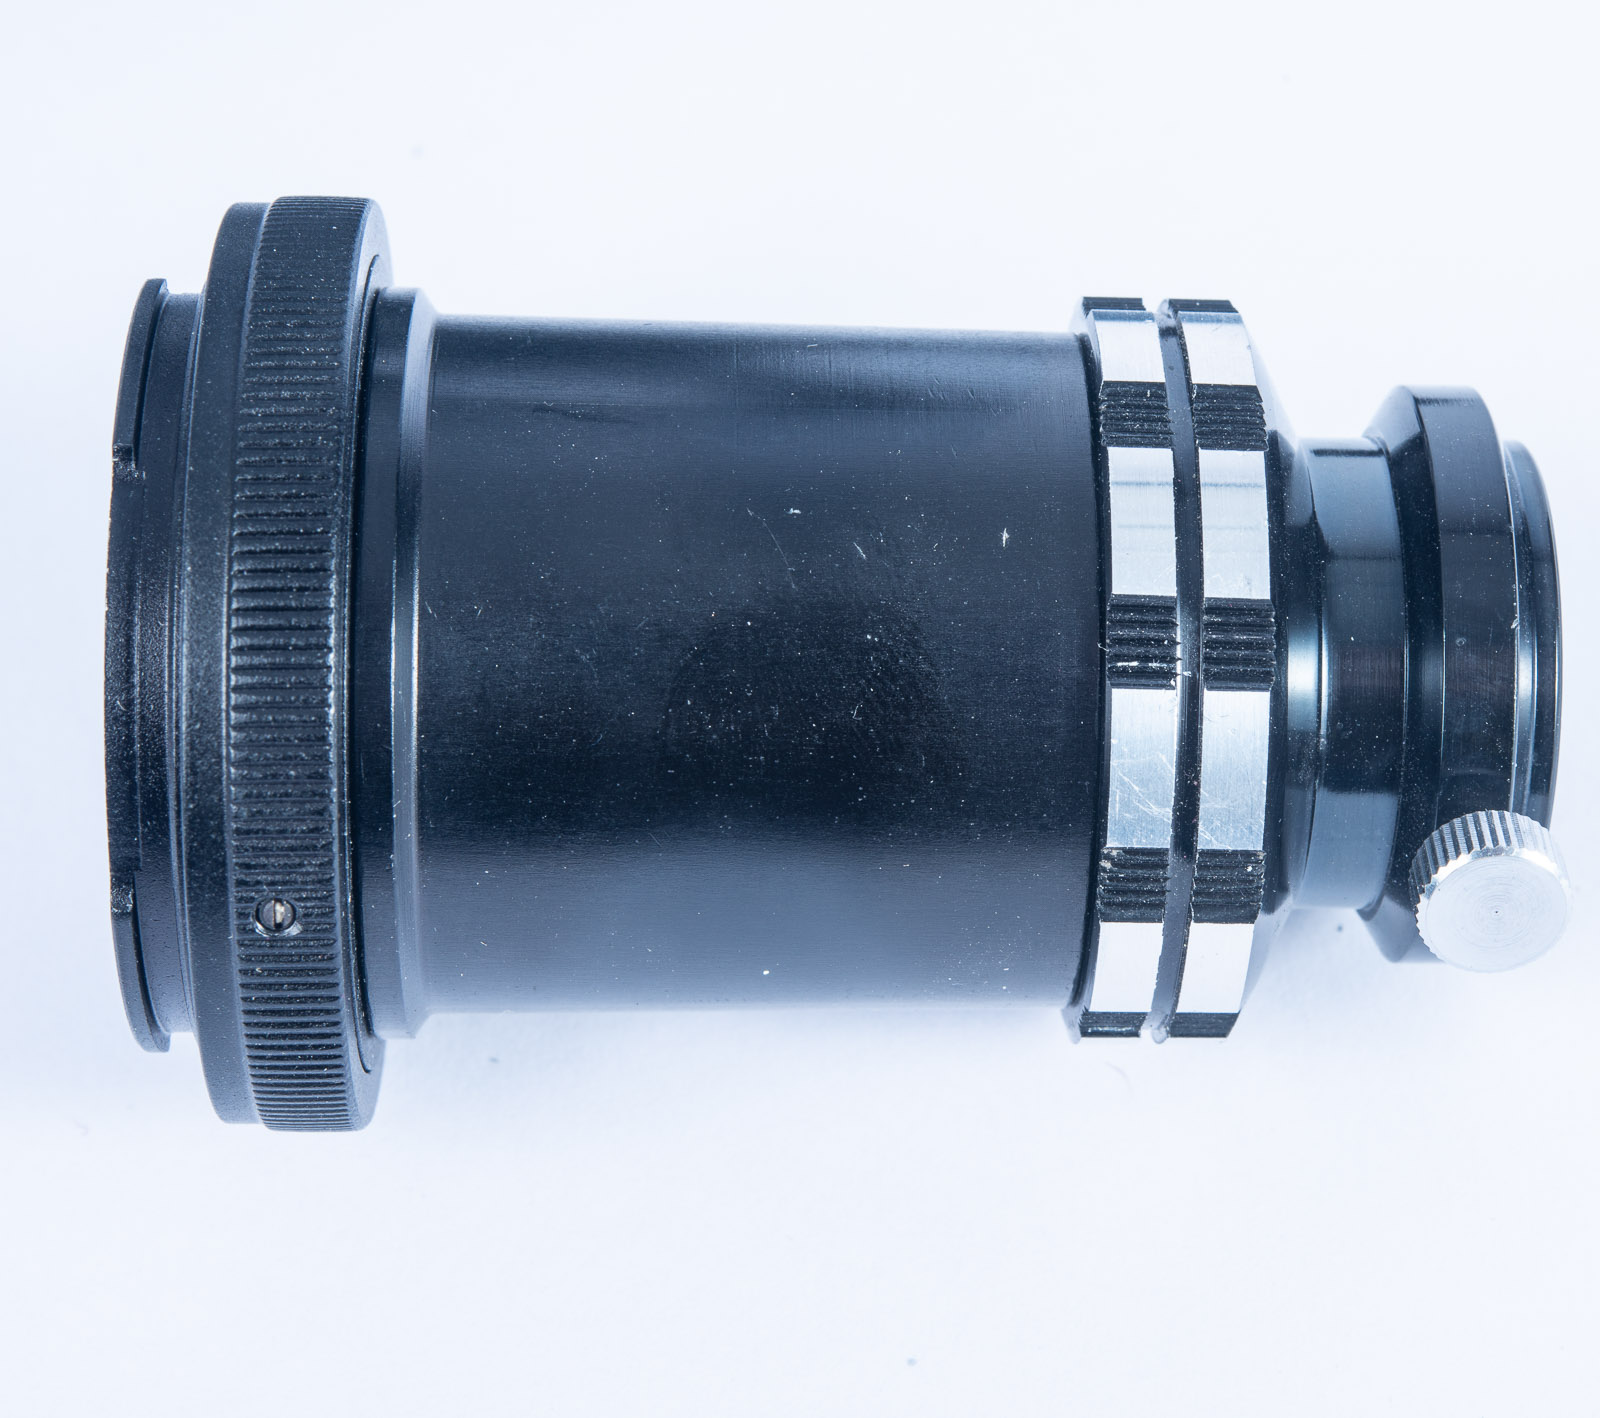
Microscope Adapter and T-mount

The adapters that you need to do this, in addition to the scope, are first a microscope adapter. This fits around the eyepiece tube on a standard microscope. Is available for less than $40. Surplus shed would be a good place to start looking for them. In addition, you will need a T-mount adapter. T-mount was an early interchangeable lens mount that is still used today. A T-mount lens could fit onto cameras with several different lens mounts, if you used the right adapter. And it remained unchanged and in use pretty much to this day. There are mounts for most current cameras, even mirrorless. T-mount is also used for telescopes and some other optical systems. You can also get old mirror lenses that use t-mount adapters. They can be a lot of fun. T-mounts are available from Surplus Shed and B&H Photo and any of a variety of suppliers.

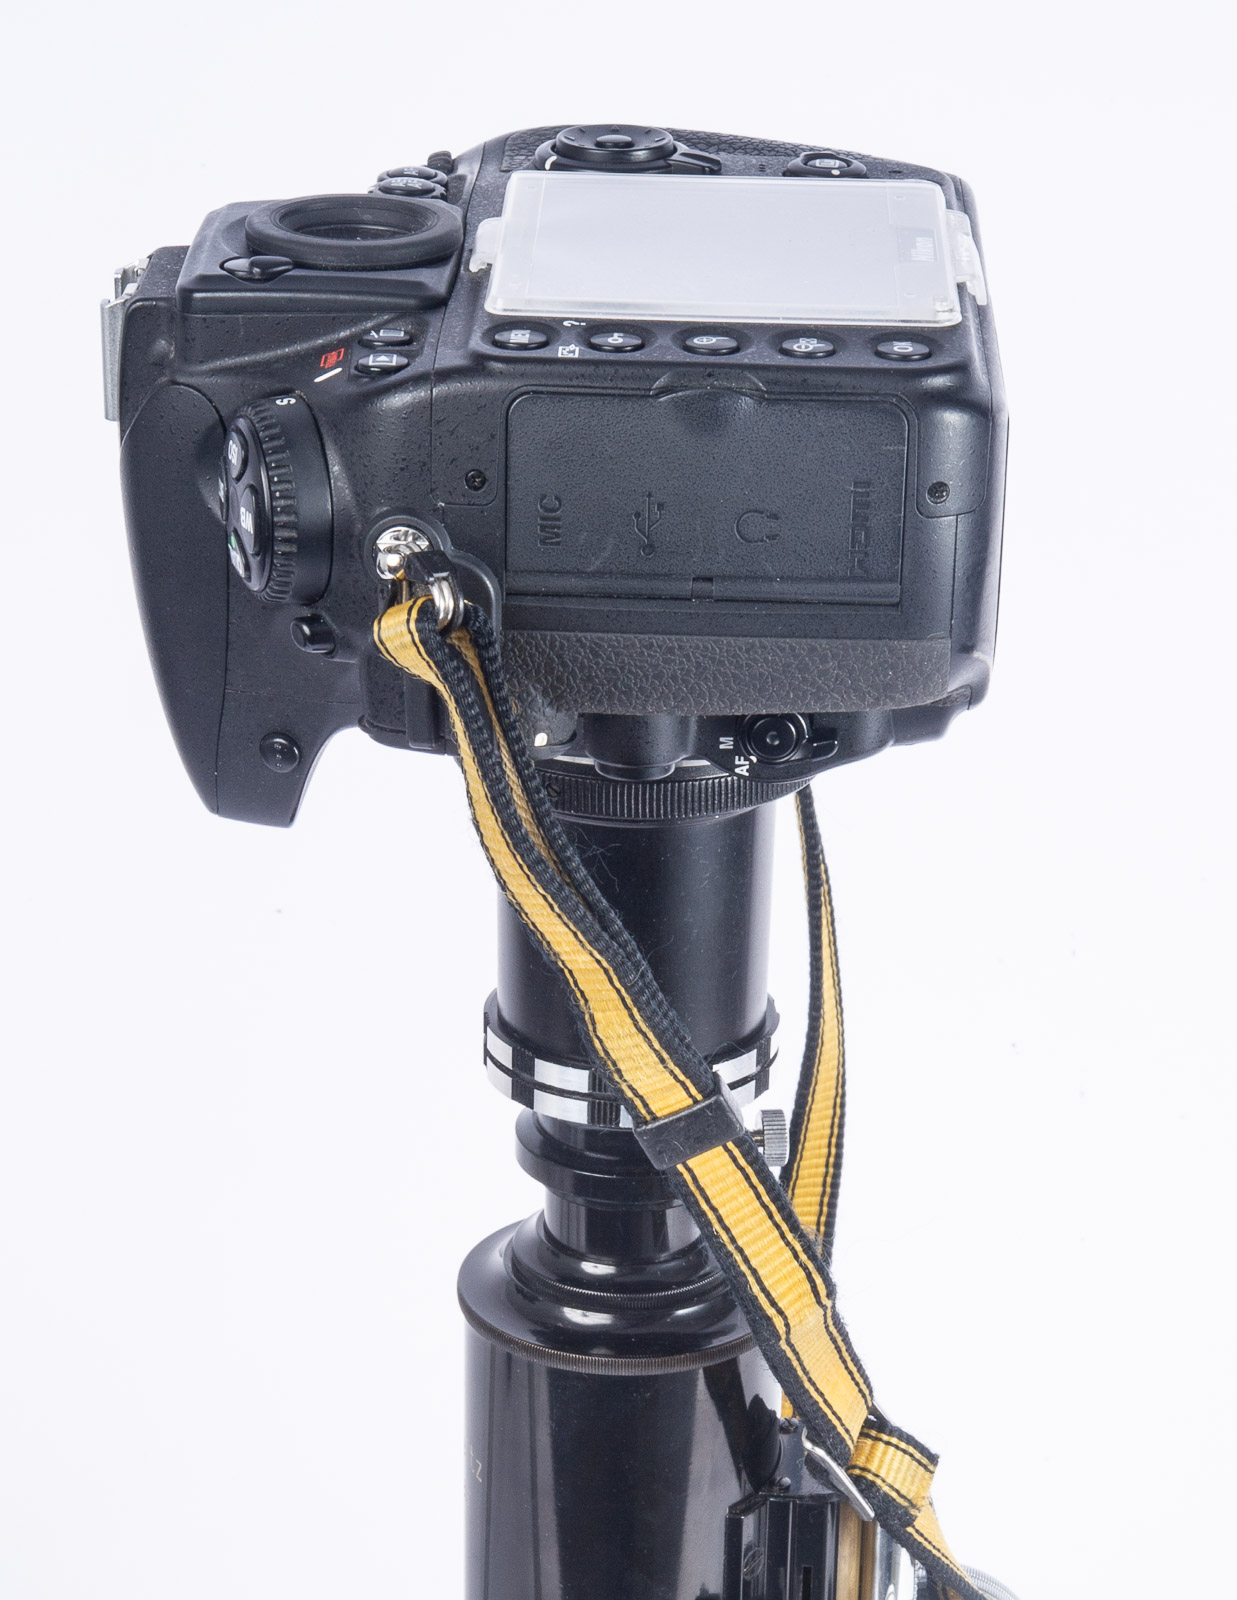
The camera on top of the scope

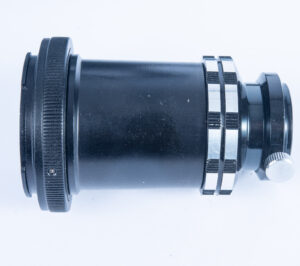
Microscope and T-mount attached. They are screwed together

The microscope adapter is two pieces. It’s easier to mount the small piece on the scope and mount the larger piece onto the camera and then put them together on top of the scope.

You should start with the microscope arranged vertically. Most of the student grade microscopes, in fact, I think all of them, will tilt backwards to make it easier to sit and view your subject. Unfortunately, if you mount your camera on the microscope in this way, it will probably fall off the microscope and that would be a bad thing. So, you’ll set up the microscope vertically. Important safety tip. It is also very important to set the camera to use the self-timer. If you trigger the camera directly with the shutter release you will shake the camera and get fuzzy pictures. You could also use a remote release, but the self-timer works very well for microscope work.

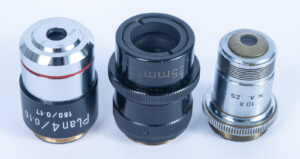
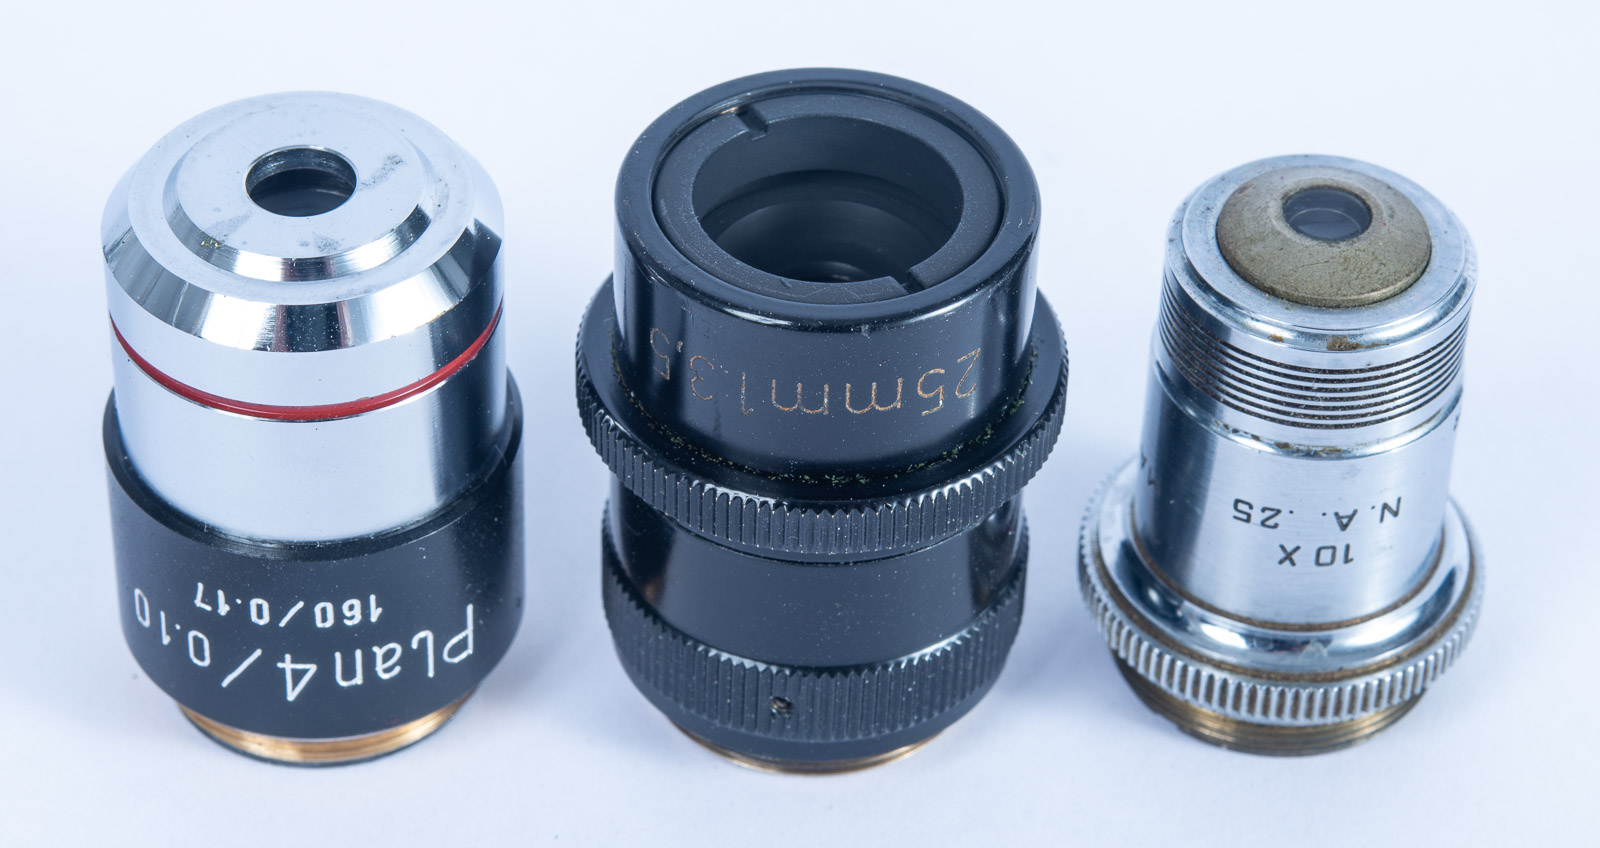
Microscope lenses- Shown are a 4X Plan, a 25mm Zeiss Luminar and a Spencer 10X. This is the group I’ll usually put onto the scope.

I would always start with a 4X objective lens. I say this because one of the problems that you’ll get into, as I mentioned earlier, is the closer you get to your subject the more difficult it is to manage taking a picture of the subject. With a 4X objective lens, the lens will end up being between a quarter and three-quarters of an inch from your subject. That gives you just enough room to light the subject from above. It also gives you room to put a filter on the lens; it gives you room to do a whole lot of things. A 10X lens will be less than 3 millimeters from your subject, which makes it impossible, or close to impossible, to light your subject from above. You’ll only be able to work with transparent subjects with the 10X or more powerful lens. It’s more difficult to manage the focusing or positioning with the 10X lens. When a professional microscopist uses a 100X lens she/he will usually add oil to the top of the subject and then put the lens into the oil. There’s less reflectivity if you do this. You would only be able to photograph transparent subjects with light transmitted from below the stage. I have not tried to do this, and, unless I find some transparent subject that seems absolutely compelling to me, I am unlikely to try it in the future.

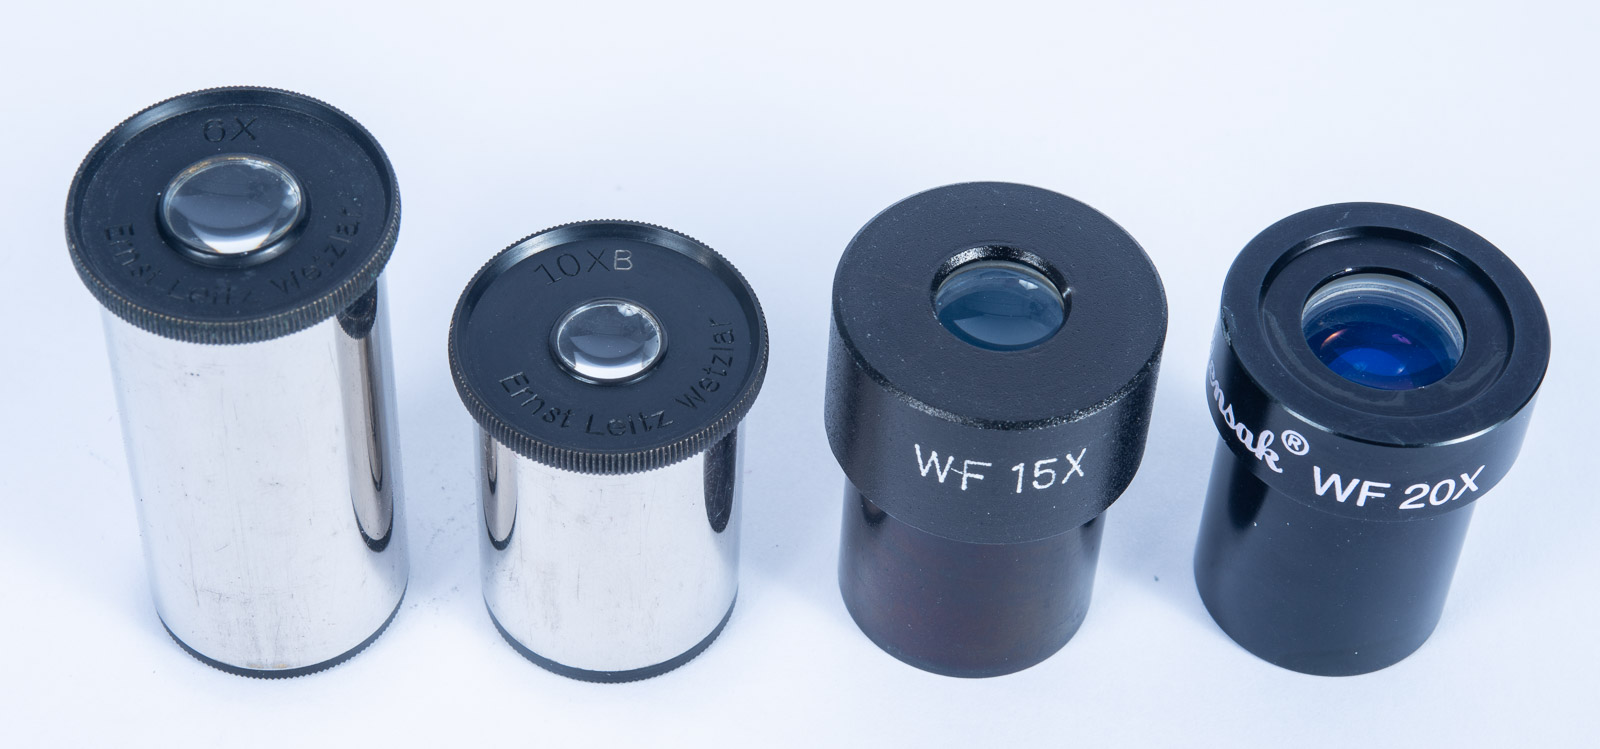
Eyepieces, Shown are a Leitz 6x and 10X and a Wollensak 15X and 20X

One of the things that may not come with a student-grade microscope is multiple eyepieces. And this is one of the things that you might very much want for photo microscopy such as I do. Since it’s so difficult to use more powerful objective lenses, you may find yourself wanting to change the eyepiece to change the power of the scope. Eye pieces come in a variety of strengths. I own a 4X eyepiece, a 10x eyepiece, a 15x eyepiece and a 20x eyepiece, which gives me some variety of reproduction powers. Surplus shed carries a number of different eyepieces and they would be a good place to start looking for eyepieces. A student grade microscope usually comes with a 10X eyepiece and that is a good place to start. Neither standard eyepieces or objective lenses are terribly expensive, compared to camera lenses. There are some special purpose objective lenses if you’d like an upgrade. If you find a PLAN objective lens it will be sharper than the lenses that come with most scopes. The biggest difference might be that an inexpensive objective lens will be more likely to be fuzzy at the sides of your image.
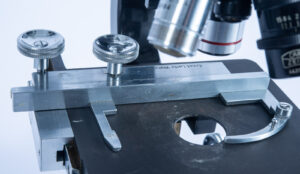
Geared stage

Most student microscopes have clips which will hold down a regular microscope slide. Then you position the slide, or other subject by moving it with your fingers under the scope. This is the biggest problem with inexpensive microscopes. Better scopes have a geared stage to move the subject around under the scope. If you really enjoy photo microscopy you might want to get a scope which has gears to control the position of the subject.

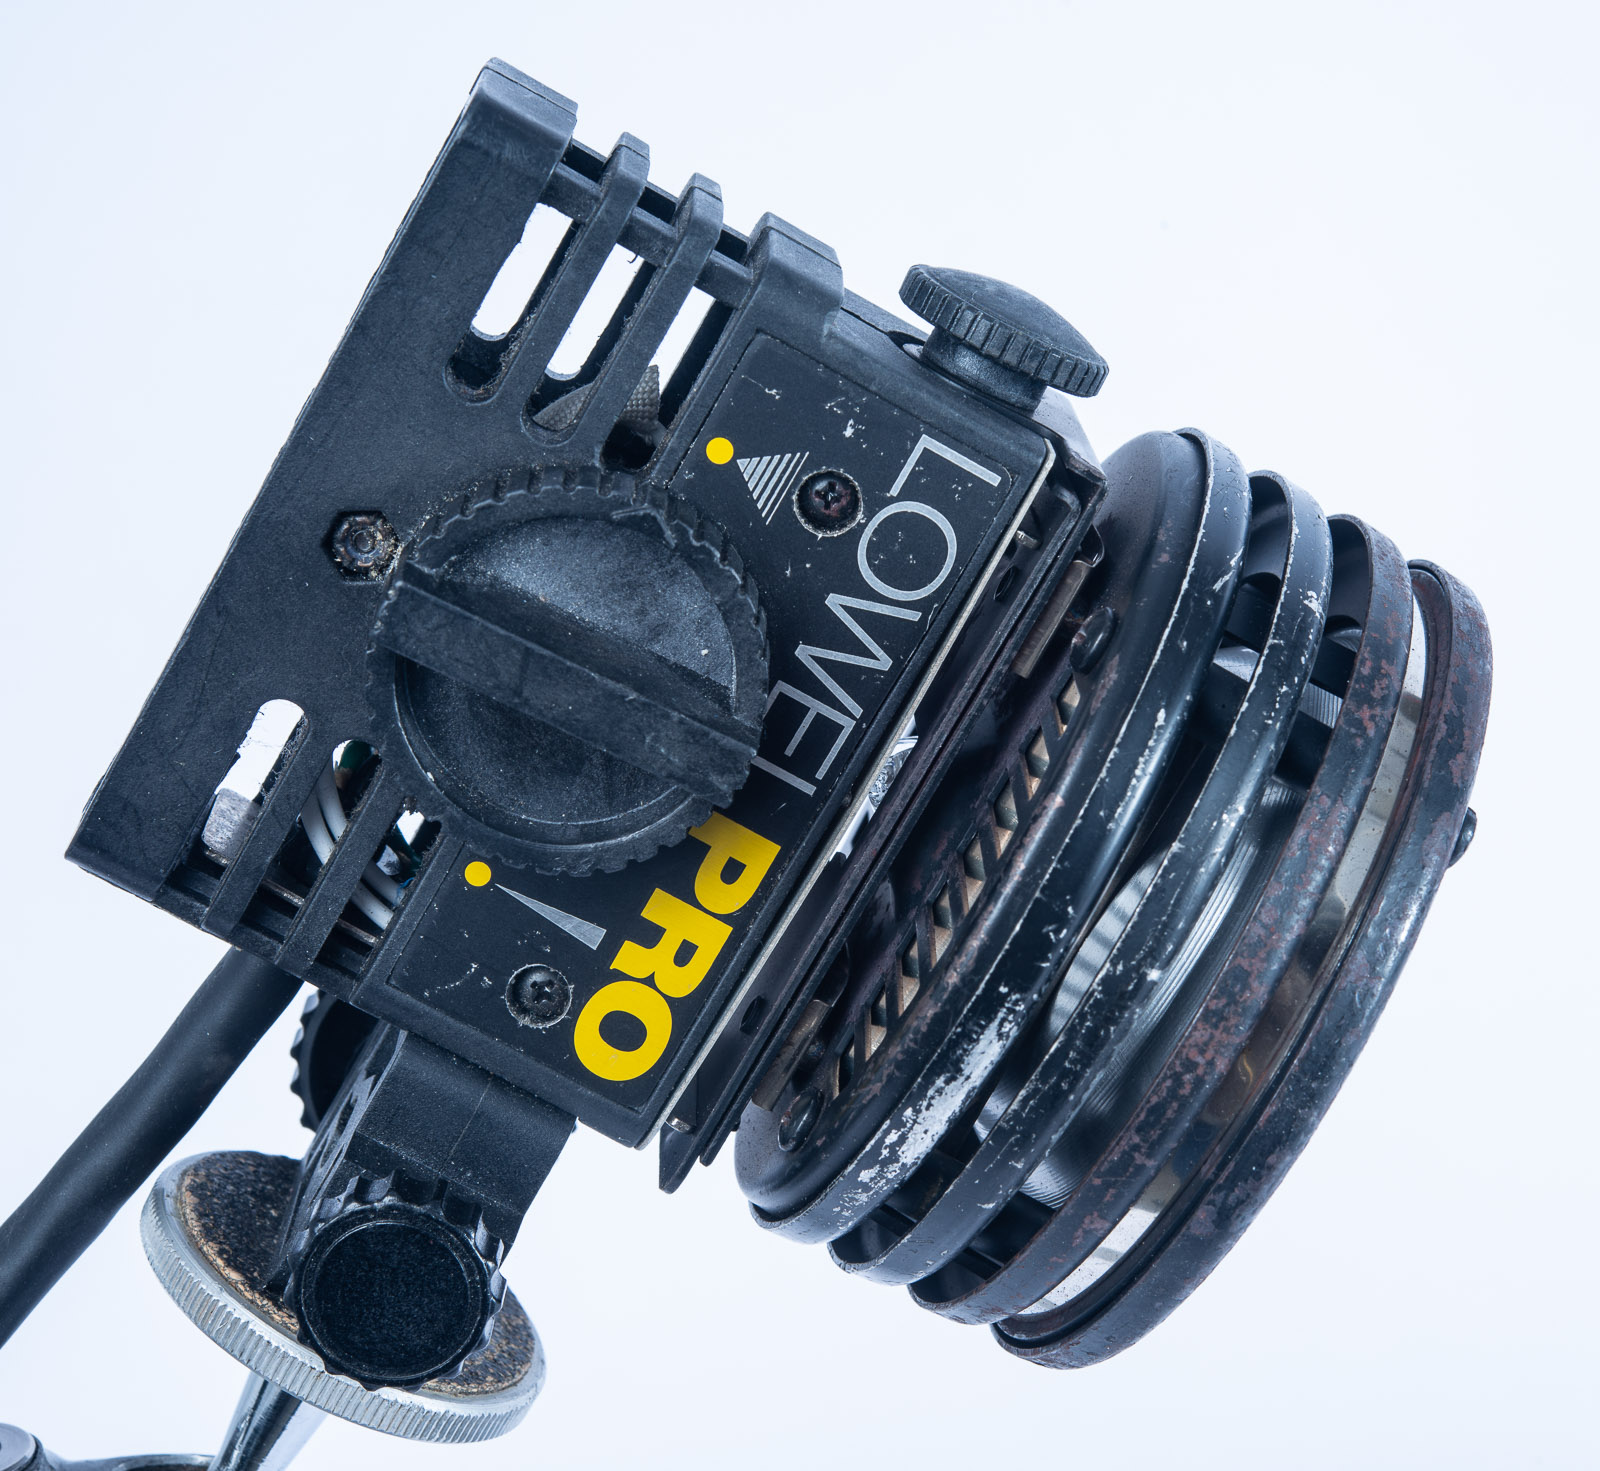
Lowell Pro light with Barn Doors
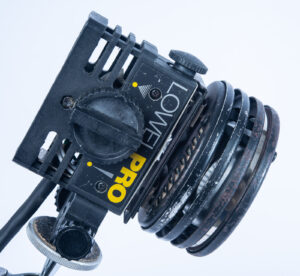
Lowel Pro light

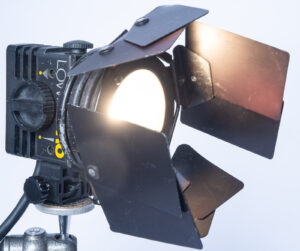
The next thing you will need is a light source. Most student-grade microscopes and in fact most fancy microscopes only have a mirror below the lens. Most scopes also have a condenser between the mirror and the stage which changes the spread of the light that you’re using. I find that the condenser is not terribly useful to the way I approach microscopy, but you may find it helpful. Some student grade microscopes will not have a condenser. The actual light source that you use can be something as simple as a desk lamp or even the room light. And that will work very acceptably for an awful lot of work that you might do with the microscope. Look for a lamp that has a continuous spectrum or perhaps an LED light source. Stay away from fluorescent light sources because the spectrum can make it very difficult to get a true color reproduction or can change the color reproductions in unexpected ways. I find that I rarely look for accurate color in micro photography, especially because the images aren’t things we can usually see with the unaided eye. Often, I will use the 3200º Kelvin quartz light and either not compensate for the warm color shift of compensate in Adobe RAW when I open the image. A small light source gives you more control than a broad light source. At this point I am using a Lowel PRO quartz light, which provides much more light than any desk lamp. I like this a lot, but it’s not available new, there are generally several of them on eBay pretty inexpensively. Lowel still makes several more powerful quartz lights, like the Lowel Omni or Tota quartz light but these might be too hot for microscope work (they do get extremely hot).  A bright light source is especially important when I start to filter or modify the light because I will still have enough light to actually see the subject. Even without a filter it’s dark through a microscope; more so when the light has to go through the camera and into the viewfinder, after it leaves the microscope eyepiece. The next problem is to position the light source. The Lowel PRO quartz light can be attached to a regular light stand mount or it can be attached to a tripod mount. This enables you to use a ball head or another tripod head to position your lamp in relationship to your subject. This light also has barn doors which give you more control over the light. You can also move the microscope mirror which will help position the light; that is if you are lighting your subject from bellow. If you’re using a 4x objective lens you can also light a subject from above, which makes positioning the Lowel PRO light with a tripod head even more helpful. You can also use a strobe to light, even a dedicated camera flash. This can increase sharpness, because camera shake can be a problem, BUT, it’s very difficult to be sure what your subject will look like when you take the picture. Also, you’ll still need a bright light to focus.

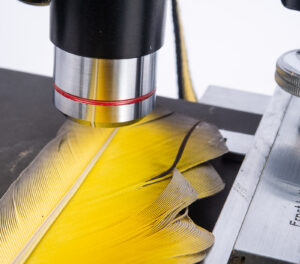
The 4X lens focused on a feather. You have a good amount of room between the lens and the subject.

If you are using the 4X objective lens you will find that most of the focusing can be achieved with the course focus wheel on your scope. The fine focus wheel is useful when you try to use that 10X lens. You will also find that the objective lens will stay at about the same distance from you subjects, so if you get a sense of that distance you can set the scope at about the right distance before you look through the camera. Your actual focus is achieved by looking through the camera viewfinder. Since your microscope is set up vertically, it may help to place the scope on a low table or get something to help you stand above the scope. As you might imagine depth of field, holding things at different distances form the lens in acceptable focus, doesn’t really exist with microscopes. With few exceptions, notably Zeiss Luminar lenses, microscope lenses do not have diaphragms, so there is no way to adjust depth of field, that is if you had any… What you can do is use Photoshop to do focus stacking. In order to do this, you need to take a several pictures at different focus points. Photoshop will enable you to combine these images into a single image with better focus. This can be a very helpful technique. While it is outside the scope of this particular post you will find that there are plenty of tutorials on line. Or, you could wait for me to do a post about modifying micro images in Photoshop. If you do take images for photo stacking, you’ll want to take them at the same exposure.

Image without focus stacking

Image with focus stacking DSC2130

When I first worked with high magnification optical systems exposure was very difficult to calculate. I had to compensate for long bellows extension on the view camera as well as reciprocity failure form the long exposure times. It is still astonishing to me how much easier it is to get a great exposure with a digital camera. If you set your camera on aperture preferred, you’ll get a good exposure. You may want to add exposure compensation correction, if you want a darker or lighter exposure. You might want to see what an image looks like at different settings, just to get a better feel for how you can interpret your subject. Of course, you can also do a lot of interpretation after you capture the image in photoshop. These changes in exposure calculation are perhaps the biggest improvement in micro photography that I’ve seen in 40 years. The massive improvement in the amount of information that a sensor records, compared to 35mm film, is also very significant. I used to do micro photography with large format cameras and transparency film, which was really quite difficult.
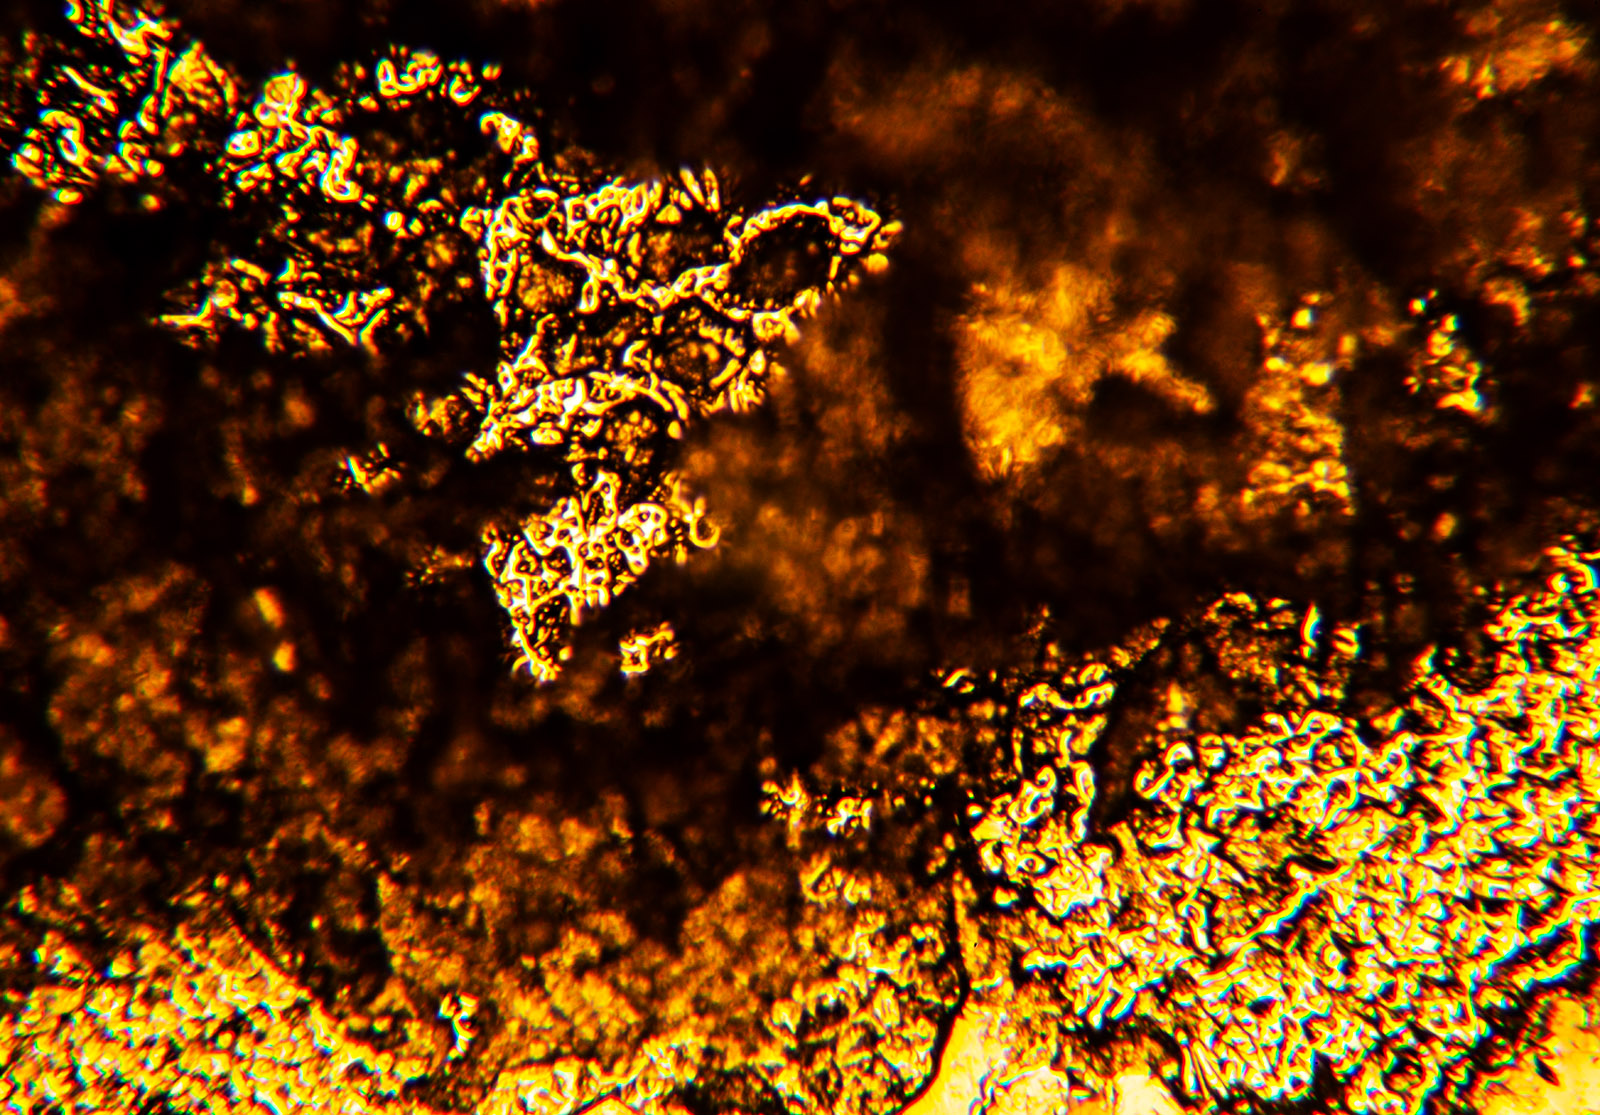
Sodium Thiosulfate

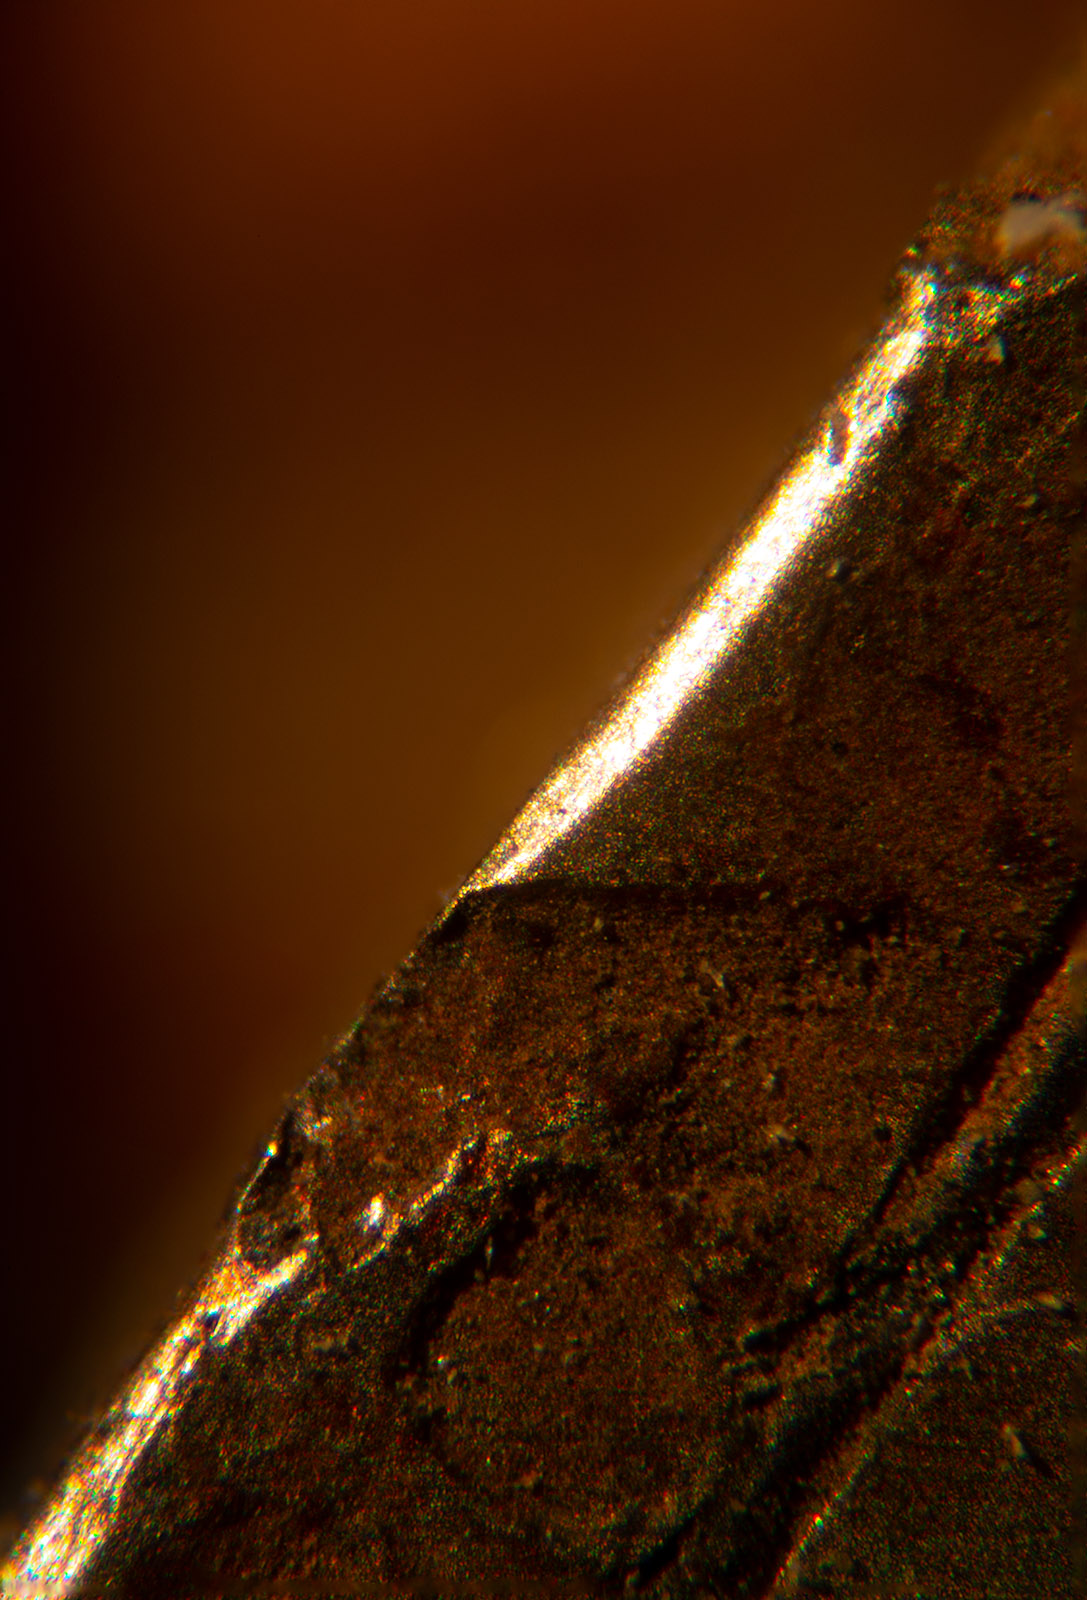
As you look at the pictures of the set-up and the various tools I use, you might want to begin thinking about subjects. I’ve recently done some nice work with old watches and some shiny goo meant for hair. Jerome Russel used to be a client and they made some very shiny hair care products with glitter and other reflective materials. I’ve included shots of both here.

Watch Parts

Old Watch Parts DSC2210

Old Watch Parts DSC2207

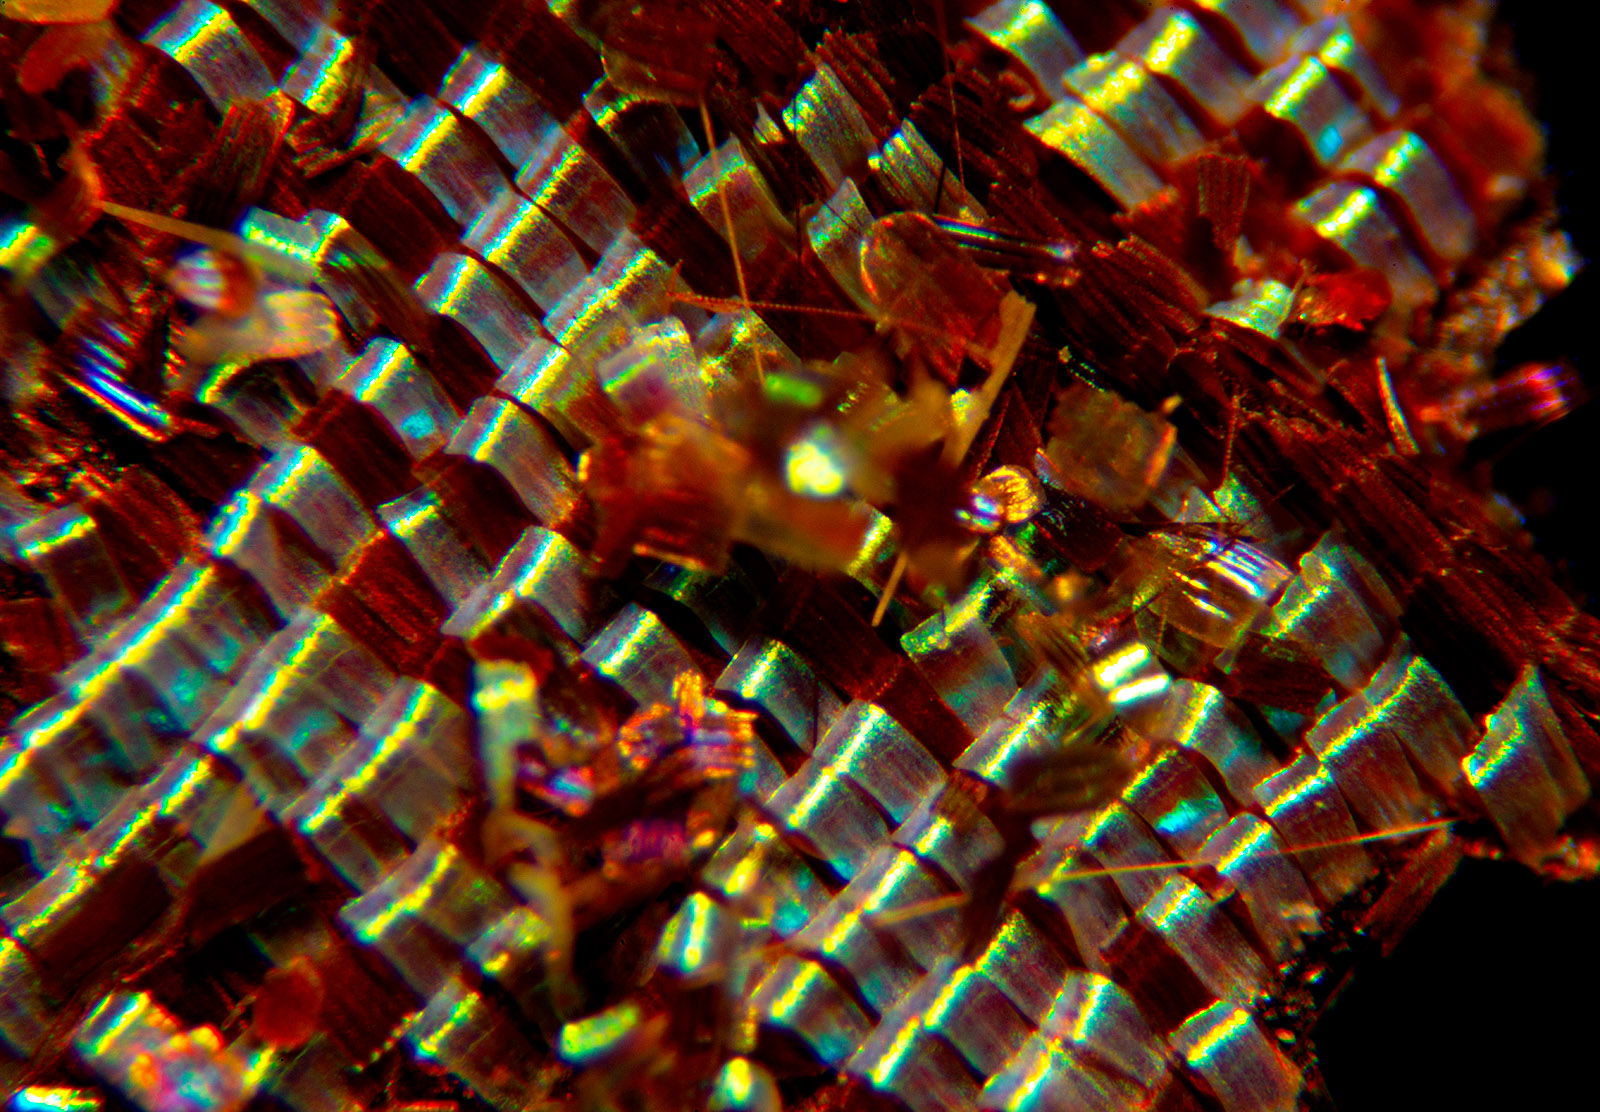
Jerome Russel Hair stuff:

Hair goo-focus stacking DSC2069

Hair goo-focus stacking DSC2061

Hair goo-file heavily modified in Photoshop DSC2058

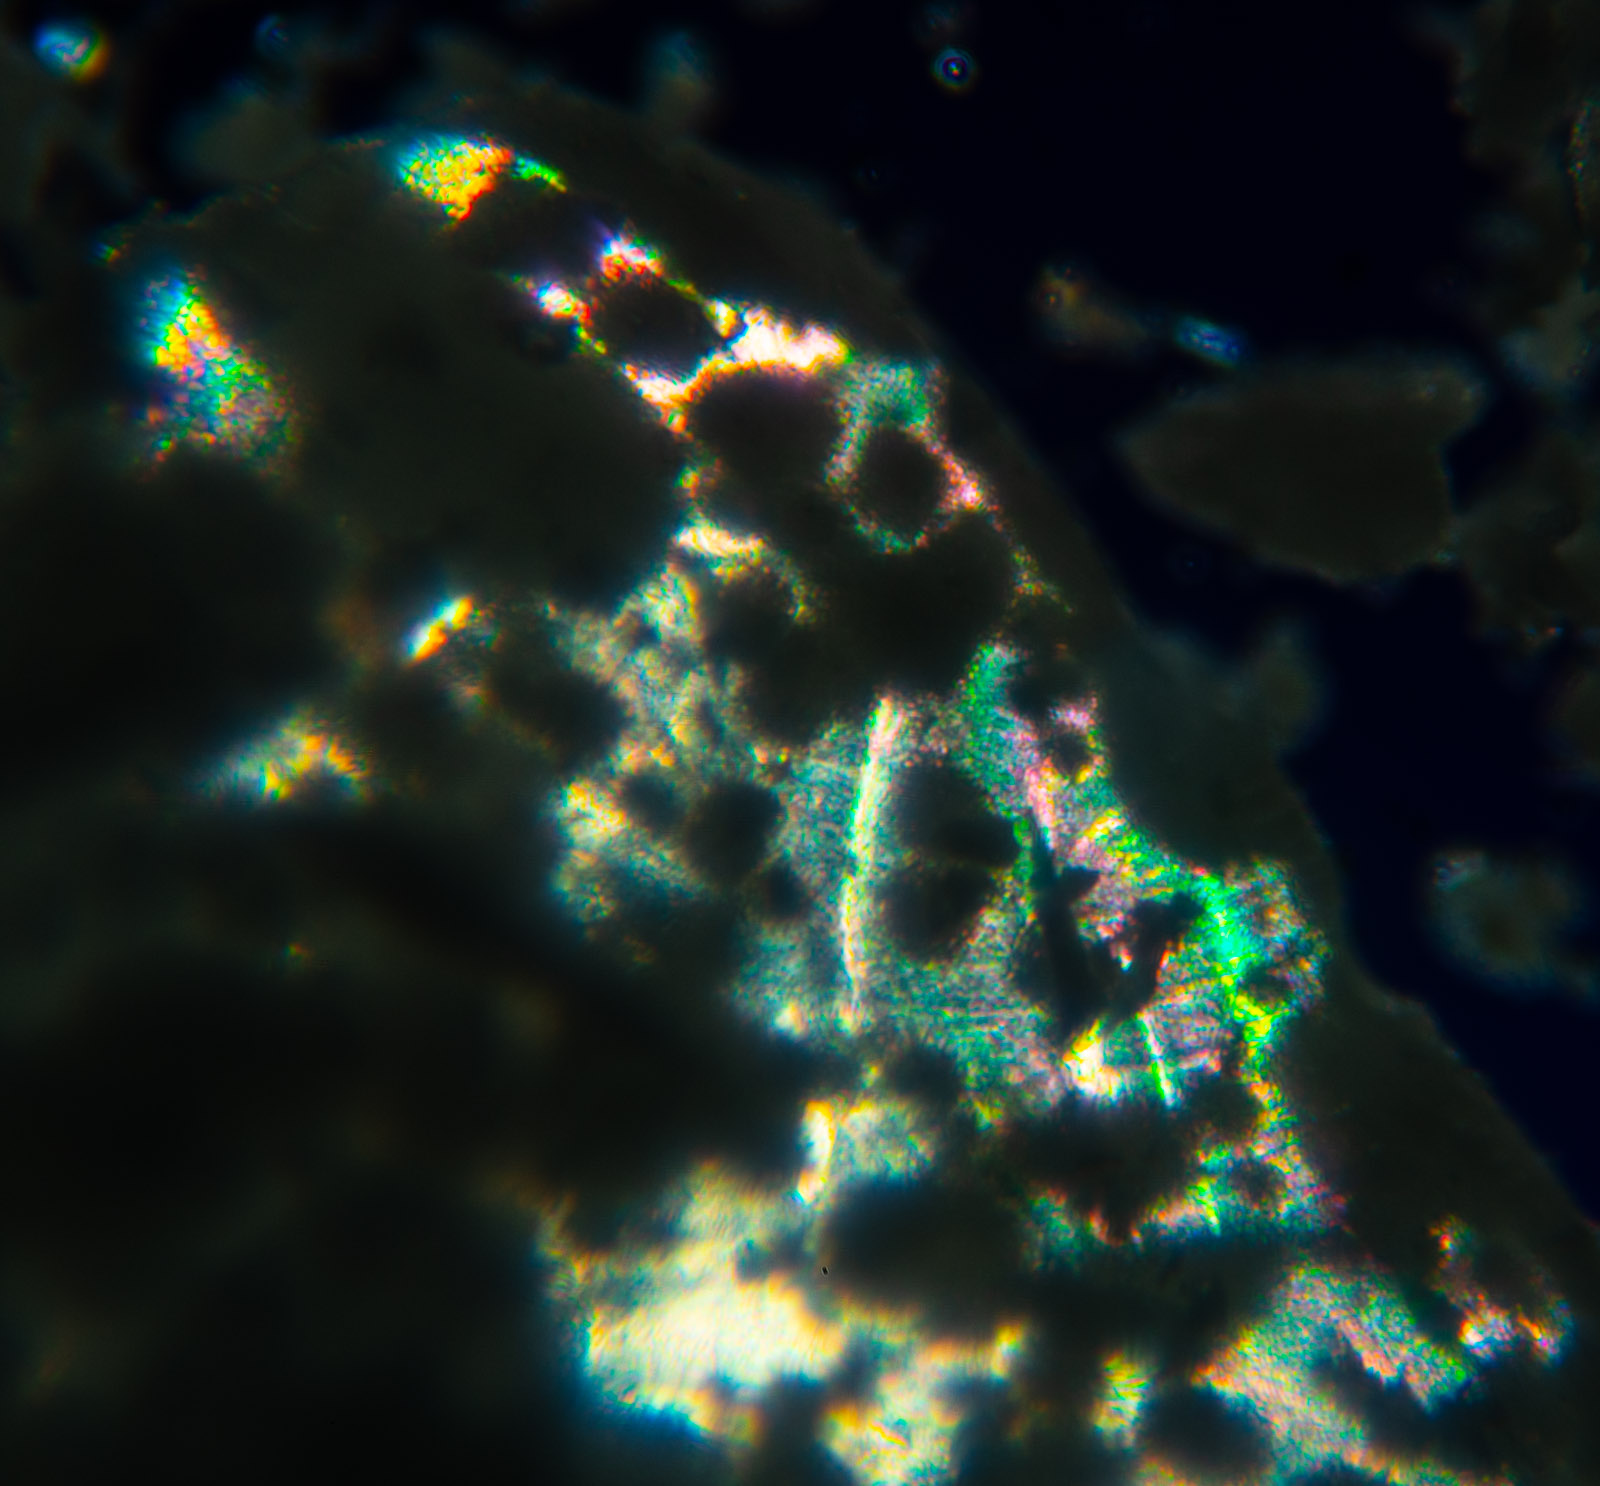
Of course, a lot of things have interesting colors. Below are a couple of shots of dried Selenium toner, which is used in the wet darkroom to add color to B&W prints.

Selenium Toner DSC1999

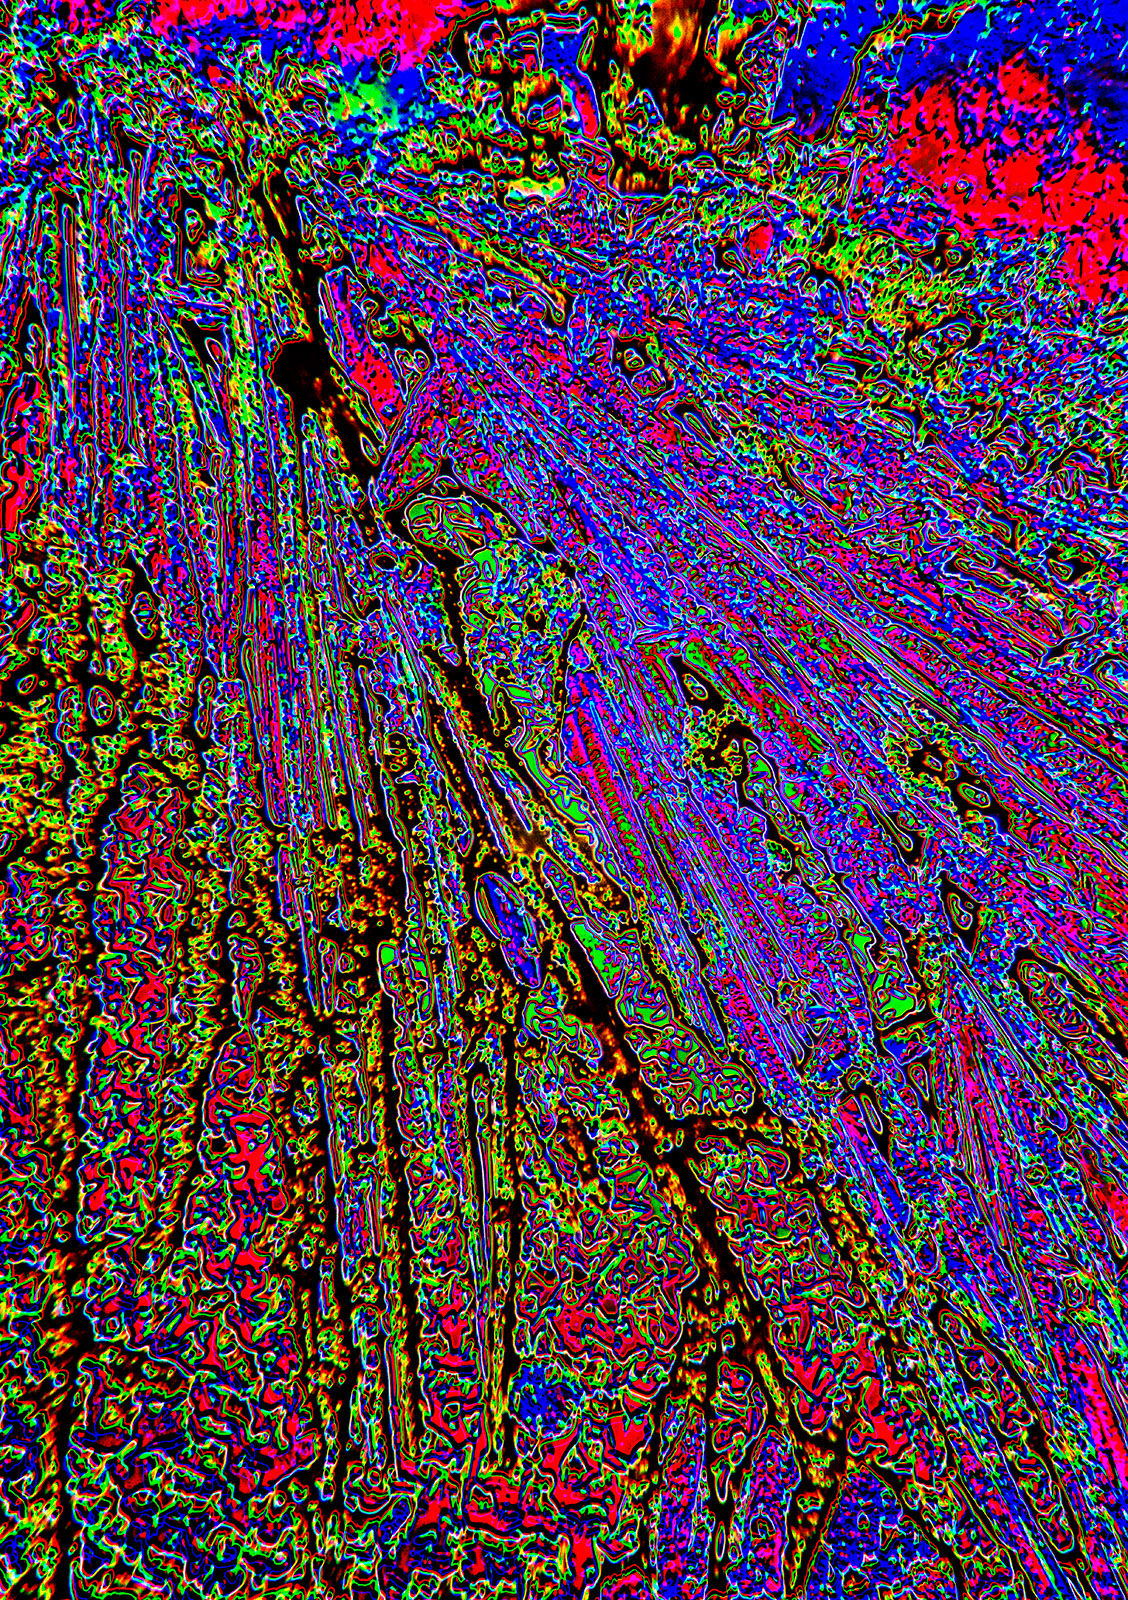
Selenium Toner-file heavily modified in Photoshop DSC2000

Let’s not forget living things. These are a couple of pictures of butterfly wings. Bet you didn’t visualize them looking like this.

Butterfly wing DSC2050

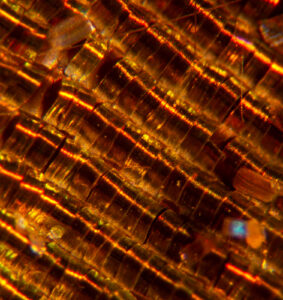
Butterfly wing DSC2046

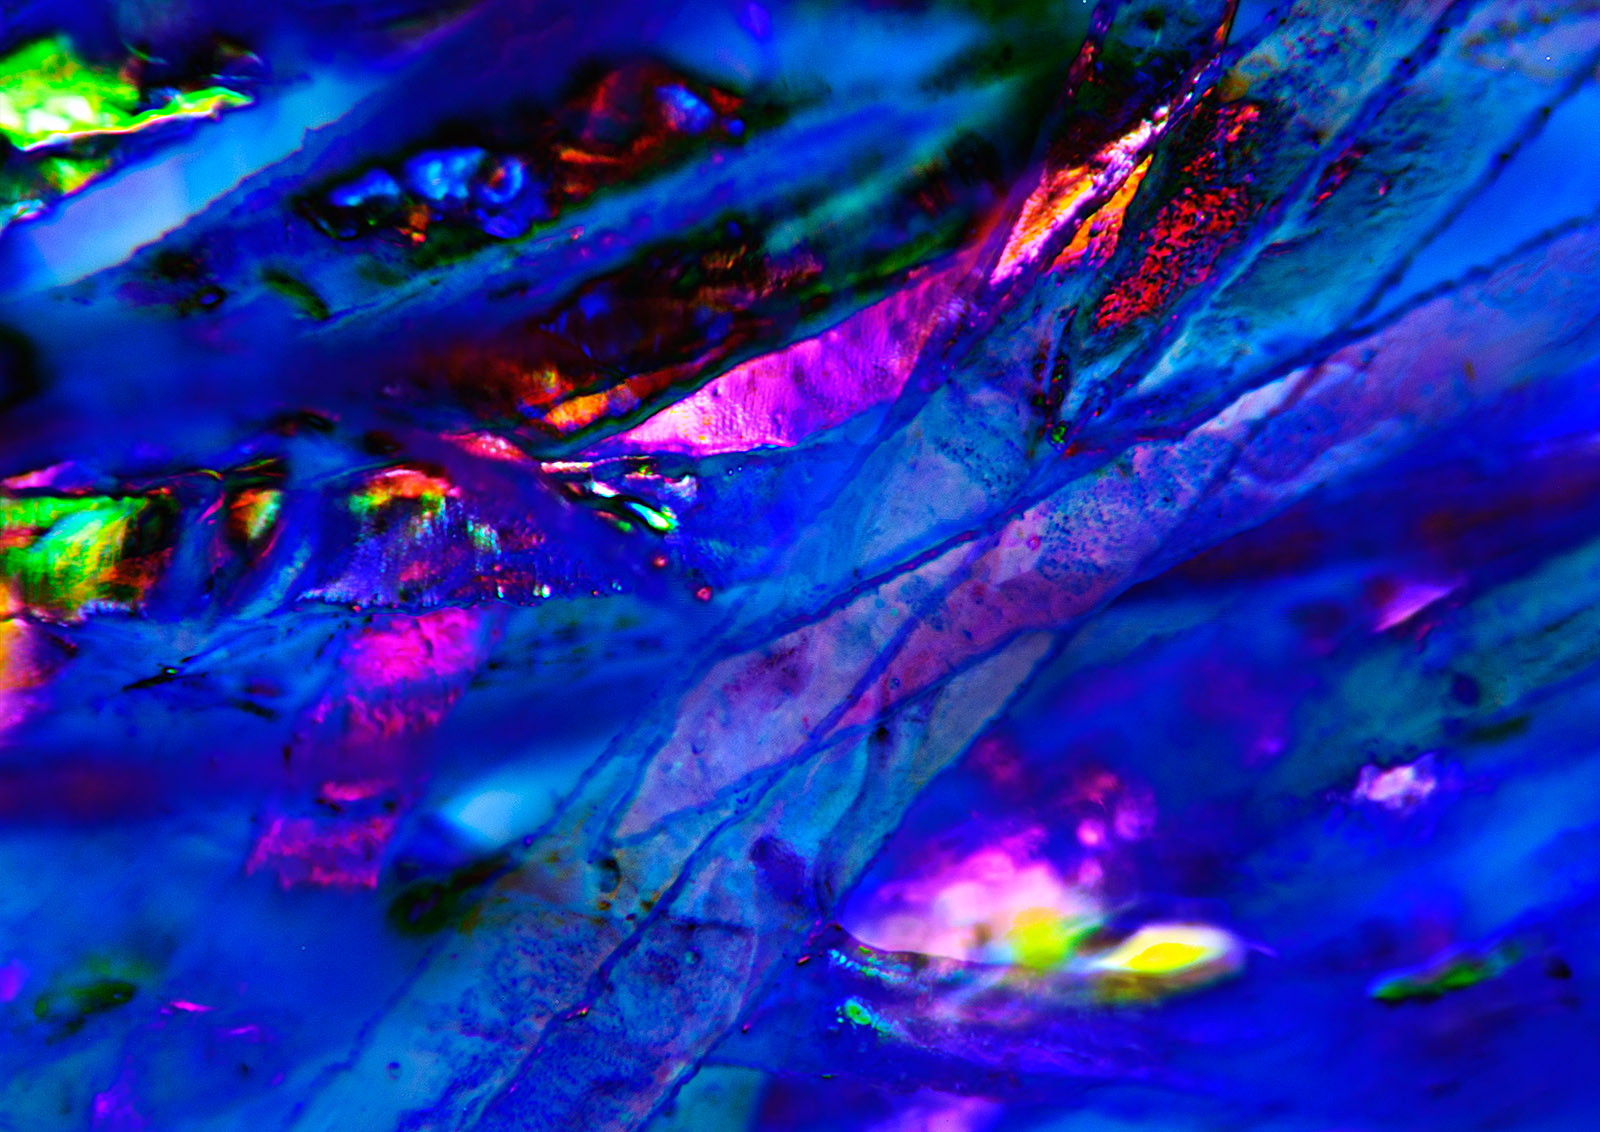
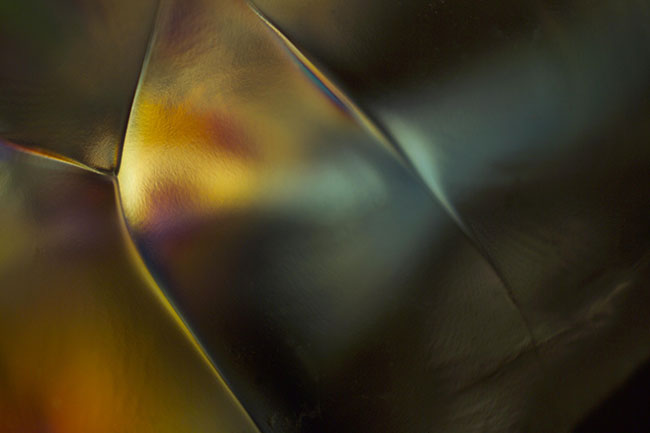
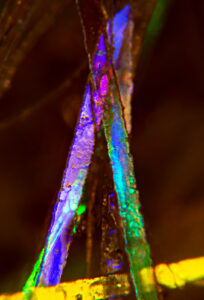
I mentioned filters above. There’s a lot of science behind this trick, but I’m going to cut direct to the chase. Put certain transparent materials, things like plastics and sodium thiosulfate (B&W fixer from the wet darkroom) between two polarizing filters. As you rotate one of the filters colors will start to appear. FUN! But, as I mentioned above, you need a lot of light. These shots are of a plastic prop ice cube. You can get interesting results, but you’ll need to experiment. Frankly all of photo microscopy requires an experimental attitude.

Plastic Prop Ice Cube-Dual Polarization

Sodium thiosulfate, fixer in the B&W darkroom-Dual Polarization DSC2025

As I mentioned at the top of this post, I am now offering prints of many of these images. If the caption has an index code like DSC1234 you can buy a print! Right now, all prints are set to fit on an 11×14 inch piece of paper. If the image is too thin it will have white paper on the sides. I am printing with an archival ink/paper combination. Prints are shipped by USPS priority mail to anywhere in the US that’s covered by Priority Mail service. The price is $75 for the first print and $60 for each additional print ordered at the same time. Please e-mail me at john@siskinphoto.com and include index code and your address. I will send you a PayPal request to arrange payment. I will be adding old and new images to this service. If you see an image on my site you would like to purchase please tell me where you found it and I’ll try to make it available to you. Thanks for your support!

A few links to the items mentioned in the post:

Student scope:

https://www.surplusshed.com/pages/item/T1480D.html

Microscope adapter:

https://www.surplusshed.com/pages/item/M1573D.html

Sony T-mount:

https://amzn.to/3s7xGOa

Nikon T-mount:

https://amzn.to/312M2DC

Canon T-mount

https://www.bhphotovideo.com/c/product/261256-REG/Celestron_93419_T_Mount_SLR_Camera_Adapter.html

And my books!
Understanding and Controlling Strobe Lighting: A Guide for Digital Photographers

https://amzn.to/3tH5Dp9

Photographing Architecture: Lighting, Composition, Postproduction and Marketing Techniques

https://amzn.to/3c8nLlU

July 16, 2018

Large Format Photography Class

I am teaching Large Format Photography at the Art Institute of Indianapolis this quarter. I will be posting a lot of information from this class, and edited audio versions of the lectures here, on my blog. If you would like to help edit the lectures please let me know! This is my first attempt at a pod cast, and it has some glitches. The information is good, and the presenter is enthusiastic

Here is the link to the first podcast:

I mentioned the quiz that I gave my students in a Facebook post. I was very disappointed by the outcome of the quiz I presented. So the first thing I want to do is go over the questions and answers, and how to get the right answers.

Question 1: You are shooting a waterfall. Your camera is on a tripod. The exposure is ISO 400 f8 and 1/125th of a second. You decide to use a 1/15 of a second to blur the water. You change your ISO to 100, what is your aperture?

The number of stops between 1/125 and 1/15 is 3. The change in the ISO, from 400 to 100 is 1 stop. So you need to change your aperture by 1 stop, that is from f8 to f11. The answer is f11.

Question 2. What stop is 3 stops less light that f5.6

1 stop less light is f8, 2 stops is f11 and three stops is f16. The answer is f16

Your exposure is 1/125th of a second and f4 and ISO 200. You want to use f8 and keep your shutter speed at 1/125 what would you change your ISO setting to?

The difference between f 4 and f8 is 2 stops. So you need to change your ISO by 2 stops. ISO 400 is one stop, 2 Stops is ISO 800. The answer is ISO 800

The standard shutter speeds are

1, ½, ¼, 1/8, 1/15, 1/30, 1/60, 1/125, 1,250, 1/500, 1/1000.

Each change lets in less light

The standard apertures are

1.4, 2, 2.8, 4, 5.6, 8, 11, 16, 22

Each change lets in less light

The standard ISO numbers are

100, 200, 400, 800, 1600, 3200

Each change INCREASES sensitivity

The difference between any two of these numbers, say f8 and f11 or 1/125 and 1/250 or ISO 100 and ISO 200 is one stop. That is the same amount of light. A one stop aperture change changes the exposure in the same way a one stop change in shutter speed or a one stop change in ISO would. You make decisions primarily based on how you want to affect depth of field or stop action.

There are intermediate numbers, like f1.8 or 1/100 or ISO 125. These are between the full stop numbers. They are generally a ½ or 1/3 stop change from a full aperture number or shutter speed. The eye can recognize a 1/3 stop change.

You should KNOW THESE NUMBERS.

This is a photomicrograph of an Autochrome. Autochromes were the first easy, well sort of easy, way to make color photographs. It shows how red green and blue particles of potato starch are used to record color with a monochrome emulsion. Some of you may be aware that this is how your digital camera records color. Red green and blue are recorded by specific pixels. Digital cameras use a Bayer Filter to record this information rather than the random potato starch grains of an Autochrome, but your digital camera uses a solution from 1907 to take color pictures!

These articles have some bearing on the subject of this and the next few posts.

Hand Assembling Lenses for the View Camera

Microphotography

Camera Building

And, just a reminder, here is the link to my DIY Page.

I hope you’ll also check out my books, use the links below:

One more thing, there are almost 8500 people registered on this blog. Wow! Thanks everyone.

October 20, 2017

Thoughts About A Penny

Filed under: Uncategorized — John Siskin @ 9:57 am

In these days, in which our symbols and our differences are taking up so much of our collective attention, I would like to say a few things about money.

First, money has a bad reputation; people say money that is the root of all evil. Frankly I haven’t seen any of that. In fact I think money is the most important invention our species has ever made. In addition I think money is much more likely to lead us to peace than to war. I also think that misunderstanding money causes pain. When we look at money as an end in itself, or as power, we misunderstand. Money is trade.

When a client pays me the effects of that transaction spread like ripples in a pond. I may purchase a product made in China, or pay for health care in Indiana. There is no such thing as a single exchange. Like ringing a bell the vibrations spread out into the world.

I didn’t start this essay to discuss economic interconnectedness, as important as I think that is. I wanted to say something about symbols. Symbols have had a large effect on our culture recently, especially the flag and statues of members of the Confederate States of America. While these are important symbols, I’d like to remind people about the symbols associated with money.

Abraham Lincoln is on the front of the penny. When I grew up Lincoln was called the Great Emancipator. The Civil War was about slavery, but it defined much more than that. The fact that the United Sates won that war proved that there would be a UNITED States of America, not just some loose association, with different rules and different standards everywhere across the continent. In many ways it made us one country. The power and wealth of our country flows from this fact. In addition this fact has made us a country of moral values: a country where the rights and opinions of all citizens are protected. Of course we are not perfect, but we are striving to become a more perfect union. So on the back of the penny it says UNITED STATES oF AMERICA.

On the front of the penny is the word LIBERTY. If Liberty was not a central value of the United States then we would long since have descended into the tyranny that afflicts so much of this planet. I would never suggest that we have secured a perfect personal liberty for ourselves, and our descendants, still we can speak, worship and associate freely. That is a lot.

On the back of the penny it says E.PLURIBUS.UNUM. I was taught that this means “From many one.” It is a traditional motto of the United States. One country that is the effort and result of many, many people. We are mostly descendants of immigrants who came here to secure liberty and a future for themselves and their children. We can only secure these things as a nation. No person is immune from harm individually; we make ourselves safe when we come together. This association places limits on liberty. Personally I agree with some limits and not others, but as a citizen I value the benefits of association. Without all of us, all of our experience and opinions, and values, we are less than we could be.

Above President Lincoln’s head are the words “IN GOD WE TRUST”. One of the greatest accomplishments of this country is the freedom to worship, or not worship as each person sees fit. The first part of the first amendment to the constitution protects this human right. This is not a universal human right, nor are the other rights protected by the first amendment universal. They are protected by our United States of American and the constitution, which defines our association. So this statement can remind us of our rights as citizens and the importance of placing our ultimate trust in something greater than our individual selves. This statement does not name a god, or any particular deity, it respects our personal right to believe or not. While some will disagree with me, I think it would be very difficult to write a more important reminder of our rights on a penny. Still, in this essay at least, there is room for the complete first amendment:

“Congress shall make no law respecting an establishment of religion, or prohibiting the free exercise thereof; or abridging the freedom of speech, or of the press; or the right of the people peaceably to assemble, and to petition the Government for a redress of grievances.”

That is a great statement of some of our basic freedoms.

I hope that the next time you see a penny on the ground you’ll pick it up and dust it off. And maybe we can hope that all our leaders will be wise and generous and remember the importance of a single cent.

John Siskin

April 4, 2016

Rock House #1

Rock House #1

Rock House #1

I’ve recently posted a couple of shots of a waterfall in Box Canyon (Box Canyon #1 and Box Canyon #2). Literally on the other side of the left had rock is this house, or what remains of this house. I know depressingly little about it, other than it’s called the Rock House. Sort of the obvious name. At some time there was fire and the place wasn’t rebuilt. You can still see the blacked surfaces on some of the timbers. The place is built out of rough hewn timber and actual logs. Much of the cabin is the native rock, and, perhaps some of the rocks mortared into the walls are local. The place is absolutely fascinating.

I came upon the place hiking down the canyon. I had no idea it was there, and there is much less than a quarter mile from where I lived.

I have no idea who owned the land. I have no idea when the fire happened. I don’t know when the place was built. In some of the shots you can see flexible conduit for electricity, but I don’t know if the electricity was put in later. I also saw a water heater, but that isn’t in any of my shots. Anyway I leave for you the mystery of the rock house.

Shot with my Speed Graphic of course. There are shoots made with my 8X10 camera, as well as the 4X5, I might add those later. Regardless I’ll add more shots from the Rock House soon.

As you know I’m adding these images to my blog as part of my re-do of my fine art portfolio pages. I’m also doing it to make these images available. If you’d like an archival print of this shot, please order with the PayPal link. The image will be about 11X14 inches and mounted on 16X20 cotton rag board. I’ll even throw in shipping, if you are in the U.S.


One more thing I wanted to mention: I offer several workshops at my studio in Indianapolis. I hope you’ll check out the workshops at http://www.siskinphoto.com/workshop.php.

I hope you’ll also check out my books, use the links below:

January 14, 2016

Beyond 1 to 1 – Going Into Uncharted Territory

Filed under: Micro Photography,Uncategorized,Workshops — John Siskin @ 9:21 am

New date coming soon

10

This workshop will give you the ability to photograph things smaller than a human hair. You’ll be able to photograph the scales on a butterfly’s wing or the tip of a pen.

17

The workshop will explain how to use simple tools to shoot amazing pictures. And you’ll have a list of the tools to take you back into the very small whenever you want. The tools are much more inexpensive than you might think: a reverse adapter, which will make a 50mm lens into a powerful micro lens, is only $12! You can get a microscope that will enable you to make an image that is 40 times life size on your sensor (that would translate into an 8X10 print that’s 320 times life size) for just over $100. It’s amazing how a few pieces of inexpensive equipment will unlock an unseen world.

14

This workshop is a guided tour into this world, but unlike a safari to Africa or voyage to Alaska, you can return to this world whenever you want. You’ll get a chance to experiment with tools you can throw into your camera bag and the tools you’d use at home. This isn’t the kind of gear that you need a lab to use, you can explore at a kitchen table! We’ll work with bellows and extension tubes. You’ll see how to shoot through microscope lenses and enlarging lenses, in fact you can make fabulous micro image with a simple 50mm lens. You’ll also get to shoot with the microscope, and learn how to shoot with your own scope!

03

The workshop is limited to just 6 people. Each person will be able to use the equipment and make shots during the workshop. If you bring a flash card you’ll be able to keep your shots! You’ll also get an extensive list of tools you might want to get, including a list of gear you can get used. The idea is to unlock the door-to give you a ticket into the unseen worlds!

22

Please visit my site to see my other workshops and to check out the Free On Line Classes!
You can buy one of my books by clicking on the titles below:


January 12, 2016

Micro Photography Workshop

Filed under: Uncategorized — John Siskin @ 5:40 pm
Ablative Absolute, yes that's the title

Ablative Absolute,
yes that’s the title

I do a lot of microphotography, images of things less than a quarter inch in size, some times small than a human hair. Much of the time I’m exploring the relationships between color and texture and line. I’m trying to explore the unseen, looking for the unexpected. That’s certainly the case in this shot. However one of the first things I get asked when someone sees these images is “What is it?” The idea is of course that a photograph must be a picture of something. I guess I could say that it’s a picture of light, but that usually doesn’t satisfy. So this is a picture of a plastic ice cube. I used to say a fake plastic ice cube, but of course it’s a perfectly real plastic ice cube, intended to be used as a prop. I’ve often made images of plastic ice cubes because, under the right circumstances, they’ll refract light in very interesting ways.

You can get a print of this image by using this PayPal link. Like all of the images I’ve been adding for the fine art pages it’s going to be $125 for a print that’s about 12 inches wide, mounted and matted onto 16X20 board. That includes shipping inside the U.S. I hope you’ll consider purchasing this shot.


MICRO PHOTOGRAPHY WORKSHOP

I think that very small subjects give photographers a unique place to look for images. Often people want to travel to take pictures, as if they can’t find anything interesting unless they go to Africa or Alaska. I’ll admit that travel can open your eyes, give you new ways of seeing, but when you come back everything looks mundane. I want to find inspiration in the everyday, even in a piece of plastic. I want to want to make new images everyday. I can take a voyage to the land of the tiny any time.

Many photographers think of macro lenses when they think of shooting small things. While macro lenses are good tools, they really don’t go small enough. You’re still just looking at a flower or a butterfly with a macro lens. You can go much closer and find that a butterfly’s wings are coated with ribbon like scales, or that a small piece of broken glass could be so interesting.

10

glass

It costs a lot of money to go on safari. It’s inexpensive to travel into the small worlds. It’s less expensive than buying a new macro lens or a dedicated flash. It can provide endless opportunities for a photographer. Of course it’s good to have a guide, so I’m offering a new Micro Photography Workshop:

Beyond 1 to 1
Going Into Uncharted Territory

This workshop will give you the ability to photograph things smaller than a human hair. You’ll be able to photograph the scales on a butterfly’s wing or the tip of a pen.

The workshop will explain how to use simple tools to shoot amazing pictures. And you’ll have a list of the tools to take you back into the very small whenever you want. The tools are much more inexpensive than you might think: a reverse adapter, which will make a 50mm lens into a powerful micro lens, is only $12! You can get a microscope that will enable you to make an image that is 40 times life size on your sensor (that would translate into an 8X10 print that’s 320 times life size) for just over $100. It’s amazing how a few pieces of inexpensive equipment will unlock an unseen world.

This workshop is a guided tour into this world, but unlike a safari to Africa or voyage to Alaska, you can return to this world whenever you want. You’ll get a chance to experiment with tools you can throw into your camera bag and the tools you’d use at home. This isn’t the kind of gear that you need a lab to use, you can explore at a kitchen table! We’ll work with bellows and extension tubes. You’ll see how to shoot through microscope lenses and enlarging lenses, in fact you can make fabulous micro image with a simple 50mm lens. You’ll also get to shoot with the microscope, and learn how to shoot with your own scope!

F2394881

The workshop is limited to just 6 people. Each person will be able to use the equipment and make shots during the workshop. If you bring a flash card you’ll be able to keep your shots! You’ll also get an extensive list of tools you might want to get, including a list of gear you can get used. The idea is to unlock the door-to give you a ticket into the unseen worlds!

The workshop will happen on February 28. It’s a one day workshop and the cost is only $175, but if you sign up in January the cost will be just $135! You can use the PayPal link below to sign up for the Workshop!


You can buy one of my books by clicking on the titles below:


Older Posts »

Powered by WordPress