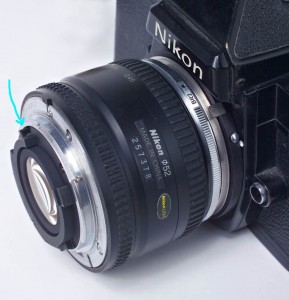
What your average lens does is to make a big image, called reality, so small that it fits onto your sensor. Reality doesn’t fit on your sensor, just an image of it. Your sensor is pretty small, so this is a big reduction. Now if you could turn your lens around, so the back was facing the subject and the front element was facing your film, it would make small things big. There are devices from camera companies that do this. Nikon calls theirs a BR-2A. You can get a generic reverse adapter for less than half the price of a Nikon one, but the Nikon one is only about $40. Keep in mind that there are no optics in this, just a piece of metal that screws into the front of the lens on one side and has a lens mount on the other side. One of the great things about this gadget is that it is small and doesn’t weigh a lot, so it’s good to have in the camera bag.
There are a couple of things that make working with the reverse adapter tricky. First the auto-focus and auto-diaphragm controls are sticking out the wrong side of the lens, so they don’t work with the camera. Also your auto exposure systems don’t work. So you need to find your exposure by trial and error, using the image on the camera back. Of course you need to do zone focusing with this set-up. I talked about zone focusing in a recent blog. You can control the diaphragm with your hand, look at the picture of the reversed lens to see what lever you have to use. Nikon does make a ring to allow you to mount filters on your lens when it’s reversed, the BR-3. This will protect the back of your lens, which is a good idea. Nikon used to make a device called a BR-4 that would enable you to use the auto-diaphragm. In order to do this you needed a dual cable release, the second cable stops down the lens before you shoot. I used the BR-4 with my old 55 f3.5 Micro Nikkor for the pictures I’ve attached to this blog. If you want you can use extension tubes or bellows to get even closer. Wide-angel lenses and fixed focal length lenses work better. Wide-angle lenses give greater magnification. I used to have 20mm lens that was great reverse mounted. You can also reverse mount such things as enlarging lenses and get excellent sharpness. Reverse mounting lenses will enable you to make something anywhere from life size to several times life size on your sensor. Of course a print or a file can be many times larger than the sensor.
I have a new article on Architectural Lighting coming out in the May/June issue of Photo Technique Magazine . I hope you’ll check it out. I also hope you’ll check out my classes at BetterPhoto.
An Introduction to Photographic Lighting
Portrait Lighting on Location and in the Studio
Getting Started In Commercial Photography
Thanks, John Siskin


This post is very usefull thx!
Comment by Aubrey — June 27, 2011 @ 5:30 pm