Here are some plugs for my books and classes: you can get right away from Amazon: Understanding and Controlling Strobe Lighting: A Guide for Digital Photographers which is at Amazon.com and other places. You can get a Kindle version or a Nook version also. The Kindle version looks OK, but the pagination is a little weird on my reader. Here is a sample chapter from the book. There has been nothing but good feedback on this book, so I would guess that you’ll like it. Of course I still hope that you will please consider purchasing my fine art book B Four: pictures of beach, beauty, beings and buildings. Purchases of this book mean a lot to me, and it is also a fine gift for any occasion. I lowered the price a couple of weeks ago, and that has helped. As you know I teach for BetterPhoto.com. I really hope you’ll sign up my class: An Introduction to Photographic Lighting. Remember that the books and the class keep me updating this blog. My new book, Lighting For Architectural Photography will be out in the fall.
 I have the idea that many of the people who take my classes, read the books or even just look at this blog are interested in taking portraits. I don’t get much actual feedback about most of the work I put out, so I could be wrong about this. But no matter, this issue of the blog will be about portraiture. I just did a shoot for Randy, a friend of mine. He is a good subject in that he has strong features and is patient. Actually there is a shot of him in my book on page 88. There are a couple of things about this shoot that might be instructive, at least I hope so.
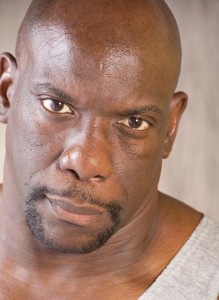
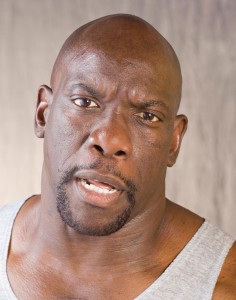
First, the light is harder than I might use for many portraits. This works well for this subject. You would not want to have this level of reflectivity in the skin if the person had a very light complexion. The density and shininess of the skin should effect the decisions you make about light. The light should be adjusted for each subject. I often use the same tools for portraits but I use them differently. In this case I used a light panel very close to the subject. The panel was about three feet from the subject. It was on the subject’s right side. Often I use a light with an umbrella behind the panel, but in this case I used a strobe with barn doors. The barn doors keep the light from spilling out the sides of the light panel. Using the light directly on the panel gives you a harder effect. The light was at the top of the panel pointed down the panel. This created a gradated light across the panel. I think this gives the face a little more shape.
 I had a second light with a beauty dish behind and above the camera. It was on the right of the camera. I was using my old Norman strobes. The Norman beauty dish is about 2 feet across and painted white. I like the catch light it makes in the eye. Also, because of the size of the dish, it is a moderately hard light. Finally I placed a light panel with a gold cover on the subject’s left side. The large size of this reflector means that the position isn’t very critical. The harder, or smaller, a light source is the more critical the position of the light is.
If I was shooting a person with a much lighter complexion I could use shadow to add shape to the face. Randy is quite dark, perhaps a little darker than he actually appears in the first two shots, so if I used a lot of shadow I would actually lose shape. The mid tones of a photograph are much better at expressing information about the subject than the highlights or deep shadows. So, for this subject, I wanted to use highlights to impart shape more than shadow. There are also cultural aspects of this: for reasons I don’t actually understand reflections are not considered flattering to many European skin tones. I think the reflectivity in Randy’s skin is quite flattering and quite effective. I am pleased with the strong sense of three-dimensionality in these shots.
I used a light gray background illuminated with a 1/2 CTO filter to give a warm look in back of the subject. I like the warm color for Randy, which is why I used a gold reflector on his left side. I would avoid a dark background for this subject. First it would have made it tougher to delineate the shape of his head and it might have made him look much more menacing. I dislike portraits where a black background seems to swallow the subject. I included two versions of this image so that you can see the difference expression makes.
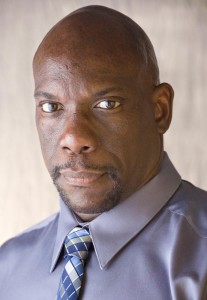
 In the third shot I moved the gold reflector. It blocked most of the light from the beauty dish. This changes the light on the face, and, importantly, it changes the catch lights in the eyes. I think this creates a more powerful look for Randy, which works well with the more formal shirt and the tie. I think the having the right side of the photograph darker is very effective.
The lights were three Norman LH2400. The power pack was a Norman P1250D. The light behind the light panel had 375 Watt-second and the light on the background had the same. I used a snoot on the background light to control spill. The light with beauty dish was set to 250 watt-seconds. The light panel on the left of the camera had one layer of white cotton broad cloth.
When I teach a class I ask people to practice. I suggest that they work with a Styrofoam wig head and cheap flood lights. The wig head is all white that makes it easy to see the shadows. The flood lights are easy to see and to manipulate. This gives you a sort of a lighting lab where you can practice and experiment. I still use the wig head when I get a new piece of lighting gear. I know I’ve said this before: musicians practice so they can play, why shouldn’t we? If you can only practice with a live model you won’t be able to take the same risks you can with a hunk of Styrofoam. Most models don’t have the patience of the wig head. So, if you’re thinking about a lighting class why not mine?