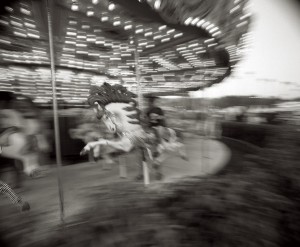
A 1/20th of a second, paned with the horse.
I talked about the shutter and what it does, a couple of weeks ago. This time I am going to discuss aspects of how to use it.
Since DSLR cameras are so small and light that we often hand hold them, they are designed to be used this way some of the time. Unfortunately too often we use them at longer shutter speeds than we can hold steady. This causes blurred pictures. Many years ago Kodak did a study on blurred photos and fond that this is the biggest reason for blurred images. I think that many people have more trouble with this now than when we used film cameras. There are a couple of reasons for this; first digital SLR cameras are heavier than film cameras were. Second since the sensors are smaller than film lenses bring subjects closer than they did with film cameras. For instance a 50mm lens has about a 45º angle of view on a full frame camera and about a 30º angle of view on a Canon D30. Not only does this mean that the subject appears to be closer to the camera, but it also means that camera shake is increased. You can see this for yourself if you want to do a simple experiment. Cut a small hole in a piece of paper, say a circle about an inch in diameter. Now if you hold the paper close to your face and look through it you will be able to keep it pretty steady. If you hold the paper a couple of feet from your face it will be a lot tougher to keep steady. A telephoto lens is like the piece of paper a few feet from your eye, tough to keep steady. There use to be a rule of thumb that you could hand hold 1/the focal length of a lens. So if you were using a 250mm lens you could hand hold a 1/250th of a second. If you were using a 60mm lens you could hand hold a 1/60th of a second. Basically this is now wrong. Unless you have a camera or lens with image stabilization you should not try to hand hold anything less than 1/twice the focal length of the lens. So if you have a 250mm lens don’t hand hold anything less than 1/500th.
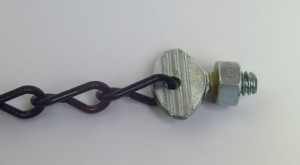
There are a couple of ways around this short of image stabilization. Everyone knows about tripods, the only problem is that you have to carry them. By the way, if you are using a lightweight tripod you might want to use the self-timer to trigger the camera, this will reduce vibration. You can also get a monopod, which is like tripod that is missing two legs, this will reduce shake on shots that are not so long. Finally you can build a chain-pod. This costs almost nothing, weighs a couple of ounces and takes up less room than a 35mm film can. Chain-pods are he simplest and best piece of photo equipment you can build. It works like a monopod. To build it drill a small hole in 1/2 inch 1/4X20 (that is a thread size) thumbscrew. Attach about 6 feet of chain to the hole (more if you are really tall). Next put a nut onto the thumbscrew and position it so that the screw can’t go too deep into you tripod socket and glue the nut in place. To use attach the thumbscrew to the base of your camera drop the chain and step on it. Now pull up against the chain. Steady!

This shows how you build a chain pod.