This is another section of my second book. This book will be out in a bout a year. You can get my first book in stores any day, or order it here: Understanding and Controlling Strobe Lighting: A Guide for Digital Photographers. Thanks for your interest!
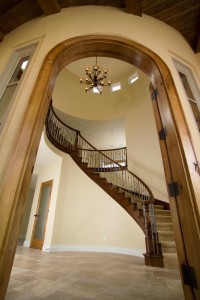
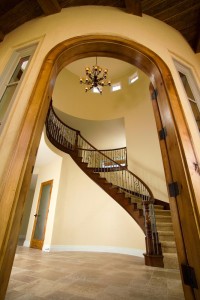
This shot really helped to create an important relationship with a client. The house had just been completed and was empty. Most of the other shots I took of this house were just empty rooms, for that matter so is this shot. But the way the angle defines the staircase and the door frame really gives the shot a feeling of drama and completion. I have gone on to do literally thousands of images for this client.
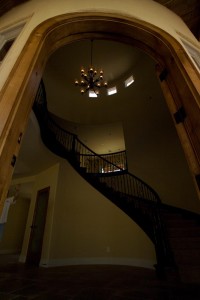
I started with the camera a little too close and just ambient light. All the important aspect of this shot don’t have enough light. You can see that the windows will contribute a little light, and there is light on the entry.
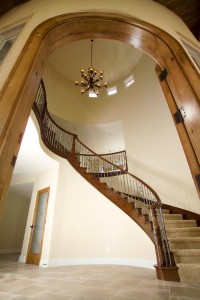
So I started to add light. In this version I have a light outside, but it is too hard. You can see the small hard reflection on the door frame. I tried to use a small shoot through umbrella outside, because of the wind. Umbrellas are bad in the wind. I changed to a larger umbrella outside later in the evolution of the shot and added a sandbag. I also added a light in the hallway on the left of the shot, and a light on the second floor landing.
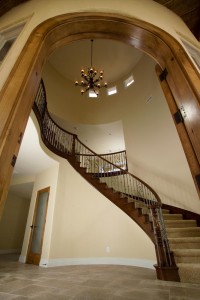
The lighting is better, but not even enough. Also I don’t like the highlight on the right side of the doorway.
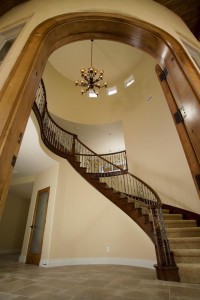
The light on the stairway and the floor isn’t really bright enough. So I added a light inside the doorway on the left side. When I took the shot I though it was this light inside that was reflection onto the doorway. Reflections can be hard to figure out. The tethering program on this camera doesn’t allow you to back up quickly. This means it is really important to do a complete examination of the shot at each stage. I could have saved time if I had realized that the next light wasn’t causing the reflection.
The light on the second floor landing is not lighting the ceiling as evenly as I would like, so I moved the light back. The light in the hallway is a little bright in this shot also. There isn’t as much shape in the entry room because the light is even and the shadow of the banister is a little too intense. One of the problems with making a shot is deciding when it is done. When do you say “Oh this is just what the client needs” and when do you decide to work a little longer? That is an important consideration in every job. In this case I know that I could make the door frame better. I suppose that there are jobs where you could keep making minor changes forever. In most cases I think it is important to take a few moments to really look at all of the shot. This is one of thee reasons that tethering your camera to a laptop is so important. Without the larger image on the laptop it is really hard to evaluate the image effectively.
In this version the light on the second floor landing is nice and smooth. It is really defining the shapes up there. I like the light in the hallway now. One of the things it does is define the curve at the top of the hallway. This shot is all about curves, so keeping the lines strong is really important. You can see that I am still struggling with the highlight on the door frame. This is the problem that stood out for me in this shot. Often there is a simple answer, but sometimes we all miss it. In this case the answer was to move to a larger softer light for the exterior. I had been using a small shoot through, as I mentioned earlier, but I finally changed to a 45-inch umbrella.
As you can see I also pulled the camera back a bit. For me this was the change than made the shot. I really like the wood and the curve at the top of the shot. It creates a frame around the image. The shapes are good. There is a nice sense of openness and light that certainly wasn’t there at the beginning. And the door frame looks fine! I also added a light at the top left side of the shot, on the second floor. You can see a little bit of the light in the upper left window. I also put in a light in a hallway on the bottom right of the shot. This hallway light really didn’t affect the shot very much, but it did seem to bring a little light to the banister.
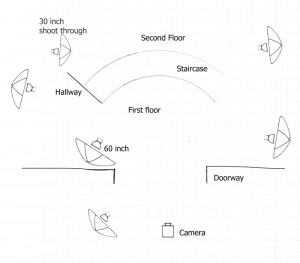
This diagram shows where the lights ended up.
The umbrellas, except where noted are 45-inch umbrellas. Except for the shoot through on the second floor all the umbrellas have black backs.
Most of the lights had 45-inch umbrella, but the umbrella inside the doorway was a 60-inch and the one on the top left of the landing was a 30-inch shoot through. Except for the shoot through umbrella all the lights had black backs, so they only lit the shot by reflection.
There was a little left to do in Photoshop. When I opened the image in Adobe RAW, I made the shot about 250ºK warmer with the color temperature slider. I also brighten the exposure by about one third of a stop. There really wasn’t anything else to do. However there were a few things to do in Photoshop. First I used the cropping tool with the perspective box clicked on. I put the top corners of the cropping box closer together. This made the door frame stand up a little straighter. While I didn’t feel it needed to be straightened completely, opening it up made the shot work better. I also cropped a little bit of the floor, because the change in perspective made the shot a little too thin. I removed the power outlet and few odds and ends from the second floor ceiling. I didn’t think they brought anything to the shot. I also put some density back into the window on the upper left.
My first book: Understanding and Controlling Strobe Lighting: A Guide for Digital Photographers will be in stores any day! Or get it from Amazon with the link. I am really pleased with the way the book turned out.
Please consider taking one of my classes, or even recommending them. I have three classes at BetterPhoto:
An Introduction to Photographic Lighting
Portrait Lighting on Location and in the Studio
Getting Started in Commercial Photography
