Photo Notes A place to talk about making images.

June 8, 2016

Roberts Park Church #6

Roberts Park Church #6

Roberts Park Church #6

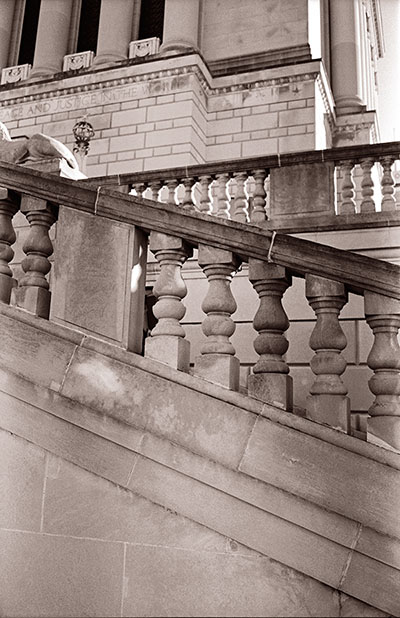
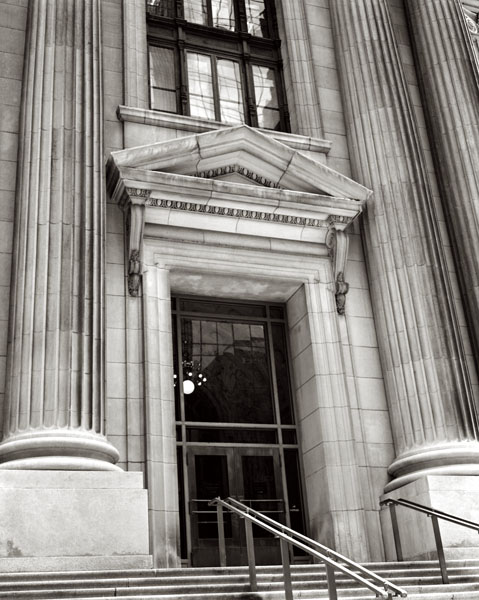
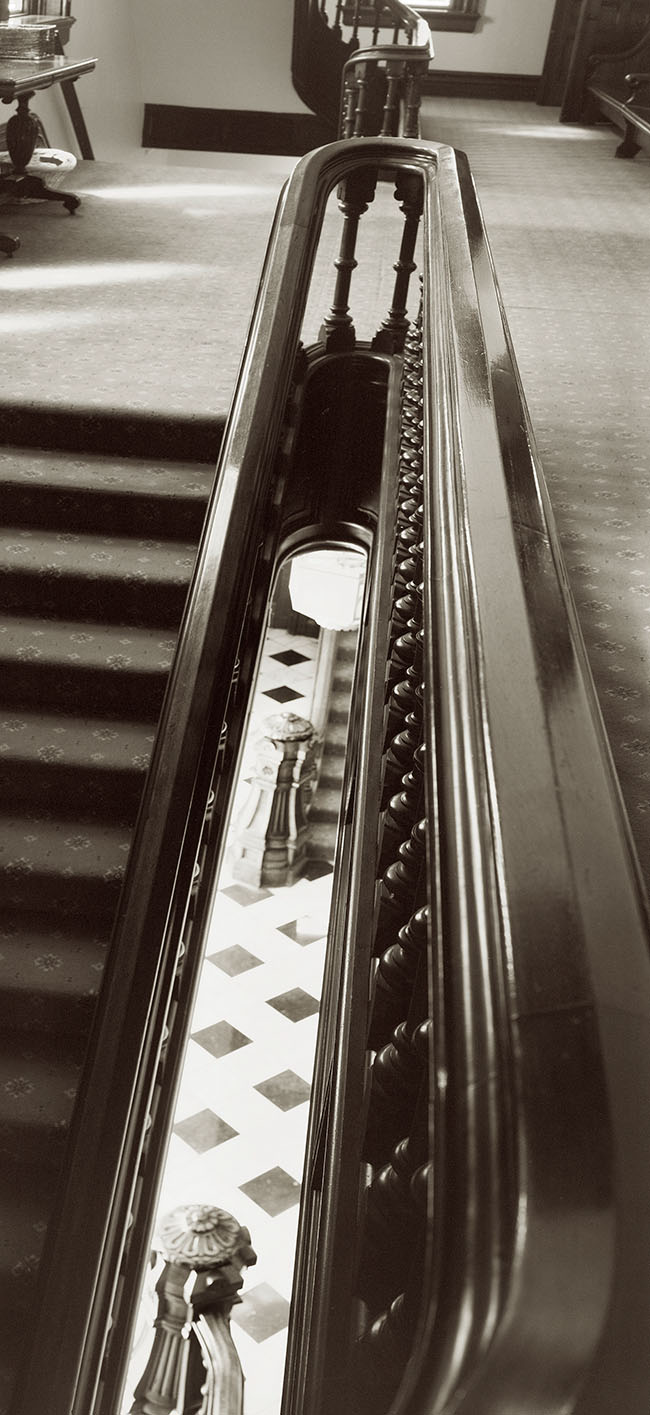
Another stair case form Roberts Park Church. I already mentioned that I like pictures of staircases. I did a shoot a Roberts Park Church a few weeks ago. I was there with the 8X10 camera. Used Ilford HP-5 in case anybody is checking. This was the last shot of the day. I know it was taken with the 8.25 inch Gold Barrel Dagor, you can see the lens. Sweet lens. Shot between f32 and f45. There is an inherent composition in a staircase. A good one combines form, function and a sense of time.

set-up #6

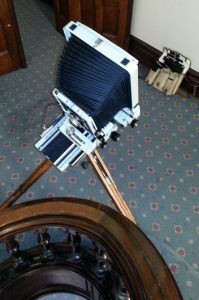
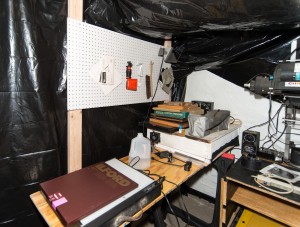
I actually remembered to shoot a set-up shot with the phone. I should do this more often. You can see that the shift is used, pretty much all the shift on the camera. Of course this is because I’m only shooting one side of the holder. You can’t really see that the lens is tilted down, which allows the depth of field to follow the bannister. You can see the top of the Ries Tripod, great tripod. My Leica bag with all the accessories, and thither holders is in the background. Oh, the camera is the Toyo 810M. I think I got the camera back in about 1985? Lot of great stories with that camera and these accessories.

I’ve shot a lot of staircases on commercial jobs. I even did work for a client in Los Angeles that specialized in making custom staircases. You can check out a few of the shots: http://www.siskinphoto.com/architecture1q.php, http://www.siskinphoto.com/architecture1s.php and http://www.siskinphoto.com/architecture1u.php.

If you’d like print of this image, I’d like to send you one. The image will be about 14 inches tall and mounted on cotton rag board (the good stuff). If you use the PayPal link below I’ll even include shipping in the U.S. I appreciate your support.


Also don’t forget my workshops: http://www.siskinphoto.com/workshop.php.

I hope you’ll also check out my books, use the links below:


Now over 5000 registered users at this blog!!

May 27, 2016

Shooting the 11X14 Camera Again!

This is another blog entry that will be part of my Fine Art pages, whenever they get finished. However I’m also going to add information about my evolving work with the 11X14 camera, which I hope will also interest you. I wrote about my first tests with the camera before: check out this entry: https://siskinphoto.com/blog/?p=2871.

The camera shoots an image area of 11X14 inches! Think about that as about 100 times more sensor area than my full frame Nikon D800. One of my goals for this camera is just working with an ultra large format camera. If you’ve never worked with a big film camera you probably won’t understand just how satisfying it is to successfully create with a camera like this. There is a joy that comes from making a photograph with this craft that I don’t get from just pressing a button. I’ve spent a large part of my life perfecting this work, and I just don’t want to stop.

Of course there is more than just being some sort of curmudgeon. There are a few things that you can’t do with a small digital camera. A lot of these involve inviting chaos into your images. I suppose this is why some people have returned to film photography, they don’t want instantaneous images so much as discovered images. My goal for this camera is to mix a high degree of craft and image quality with a process that allows chaotic intervention. So far I’ve been pleased with the results.

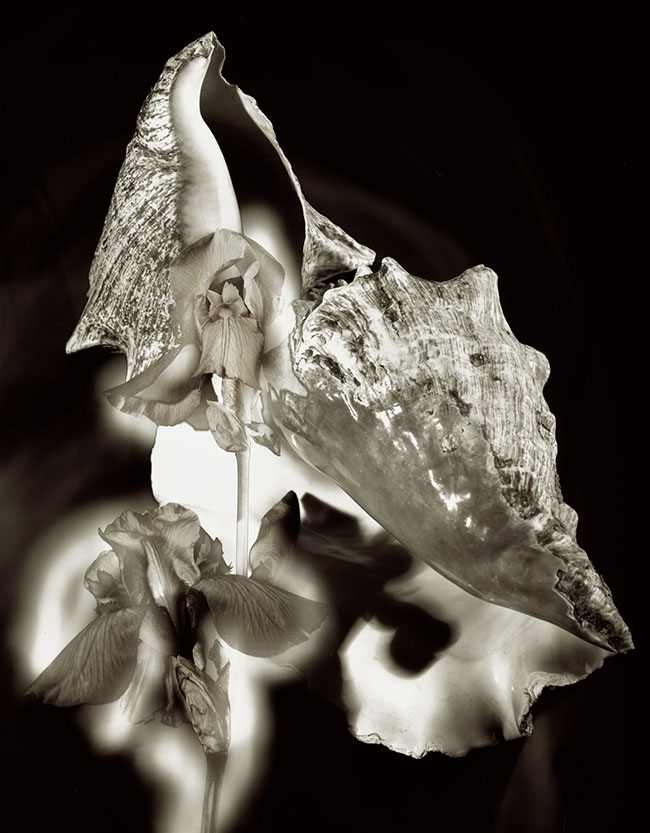
In this image you can see that the flowers are surrounded by a glow. This glow doesn’t continue around the shells and leaves the background largely black.

Shells #C v-1

Shells #C v-1


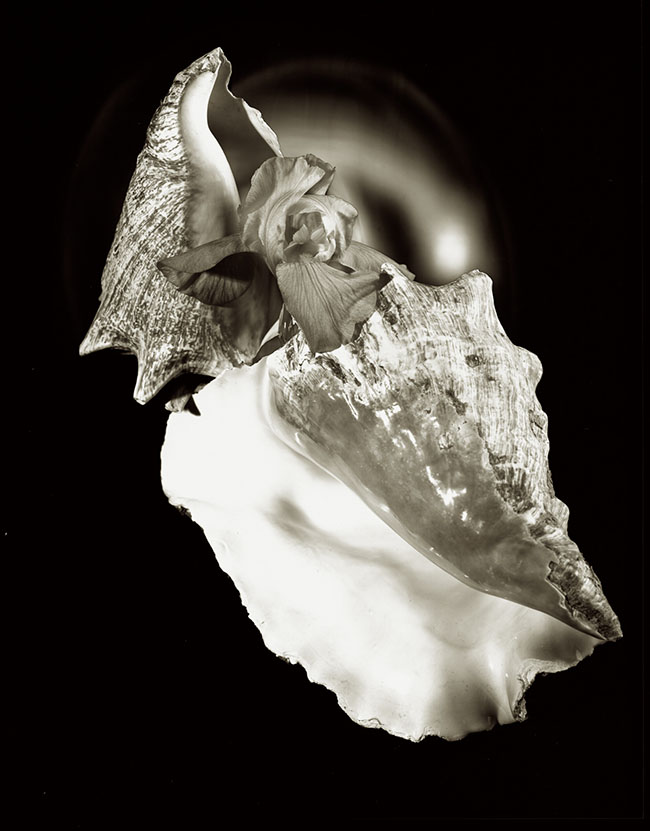
In this alternative version there is only a single flower and the glow is mostly confined to the background.

Shells #H v-1

Shells #H v-1


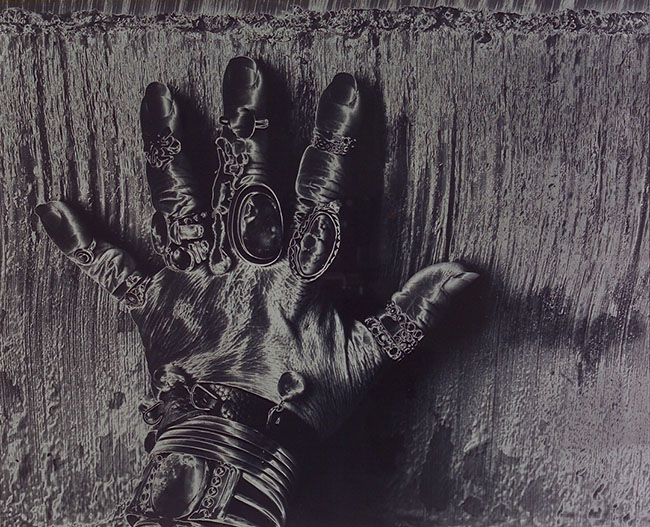
As I mentioned in the earlier blog, I am shooting Ilford Multigrade paper. I am processing the paper in the studio as I shoot. The exciting part, for me anyway, is that I am re-exposing the paper to light during processing. This process is usually caller solarization (sometimes the Sabatier effect). Usually it’s done on the print, which makes the light areas of the print dark or black creating an overall dark image. The original mid tones of the image preserve some or all of their tone, creating an image that is partially reversed. The image below is a traditional solarization.

Bonnie-Hand Solarization

Bonnie-Hand Solarization. This is a print solarization

By solarizing the negative I’m able to add light rather than black. Because I’m working on such a large negative I’m able to control where I put the additional light. Since I’m processing as I shoot make the negatives I’m able to see how the re-exposure and my image interact.

At this point I’m only offering 11X14 digital prints. The prints are mounted and matted, and the price includes shipping in the United States. Please support the work by purchasing a print! I am experimenting with creating transparent negatives that will enable me to create various kinds of prints in the wet darkroom. I hope to make some of these analog prints available soon.

One more thing I wanted to mention: I’m offering individual workshops at my studio in Indianapolis. I’m calling these One on One Workshops. You can choose the subject and the time. I’m hope you’ll sign up soon. How about a day spent working on lighting, or even large format photograph? I hope you’ll check out the workshop at https://siskinphoto.com/blog/?p=2818. You can see other upcoming workshops on my site: http://www.siskinphoto.com/workshop.php.

I hope you’ll also check out my books, use the links below:


Now over 5000 registered users at this blog!!

December 29, 2015

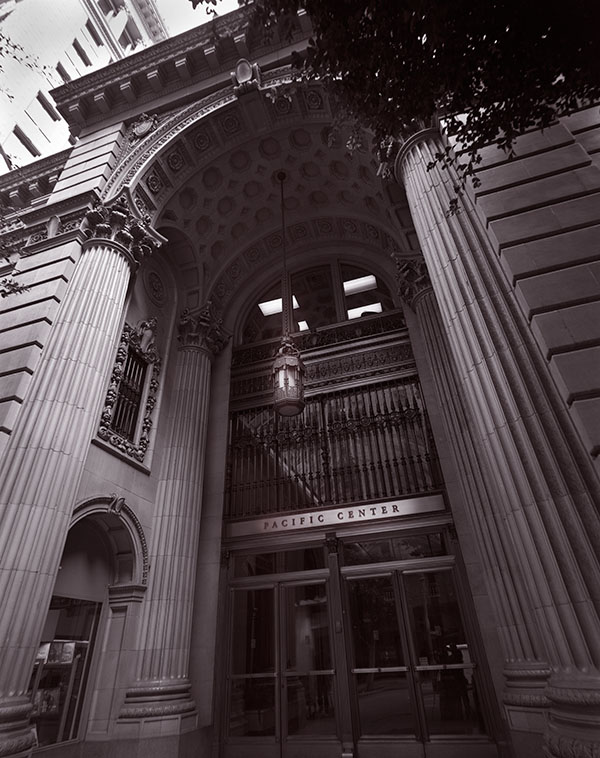
Pacific Center #1, Los Angeles

Pacific Center #1, Los Angeles

Pacific Center #1, Los Angeles

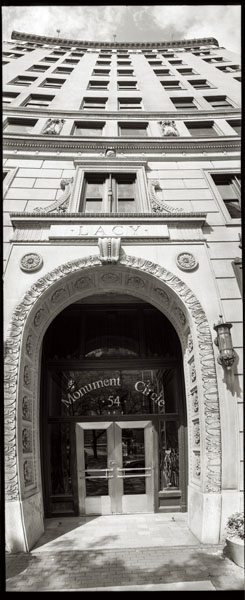
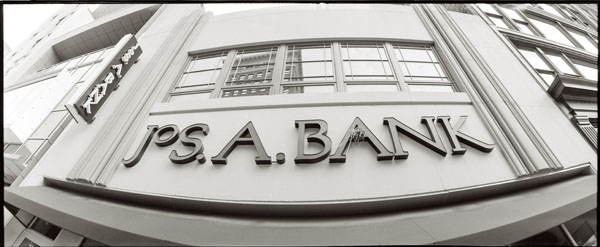
Often the approach to an architectural image is to maintain a neutral perspective. So when you shoot the front of a building you try to keep the parallel lines in the subject parallel. When the lines come together, as they do in this shot, the effect is called key stoning. The thing is that often buildings are designed to impress, even intimidate, people. The neutral perspective tends to weaken or remove that effect. In this case I used my 65mm f8 Super Angulon, so that I could shoot close to the building. I did this for a couple of reasons, first I wanted to capture the imposing design of the entrance, and second I didn’t want to stand in the middle of the street. I used my Speed Graphic as the camera. Many people don’t know that the Speed will accommodate extreme wide angle lenses.

I’m not sure exactly when I shot this, but at least 20 years ago. Time flies when you’re making pictures. It’s always been a favorite of mine, in fact there’s a big print hanging in my office. One of the reasons I like this image so much is that I learned a lot printing it.

Photographers often talk about the zone system. This is a way of discussing the relationship between exposure, negative processing and final negative density. The system was first described by Ansel Adams and Fred Archer. One of the most important aspects of the system, and one that is often forgotten, is the way processing affects the contrast of the negative, and thus the final print. I mention this because one of the things I learned from this image is that even if you have a good negative, one that accurately reflects the tonal values of the subject, you may not be able to make a good print with normal printing processes. Black and white photographic paper comes in various contrast levels, from soft paper that has low contrast to hard paper that is very contrasty. The idea is that if you make a good negative you’ll be able to print it on a middle contrast paper. I learned that this isn’t always true when I tried to print this negative. While a print on middle grade paper showed all the tones of the negative, it was flat and not really effective. When I printed the image on a higher contrast paper the middle tones of the print looked much better, but much of the shadows and highlights were to far gone to see. In order to make a good print I needed to use high contrast paper and do considerable dodging and burning to maintain the highlights and shadows. Even when photographers shot film there was a lot of work done after you tripped the shutter.

Many of my images were first scanned quite a few years ago, so when I wanted to add this image to the fine art section of my site and blog, I went back to the original negative. Once again I had to do a lot of work to get the original scan to agree with the way I wanted to see the final print. I used several layers to change the contrast and exposure values in different areas of the image. I’ve learned a lot about working with an image in Photoshop over the years. For this image I choose a different color pallet from the one I normally use for black and white images. I usually add a little red to the shadows and some yellow to the mid tones. This creates a similar effect to the warm tone photo papers I used to use. In this case I added some red to the shadows, but I added a very small amount of blue top the mid tones. This creates an effect like a cold toned paper toned with selenium, which was the way I handled the original printed version of this image.

If you’d like to get a fine art print of this image you can click on the PayPal link below. As I’ve mentioned I hope to add alternative presentations of my images as I continue to review my fine art images. The current prints are almost 13 inches wide. They’ll be mounted and matted to 16X20 inches. The price, just $125, includes shipping in the United States. If you’d like to have me ship somewhere else, or order another size please contact me at john@siskinphoto.com.


You can buy one of my books at these links

December 21, 2015

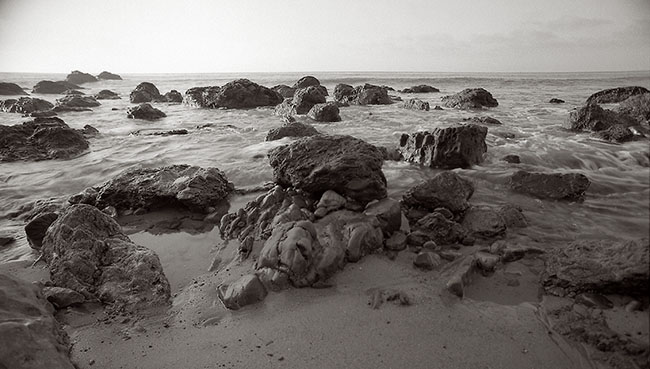
El Matador State Beach #2

Filed under: Do It Yourself,Film Technique,Fine Art,Landscape Photography — John Siskin @ 5:45 pm
El Matador State Beach, California #2

El Matador State Beach, California #2

I like the texture and presence of the rocks in this shot as well as the action of the water. The shutter speed, about 1/30th of a second showed the water coming over the rock in an interesting way. The rest of the water shows a feeling of movement, which is good for surf. The camera is positioned quite close the rocks in the foreground which gives the image a more exaggerated point of view. I can do this because of the very wide coverage of this lens. I’m still playing with ways of presenting this image on line since horizontal panoramic formats seem to suffer on this blog format. I really liked shooting at El Matador State Beach because of the rocks and caves. I’ve added another image from El Matador here.

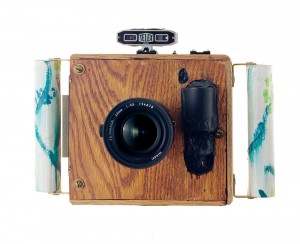
Part of being a creative professional is staying creative. I suppose that’s obvious when you say it, but it’s a challenge to do. I see through the eyes I’ve always used, and I need to continue to see fresh and new. Of course craft will make a beautiful image, and craft is essential for my professional work, but there is more to being creative than achieving great craft. One way I change my seeing is to change my tools. If I choose to shoot with my usual kit I go down roads I’ve seen before, but new tools create new paths. Often this is because of what a tool CAN’T do. So if I have a huge camera I’m forced to look for static subjects. You can’t shoot children playing with an 8X10 camera. Over the years I’ve built cameras that allow me to walk down different paths. I’ve been especially interested in shooting extreme wide angle views. Of course I could always do this with 35mm film cameras, but the combination of wide angle vies with the lower resolution of 35mm film was not satisfying. I’ve found that using extreme wide angle lenses with my digital camera is much better. I’ve also used other tools to achieve this point of view; one of the most successful is my super wide camera. This camera uses a special Nikon lens, with very wide coverage, and medium format film (6cm wide). I’ve written about this camera before: www.siskinphoto.com/camera3a.html. I’ve included a picture of the camera below.

Superwide Camera

Superwide Camera

As I’ve mentioned this blog is part of a series of entries about my fine art images. I’m doing this series as part of an update for the fine art pages on my website. I hope this series will make my images more accessible, both on line and as prints. If you’d like to buy a digital print of this image, mounted and matted on archival cotton rag board, please use the PayPal link below. The image will be about 16 inches wide mounted on 16X20 board. The price includes shipping in the United States, for other countries please ask first.


This image, and many others, is also available in my book B-Four. You can look at the book at this link, and order it as well. I hope you’ll take a look at the book.

You can buy one of my other books by clicking on the titles below:


December 11, 2015

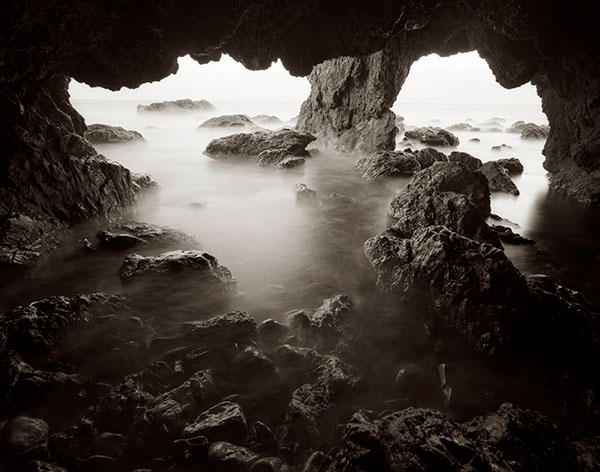
Sea Cave, El Matador State Beach, California #1

Filed under: Basic Photo Technique,Film Technique,Large Format Photography — John Siskin @ 1:00 pm

Sea Cave, El Matador State Beach, California #1

El Matador is my favorite beach. Many of the beaches around Los Angeles are large stretches of sand, good for surfing, or just lying in the sand, but not so interesting to photograph. El Matador has wonderful rocks and even caves. Of course I’m not the only one who likes El Matador: there are always photographers at El Matador. As you may guess from the title I’ve made several more images at El Matador: I’ll be posting them soon.

This photograph has been in several exhibits, and it was on display at the Huntington Library for years.

I wrote about the 65mm Super Angulon in my last post (https://siskinphoto.com/blog/?p=2958) and this is another shot I made with that lens. The lens is an extreme wide angle, equivalent to about an 18mm lens on a full frame 35mm camera. So the way the lens sees is very different from our normal perception. Since the lens is so close to the subject, in this case the camera is just above the water and inches away from the rocks in the image, the depth and shape of the subject is exaggerated. Wide-angle lenses show exaggerated perspective because of the position they are used in rather than because the lens actually distorts the subject. While this effect can be disconcerting in some architectural subjects it works very well here.

The lens is focused close to the camera, which is important with extreme wide-angle lenses in large format work. The aperture is at f22 to maintain focus through out the image. Since the cave is dark, and the aperture is set to such a small stop the exposure is long, several seconds. This evens out the movement of the water, which creates both transparent and fog effects with the moving water. Because of the lens and the long exposure it’s impossible to actually see the image as you take it. I have to internally visualize the image I want to make and use the camera to create that visualized image. It’s important to use pre-visualization even with a digital camera, otherwise you’re just recording the scene; pre-visualization enables you to interpret the image. This skill enables photographers to make images rather than just take pictures.

I really love working with wide-angle lenses. I use them a lot. Any extreme wide-angle lens creates challenges and opportunities for the photographer. This lens has a maximum aperture (wide open) of f8, so it’s quite dark. In addition it requires the lens to be very close to the film, which can make it difficult to manipulate the camera. It’s even important to arrange the camera so that the front of the camera isn’t in the picture. So the whole process of positioning the camera and visualizing the image was a challenge here, not to mention the fact that the cave is actually quite small. As with so many film shots, it was really exciting to see a good negative!

As with the last image I posted Union Station, Los Angeles #1, I’m offering this image at a special price until the end of the year, just $95. This price is for an archival digital print, mounted and matted on 16X20 cotton rag board. The image area is 11X14 inches. Shipping in the U.S. is included, if you’d like me to ship somewhere else please contact me at john@siskinphoto.com.


This image, and many others, is also available in my book B-Four. You can look at the book at this link, and order it as well. I hope you’ll take a look at the book.

You can buy one of my other books by clicking on the titles below:

I’m going to be using my blog to add information about images to the fine art pages of my site. This part of the site isn’t functioning yet, but it will be. These posts will enable me to put up information about the shot and to add details about buying prints. I think it’s very useful to talk about the details of creating specific images. I hope to hear from you about this-use my e-mail to let me know: john@siskinphoto.com. Of course I hope you’ll also want to buy some prints. I’ll be offering more types of prints in the future.

December 6, 2015

Indiana World War Memorial & Museum-Stairs, 2015

Filed under: Film Technique,Looking at Photographs,New Photographs — John Siskin @ 3:31 pm

Indiana World War Memorial & Museum-stairs, 2015

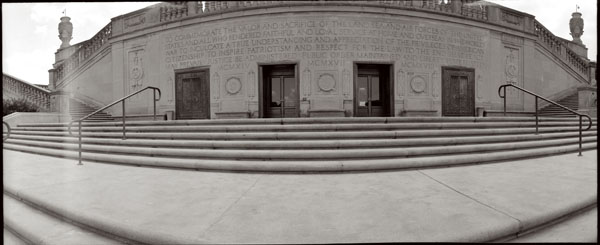
Except for dance and the human voice, art requires people to use tools. Of course tool use is so basic to human beings that we often differentiate ourselves from other animals because we use tools. I think that tools are important to artists, and I know that they’re important to me. Some cameras inspire me to take pictures: some lenses seem to bring images to life. I recently got a Graflex XL, and I’ve carried it with me ever since. The camera is nice, but the real star is the lens: a Zeiss Planar 80mm f2.8. This lens is also on the classic Hasselblad and Rolleiflex cameras.

I like the way that stone and concrete look in black and white images. The stone has a real presence in this image probably because of the way the lens capture texture. The precision of the stonework is evident in this shot. Indianapolis has some really amazing stonework throughout the city. I’ve made some fine images of buildings here, and I continue to work with these subjects. Indiana has been a source of limestone for many buildings in the U.S. and the stuff has a great monumental feel. I really like the brighter highlights on the columns in the middle of the image.

I’m still committed to film for many of my fine art images. One reason is a second moment of discovery: when you shoot in digital you see a picture immediately, with film you don’t see an image until the film is developed and printed. The separation between shoot and image gives me a chance to imagine how I will work with the image. The sense of seeing a good negative is very rewarding. Of course it is also rewarding to work with a craft I’ve been practicing for decades.

If you’d like to buy a digital print of this image, mounted and matted on archival cotton rag board, please use the PayPal link below. The image will be 14 inches long mounted on 16X20 board. The price includes shipping in the United States, for other countries please ask first.


You can buy one of my books at these links:

I’m going to be using my blog to add information about images to the fine art pages of my site. This part of the site isn’t functioning yet, but it will be. These posts will enable me to put up information about the shot and to add details about buying prints. I think it’s very useful to talk about the details of creating specific images. I hope to hear from you about this-use my e-mail to let me know: john@siskinphoto.com. Of course I hope you’ll also want to buy some prints. I’ll be offering more types of prints in the future.

October 10, 2015

Tool Kit

Of course I’m thinking about the workshop next weekend. There are only two spaces left, so you should SIGN UP NOW!

Samantha will be one of the models for Sunday October 18th.

Samantha will be one of the models for Sunday October 18th.

One of the things I want to examine at the workshop is the lighting tool kit for a photographer. The equipment manufacturers want us to buy everything; they’re not exactly on our side. Many of the available tools are of little use, or totally redundant. So I hope that this workshop will actually help you to save money by experimenting with the tools. I’ve seen a lot of people who work with hammers: carpenters, roofers and neurologists. The all use different kinds of hammers; purpose built for their applications. When we choose our tools we need to exercise the same care a carpenter does when he buys a hammer.

harley

The main tools we use as photographers are designed to work for a large variety of applications. So my Nikon D800 is a terrific camera to fit onto a microscope or use for architectural photography or even an auto race. While the camera will work well in all those applications, I’ll need to use different lenses for each situation. This is one of the great strengths of camera design: a good camera can be adapted to different situations. Can you imagine buying a whole new camera everything you needed a lens or even a filter? Strobe lights are the same way: a basic strobe can be used for a lot of applications, if you have the light modifiers for the job. This is one of the good aspects of strobe lights over movie lights, which are purpose built. Over the years I’ve worked with many light modifiers for strobes, everything from large soft boxes to fiber optics. These modifiers are designed to make the lights useful in all kinds of applications. Some of modifiers have been good, some bad; some work in a lot of situations and some are only good for one kind of job. I hope one of the things you’ll receive from the workshop is a better way to choose your tools.

The first step in adding a tool to your kit is identifying the reason you need or want that tool. So I may choose a new light because I didn’t have the lights I felt I could use at my last job, but I may also choose a tool because it inspires me. I think this second reason is really important. I often get tools because they make me want to work, or because they open up new ideas for shots. I also get tools because they replace or upgrade or back up the tools that I have. Of course one problem is that I now have too many tools to take on location.

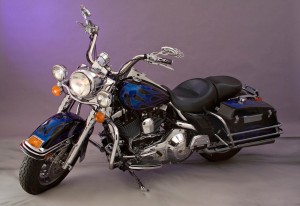
When i shoot a motorcycle i need to use large light modifiers to build good light.

When I shoot a motorcycle I need to use large light modifiers to build good light.

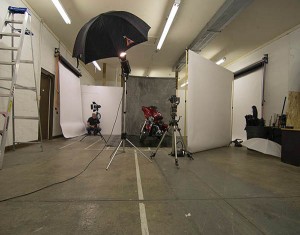
I’ve got a large studio so I have some tools that are only useful in a full time studio. One of the best is my Broncolor Hazylight. I picked up the frame in a studio sale, and adapted a Norman head to fit the frame. Then I put the whole thing on a camera stand, so it’s easy to position in my studio. Most photographers don’t have a space for a light modifier this big. If you’re going to use a smaller studio you might want to use light panels. The panels are cheap to make and incredibly adaptable.

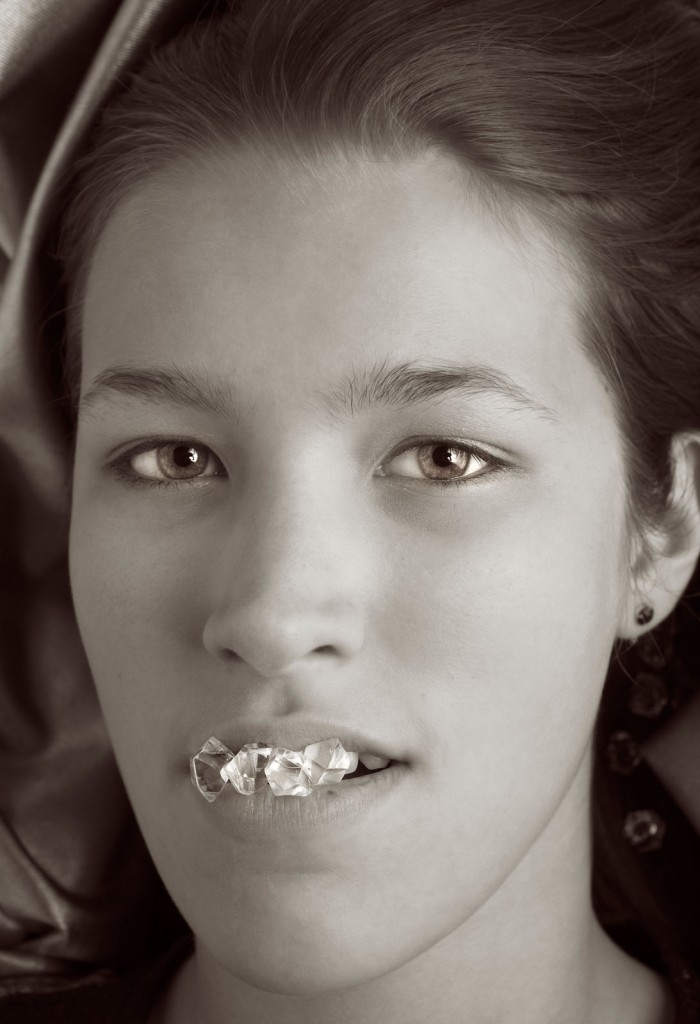
Here's a shot that mixes hard light, soft light and continuous light effectively.

Here’s a shot that mixes hard light, soft light and continuous light effectively. Effective catch lights as well.

One of the important aspects of a portrait is the catch light in the eyes. The catch light, which is really just a small reflection of you’re the light, can change the whole quality of a portrait. If you don’t see a catch light, or if you see an umbrella, or just a tiny pin prick of light, it can damage an image. There are all kinds of light sources for portraits shooting that address this problem. I’ve used quite a few: portrait dish, soft box, octabox, umbrella and so on. One of the things that makes better catch lights is a large circular light source, which will make a round catch light in the subject’s eyes. For this reason I’ve got a cover with a circular cut out for my Hazylight. I would build a similar cover for a soft box, if I were using one. I also use a light panel and a snoot to make a circular light source. I can use the snoot to put a circle of light onto the panel. I can use these tools to make other shapes and control the direction of the light. This gives me a round catch light, or I can change the angle of the snoot and get many different shapes on the light panel. So both the snoot and the light panels are at the top of my list for light modifiers. I also use the snoot as a hard light source in my shots. I’ve found that the snoot is an incredibly fun tool to have in my lighting kit.

Just a guy using thee right tool for the job!

Just a guy using thee right tool for the job!

I also like using a set of barn doors with my light for illuminating the light panels. The barn doors can even crate a strip with the light panel. I also like the barn doors for shooting architecture. I can control a bounce off a ceiling or other surface, to keep the light out of my image. Of course the barn doors can help to place a highlight in a subject, say a hair light or a rim light. Both the snoot and the barn doors are small light sources, so the position of the light is important, but if you use the snoot or the barn doors with a modifier like the light panel you can make a large light source.

It really doesn’t matter whether you make light with a mono-light or a dedicated strobe. What matters is controlling just a few things: the color of the light, the power of the light, the size and shape of the light source and the position of the light. The color and power of the light really only matter relative to other light sources in your shot. So if you were using just one light you could change the ISO or the aperture to control the amount of light, but if you have two lights they have to be balanced. Not necessarily the same power, but a balance that suits your vision for the shot. Similarly you might want all the lights in a shot to have the same color balance, but you might also want one light to be warmer. A warmer light might give the effect of sunlight coming into your shot. You can control the color of one light in your camera, but the camera won’t make one light warm and another cool. Controlling power and color are tools that you use to build your shot. The size of the light source, relative to your subject, affects the quality of the light: hard or soft. The larger your light source is the less that the position of the light matters; consider how the light comes from the whole sky on an overcast day, no shadows and no direction.

F2359911

The image should start in your mind. If you have an idea of how to position a model, or how to light a face, or a room, or a product, then you can start to build that shot. If you start with the same light each time, or only use existing light, then you have much less control over your shot. So it’s important to understand how each tool works, how you can use the tools together, to build the images you want to make. One of my heroes is Felix the Cat, because whenever he gets in a fix, he reaches into his bag of tricks. As photographers we need a big bag of tricks. Here are a couple of things I have in my bag of tricks whenever I go on location: umbrellas (white, silver, gold all with black covers) gaffers tape, magic arm and super clamp, small tripod, large tripod, lighting filters (Rosco gels) light stands, maybe even a reflector or two. Of course I’ve also got some interesting strobes on location, mine work with both ac and dc power. The heads are small enough to fit almost anywhere. I’ve been doing this for more than forty years, which means a couple of things: I’ve got multiple kits for different location work. I can grab just one box if I’m shooting an executive portrait, but I’ll add a couple of boxes to this, if I’m making room shots. The time I’ve spent shooting also means that the way I use the tools, and the tricks I use, have evolved over the years. Part of being a creative photographer is learning to see what could be, not just what is. I want to help you to build the images that could be.

This is shot made with just a snoot.

This is shot made with just a snoot.

Of course I want to see you at the lighting workshop on October 17 & 18. You can sign up here. You can also see another post about the workshop here. There are only two spaces left for the shoot on Sunday. You can also sign up for just Saturday, which will be demonstrations and explanations. Of course if you just can’t make it to the workshop, you can still get my books.

September 10, 2015

Shooting the 11X14 inch Camera!!

Just a couple of details to mention, before we get to the good stuff. I’ve taken down my site at BetterPhoto: www.john-siskin.com. I think BetterPhoto and Jim Miotke are absolutely wonderful, but since I’m not teaching for them anymore I wanted to have the fine art part of my site hosted along with the rest of the site. It’s going to take a few days to complete the new pages I hope you’ll be patient. I hope you’ll check out the books, click on the cover pictures below, and don’t forget my workshop page (www.siskinphoto.com/workshop.php). I’m going to offer a lighting workshop in OCTOBER. More information soon.

I wrote about my 11X14 film camera some time ago, and included a couple of pics of the camera. You can see that earlier post here. There is something quite magical for me about working with a very large camera. I suppose it’s not that different from people who want longer lenses to shoot surfing or birds. I should say that an image made with a large camera is different from an enlargement. In an enlargement there is another optical system, that changes the information in the image in some way and there is less information in the image. If you do an enlargement that is just eight time the size of the negative you’ll usually see grain: the shadows of the silver crystals that record the image. A print that’s made by putting the image right on the printing paper has a sense of infinite detail. I hope you’ll find a way to see an original contact print of a big negative, preferably made by a great photographer.
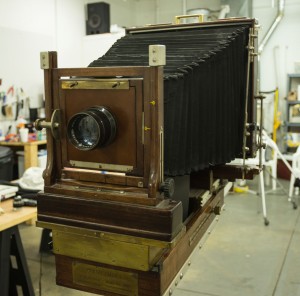
The big camera in the studio. It took 2 people to put it on the tripod.

The big camera in the studio. It took 2 people to put it on the tripod.

I can do contact prints from my 8X10 camera, and it’s quite satisfying. Now that I have a darkroom I can process and print from this camera again. I can even take the camera out to shoot on locations. However, the 11X14 is a beast; and it creates challenges that are different from 8X10. It’s taken me a while, but I’ve worked out ways to work with the camera. I’m going to detail some of the things I’m doing, some of the compromises I’ve made to get successful tests.
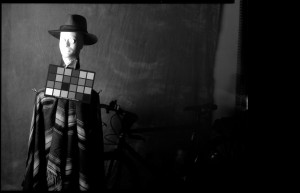
11X14 test image

Successful test image of Wiggy, made with 11X14 camera.

The biggest problem with the 11X14 camera is film. There are still quite a few sources for 8X10 film: a search at Freestyle Photo reveals fifteen separate results for actual camera film. You can get a sheet of film for less than $3. If you’ve been shooting digital the cost of shooting large film will come as a shock. If you search for 11X14 film you find one result: Ilford HP-5. This is a good film, but at about $9 for a single sheet, and that’s one picture, it’s expensive. One of the ways photographers afford to work with large cameras is to work with films that aren’t designed for cameras. One of the most popular is litho film. This is a graphic arts film. The good news is that it’s inexpensive. There is a lot of bad news: first it’s designed to make black and white images: no gray tones at all! I did some tests with litho films and I was unhappy with the results. You can process the film to get some gray tones, but it’s a real challenge to get a complete gray scale. The second problem is that the film is quite slow, insensitive to light, the ISO speed is about 3. I swear my skin sunburns with less light than it take to expose this film. An additional problem is that the film is designed to work under darkroom safelights, so it doesn’t respond to all colors of light. This is a good news bad news sort of problem: you can process the film by safelight so you adjust the development by inspection, but many colors of light just don’t show up on the film. I used a Macbeth color checker in my test shot and there were a lot of color patches with no density. Another inexpensive film choice is x-ray film. I haven’t tested this yet, but I’ve read about the challenges it presents.
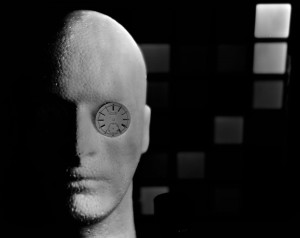
This is an image made with litho film. I used my 4X5 camera to test. Not really successful.

This is an image made with litho film. I used my 4X5 camera to test. Not really successful.

At some point in this process it occurred to me that I own a flat bed scanner that will scan 12X17 inch images, much large than most scanners. I also realized that I had a great deal of 11X14 Ilford Multigrade glossy resin coated paper. I decided to try loading this paper into the film holder and shooting it in camera. In the beginning of photography Fox Talbot used paper negatives, so this was not a unique inspiration. The thing was that I realized that I could use the scanner to turn the images I made in the camera, which would be negatives, into positive images. The big advantage here is that I have all the tools of digital photography to interpret my images, but I’m not going to be making contact prints. Right now this seems a good trade. If I want to I can make a digital negative with my printer and make a sort of a contact print, and I can use a digital negative to make cyanotype or Vandyke prints. Of course I can also output a digital print, so I have a lot of printing options. I suppose some would say that I might just as well capture the image with my Nikon D800, but that would take away the pleasures and challenges of the big camera.
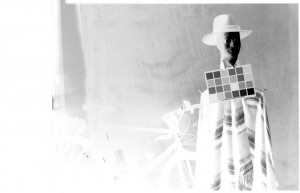
Negative image made on Ilford Multigrade paper

Negative image made on Ilford Multigrade paper

My tests revealed that the Multigrade had an ISO of about 100, which is so much nicer to work with than 3. In addition my tests revealed that Multigrade reacts to a much wider range of color than the litho film I tried. While the paper isn’t panchromatic it does react to most colors other than red. I think that’s because it’s a variable contrast paper. Of course the paper is designed to give a complete gray scale with normal processing. The Ilford paper can be processed under regular darkroom safelights, for instance the Kodak OC filters. I am lucky to have a Thomas sodium vapor safelight, which is a very bright safelight. I set it up in my studio, and it provided a good working environment for loading and processing the paper, even posing the subject. I should also mention that it is MUCH easier and quicker to process and dry this resin coated paper than to work with any film.
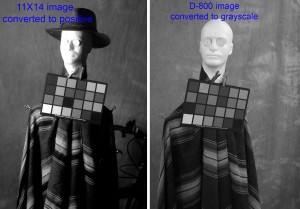
The image with the hat was made with Ilford Multigrade paper and the hatless image was made with my digital camera and converted to black and white. Note that most of the color samples show in the Multigrade image.

The image with the hat was made with Ilford Multigrade paper and the hatless image was made with my digital camera and converted to black and white. Note that most of the color samples show in the Multigrade image.

The paper is designed to change its contrast range depending on the color of light you use with your enlarger. There are filters for this purpose. Right now I’m working without a filter. This seems to provide a long contrast range. One advantage of scanning the negatives (ok, I know that these things are not transparent film negatives, but still they reverse black for white) is that I can control contrast in the computer. I can also flip the images left for right because, like any film image, the picture on the emulsion side of the base is reversed left for right.
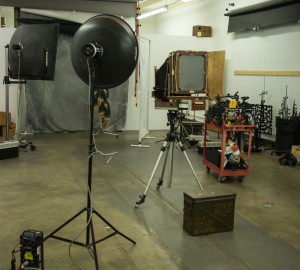
Studio set-up

The set up in the studio, for the shot of Wiggy and myself. I used 4 power packs to make over 5500 watt-seconds of light.

My scanner (actually it’s a very large all-in-one) is a Brother MFC-J6910DW. I did my first tests with the software that come with the scanner. This provides little control over the scan. I also have VueScan for my film scanner and, happily enough, this will also control the Brother scanner. I can scan at 2400 dpi, which would enable me to make a print that is 110 inches on the long side at 300 dpi. The resin coated paper lays flat and the glossy surface scans very well, no surface detail.
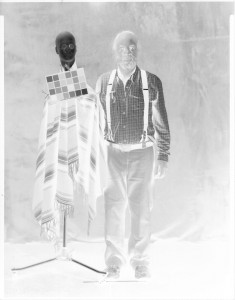
Wigg & Me, selfie

The negative of Wiggy & me. Actually it’s quite amazing to be able to make a portrait with a camera this big and strobes.

There are other details. One of my favorite areas to explore is the lenses for this large camera. The camera is too heavy and unwieldy to take out of the studio and this affects the choice of lens. The normal lens for this camera would be about 16 inches (400mm) long. It’s unlikely that I would use a wide-angle lens for a distance shot in the studio, but I would use a wide angle to shoot closer to a subject. My tests were done with a 24 inch (600mm) f11 Artar that I got for the camera. This lens is rather long for the studio. Because the distance between this lens and the back of the camera is quite long it’s a little difficult to control the camera. Since I did the tests I’ve mounted my 270mm (10 inch) G-Claron W.A. f6.3 on a lens board for the camera. I think this will be a useful lens for the camera, especially for small subjects. I’ve also ordered a board for my 14 inch Dagor. I have very high hopes for this lens. I’ll also set up my 48cm (480 mm, 19 inch) f5.5 Dogmar for this camera. I should note that I love Goerz lens design, but because the lenses were made at different times and places they are sometimes described in inches and sometimes in centimeters or millimeters, which is why I’ve used different both English and metric measures. The only one of these lenses that has a shutter is the Dagor, but that’s not a big deal. Since you can keep the safelight on in the studio you don’t have to fumble in the dark.

Right now I only have one holder and this holder only works on one side. Since I can shoot load and process immediately, under safelight, this isn’t as big a problem as it might be out of the studio. Additional 11X14 holders are amazingly expensive: used ones are usually more than $200 each! I am working on a design using framing parts to build a holder for the studio. This design wouldn’t have a dark slide, so it would only be practical in the studio. Updates on this as they become available.

As you can see I’ve done tests with Wiggy and a color checker. Wiggy’s wearing a serape in the 11X14 tests. The serape is mostly green. I also did a selfie with me and wiggy. An 11X14 selfie is a heck of a thing. If I used a selfie stick it would have to be a telephone pole. As it is, my Majestic tripod is a little overloaded by this camera.
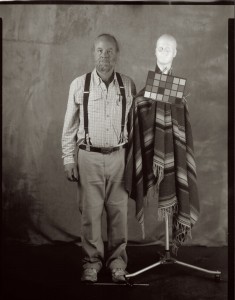
Positive of Wiggy & me

The last test with Wiggy and me. Would you like to come in for some shots?

Now that I’ve done the tests it’s time to shoot some actual pictures. I’m going to do still life shots of course, but I’d also like to do some work with people. Since the paper has an ISO of 100 I can actually shoot portraits and figure studies. Any volunteers?

Thanks, John
July 23, 2015

Finally the Darkroom!

I’ll start with a mention that you can find some of my courses from BetterPhoto on the workshop page of my website: www.siskinphoto.com/workshop.php. You can also arrange a One on One Workshop or sign up for the Portfolio Workshop. Check out the whole site: www.siskinphoto.com! You can get my books by clicking on the pictures below, and why not do that now?

Sometimes a circumstance or a thing sets off an idea in my brain. I see something that I like and I need to make a photograph, or I get to work with someone and that brings up new ideas, or a desire to work on an old idea. For instance I just did some testing with an Indianapolis model, Khristian Hildrith, and it was a great chance to work with my Norman Tri-Lite. I’m adding one of these shots here, and I’ll probably add more later.

Khristian with the Norman Tri-Lite

Khristian with the Norman Tri-Lite

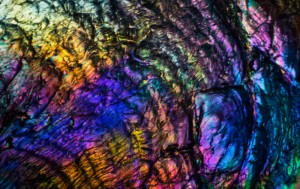
The thing about being a professional creative, and I suppose this applies to all visual artists, writers and other creatives, is that there is a responsibility to work even when you’re not inspired. Not only do you need to work, but also you need to do good work. Sometimes this means doing the craft more than working with inspiration. For instance, a client may come to me to do a product shot that doesn’t require a new vision, just a good solid interpretation of a three-dimensional object into two-dimensions. Sometimes doing the craft of photography will lead me to new ideas. Often, when I haven’t done any real shooting for a while I’ll get out the microscope equipment and search for new worlds in a plastic ice cube. Creativity is something I need to exercise.

Plastic Ice Cube

Plastic Ice Cube

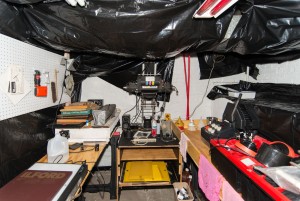
There are always stumbling blocks and obstacles to creative work. The desire to make an image doesn’t always begin with a road map to the image, or even with a visual inspiration. I’ve written about my delight with big film cameras and large format lenses in the past. Just using these things makes me feel better about photography and my way of working. A view camera slows me down; it makes me more deliberate about everything that goes on into the frame. My problem has been that, if I want to make an image with a large camera, I also need to be able to process and print it. When I did commercial or personal work ten years ago I could send the film to the lab, but now I need to do the lab work. I am so pleased to announce that I now have a darkroom!

Darkroom

Darkroom

This is a black and white darkroom; frankly I just can’t find any reason to do color work in a wet darkroom. For color work, digital is not only easier; it just seems better. You can see a couple of images here, but I want to tell you a little about the tool kit in the darkroom. It starts with the sink, in a chemical darkroom the sink is where stuff happens. This sink will hold three 20X24 inch trays, so I can make very large prints. It’s a wooden sink, and it’s coated with marine grade varnish. It’s a real sink, with hot and cold running water, not just a catch basin. My Jobo processor fits easily into the sink, which means I can process most any kind of black and white film or paper.

The large sink, with the Jobo Processor

The large sink, with the Jobo Processor

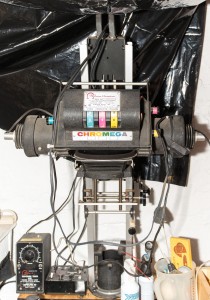
I guess that when most people think about film photography they’re remembering 35mm cameras, so they think the enlarger might be the main tool in the darkroom. While my goal is to work with larger negatives than 35mm, I still want an enlarger. Mine is an old Omega D-2 that will handle film up to 4X5 inches. The strange thing about this D-2 is the head (light source). Many years ago I converted an omega color head, and this head was old even then, to work with filters for printing black and white paper. This head used to be referred to as the Mickey Mouse head, maybe because of the shape: a black sphere with cylinders on the side, or maybe it’s just the technology. Regardless it gives even light and control over contrast. I’ve also got an ultraviolet light source for contact printing large negatives and alternative processes. The UV light source means that I can do Cyanotype and Vandyke prints maybe even platinum prints someday.

Omega D-2 Enlarger

Omega D-2 Enlarger

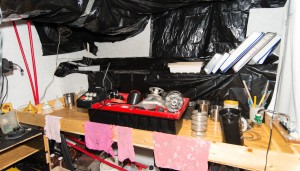
The dry table is a little smaller than I might like, but it’s big enough to load large film holders. Of course, with all the black plastic, the darkroom has the ambiance of a homeless encampment, but it’s going to be a good place to work. The important thing is I was able to build a workspace that will enable me to unlock all of my large format photography tool kit, even the 11X14 camera!

Dry Table

Dry Table

I hope you have inspiration and the tools you want. Thanks for your attention!

July 6, 2014

Changing Your Way of Seeing

My books and my classes give me a reason to keep doing this blog. If you’re in Indiana I hope you’ll consider taking my Portfolio Workshop. You can see a little more information about this workshop if you check out this blog post . I’ve listed my BetterPhoto classes at the end of this post. Thanks so much for your attention.

Frame 16

I see as a photographer, constantly breaking the world into still images. I think that most people who spend a big chunk of life doing photography see a little differently from people who aren’t involved in static art forms. I’ll look at something and think: “I’d shoot that, maybe a little warmer and with more contrast” or maybe: “That was a really great instant” and: “Look at that design.” I think this is part of being a good photographer. I once heard a guy say that he always adjusted a TV to look like Kodachrome, since that was the way he saw the world. Of course this illustrates one of the problems with this way of seeing: you start to see everything the same way. I’ve been known to walk by an interesting subject while thinking that’s not the kind of shot I do. I often make my shots warmer, even my black and white shots, but I can’t remember the last time I made a shot cooler.

Frame 22

So I’m always looking for ways to break out of my way of seeing. I know that many people want to have a style, but not me. I’m a photographer, not a painter, so I can be prolific and do work that’s new. I want to push myself to see in different ways. One of the ways I do this is to work with different tools: cameras, lenses and software. I just got a Horizon Perfekt, which is really helping me to see differently. This camera shoots a 120º image, horizontally anyway. It’s really different from other wide-angle images because the lens actually moves during the shot.Frame 12


I shot with a Koni-Omega camera last week. It’s a medium format film camera. This is a manual camera with range finder. Shooting it reminded me of the acronym FAST: Focus, Aperture, Shutter and Think. I think that my digital camera has allowed me to get a little sloppy with technique. Of course shooting with a new camera is not the only way to open yourself to new ways of seeing, but it can be fun as well as enlightening.

Frame 15

I got an 11X14 camera recently, but I haven’t shot with it yet. I still have to build a lens board and order some film, but it should be a quite an experience. Whenever you work with a very large camera the difficulties increase and so does the expense. But if 11X14 is anything like 8X10 getting a good result will be really fun. Sometimes just getting a good exposure can make you feel great. There’s another practice tool I want to work with. I have an old Spiratone 400 mm f6.3 lens. I’ve really only used it a couple of times because I’m more interested in wide-angle lenses. But in an effort to expand my vision I’m going to put in on the digital camera and start shooting. Who knows how that will affect my seeing? By the way I’ve included a couple of panoramas from the Horizon camera and one more from the Koni-Omega. Also I recently updated my website so you can get an idea of how I’m seeing now. Please check it out at www.siskinphoto.com

Of course there are other ways of expanding your seeing, like taking a BetterPhoto course. Here are the three I teach, perhaps you’d like to take another one or share them with a friend.
An Introduction to Photographic Lighting
Portrait Lighting on Location and in the Studio
Getting Started in Commercial Photography
One other note about BetterPhoto: I’ve been in the habit of sending out a private note to all my former students at BetterPhoto (Almost a thousand people!) each month. There’s some sort of hang up in the e-mail system for thst so, for a while anyway, I won’t be sending that note. I hope no one is too disappointed.
Thanks,  John


« Newer PostsOlder Posts »

Powered by WordPress